
算力平台:
文本到视频生成与AnimateDiff
概述
AnimateDiff: 无需特定调优即可动画化你的个性化文本到图像扩散模型 由郭宇伟、杨策远、饶安一、王耀辉、乔宇、林大华、戴波撰写。
论文摘要如下:
随着文本到图像模型(例如 Stable Diffusion)及其个性化技术(如 DreamBooth 和 LoRA)的发展,每个人都可以以较低的成本将他们的想象转化为高质量的图像。随后,对图像动画技术的需求大大增加,以进一步将生成的静态图像与动态运动结合起来。在本报告中,我们提出了一种实用框架,可以一次性动画化大多数现有的个性化文本到图像模型,从而节省了特定模型调优的努力。该框架的核心是在冻结的文本到图像模型中插入一个新初始化的运动建模模块,并在视频片段上对其进行训练,以提取合理的运动先验。一旦训练完成,只需注入这个运动建模模块,所有从同一基础 T2I 派生的个性化版本即可轻松成为生成多样且个性化动画图像的文本驱动模型。我们在多个公开的代表性个性化文本到图像模型上进行了评估,涵盖了动漫图片和真实照片,并展示了我们提出的框架帮助这些模型生成时间上平滑的动画片段,同时保持其输出的领域和多样性。代码和预训练权重将在 此链接 公开提供。
可用管道
| 管道 | 任务 | 演示 |
|---|---|:---😐 | AnimateDiffPipeline | Text-to-Video Generation with AnimateDiff | | AnimateDiffControlNetPipeline | Controlled Video-to-Video Generation with AnimateDiff using ControlNet | | AnimateDiffSparseControlNetPipeline | Controlled Video-to-Video Generation with AnimateDiff using SparseCtrl | | AnimateDiffSDXLPipeline | Video-to-Video Generation with AnimateDiff | | AnimateDiffVideoToVideoPipeline | Video-to-Video Generation with AnimateDiff | | AnimateDiffVideoToVideoControlNetPipeline | Video-to-Video Generation with AnimateDiff using ControlNet |
可用的检查点
Motion Adapter 检查点可以在 guoyww 下找到。这些检查点旨在与基于 Stable Diffusion 1.4/1.5 的任何模型配合使用。
使用示例
AnimateDiffPipeline
AnimateDiff 与一个 MotionAdapter 检查点和一个 Stable Diffusion 模型检查点配合使用。MotionAdapter 是一组负责在图像帧之间添加连贯运动的 Motion 模块。这些模块在 Stable Diffusion UNet 的 Resnet 和 Attention 块之后应用。
以下示例展示了如何使用 MotionAdapter 检查点与 Diffusers 进行基于 StableDiffusion-1.4/1.5 的推理。
python
import torch
from diffusers import AnimateDiffPipeline, DDIMScheduler, MotionAdapter
from diffusers.utils import export_to_gif

# Load the motion adapter
adapter = MotionAdapter.from_pretrained("guoyww/animatediff-motion-adapter-v1-5-2", torch_dtype=torch.float16)
# load SD 1.5 based finetuned model
model_id = "SG161222/Realistic_Vision_V5.1_noVAE"
pipe = AnimateDiffPipeline.from_pretrained(model_id, motion_adapter=adapter, torch_dtype=torch.float16)
scheduler = DDIMScheduler.from_pretrained(
    model_id,
    subfolder="scheduler",
    clip_sample=False,
    timestep_spacing="linspace",
    beta_schedule="linear",
    steps_offset=1,
)
pipe.scheduler = scheduler

# enable memory savings
pipe.enable_vae_slicing()
pipe.enable_model_cpu_offload()

output = pipe(
    prompt=(
        "masterpiece, bestquality, highlydetailed, ultradetailed, sunset, "
        "orange sky, warm lighting, fishing boats, ocean waves seagulls, "
        "rippling water, wharf, silhouette, serene atmosphere, dusk, evening glow, "
        "golden hour, coastal landscape, seaside scenery"
    ),
    negative_prompt="bad quality, worse quality",
    num_frames=16,
    guidance_scale=7.5,
    num_inference_steps=25,
    generator=torch.Generator("cpu").manual_seed(42),
)
frames = output.frames[0]
export_to_gif(frames, "animation.gif")
这里有一些示例输出:
AnimateDiffControlNetPipeline
AnimateDiff 也可以与 ControlNets 一起使用。ControlNet 由 Lvmin Zhang、Anyi Rao 和 Maneesh Agrawala 在论文 Adding Conditional Control to Text-to-Image Diffusion Models 中引入。使用 ControlNet 模型时,你可以提供一个额外的控制图像来条件化和控制 Stable Diffusion 的生成过程。例如,如果你提供深度图,ControlNet 模型将生成一个保留深度图空间信息的视频。这是一种更灵活和准确的视频生成控制方式。
python
import torch
from diffusers import AnimateDiffControlNetPipeline, AutoencoderKL, ControlNetModel, MotionAdapter, LCMScheduler
from diffusers.utils import export_to_gif, load_video

# Additionally, you will need a preprocess videos before they can be used with the ControlNet
# HF maintains just the right package for it: `pip install controlnet_aux`
from controlnet_aux.processor import ZoeDetector

# Download controlnets from https://huggingface.co/lllyasviel/ControlNet-v1-1 to use .from_single_file
# Download Diffusers-format controlnets, such as https://huggingface.co/lllyasviel/sd-controlnet-depth, to use .from_pretrained()
controlnet = ControlNetModel.from_single_file("control_v11f1p_sd15_depth.pth", torch_dtype=torch.float16)

# We use AnimateLCM for this example but one can use the original motion adapters as well (for example, https://huggingface.co/guoyww/animatediff-motion-adapter-v1-5-3)
motion_adapter = MotionAdapter.from_pretrained("wangfuyun/AnimateLCM")

vae = AutoencoderKL.from_pretrained("stabilityai/sd-vae-ft-mse", torch_dtype=torch.float16)
pipe: AnimateDiffControlNetPipeline = AnimateDiffControlNetPipeline.from_pretrained(
    "SG161222/Realistic_Vision_V5.1_noVAE",
    motion_adapter=motion_adapter,
    controlnet=controlnet,
    vae=vae,
).to(device="cuda", dtype=torch.float16)
pipe.scheduler = LCMScheduler.from_config(pipe.scheduler.config, beta_schedule="linear")
pipe.load_lora_weights("wangfuyun/AnimateLCM", weight_name="AnimateLCM_sd15_t2v_lora.safetensors", adapter_name="lcm-lora")
pipe.set_adapters(["lcm-lora"], [0.8])

depth_detector = ZoeDetector.from_pretrained("lllyasviel/Annotators").to("cuda")
video = load_video("https://huggingface.co/datasets/huggingface/documentation-images/resolve/main/diffusers/animatediff-vid2vid-input-1.gif")
conditioning_frames = []

with pipe.progress_bar(total=len(video)) as progress_bar:
    for frame in video:
        conditioning_frames.append(depth_detector(frame))
        progress_bar.update()

prompt = "a panda, playing a guitar, sitting in a pink boat, in the ocean, mountains in background, realistic, high quality"
negative_prompt = "bad quality, worst quality"

video = pipe(
    prompt=prompt,
    negative_prompt=negative_prompt,
    num_frames=len(video),
    num_inference_steps=10,
    guidance_scale=2.0,
    conditioning_frames=conditioning_frames,
    generator=torch.Generator().manual_seed(42),
).frames[0]

export_to_gif(video, "animatediff_controlnet.gif", fps=8)
这里有一些示例输出:
| Source Video | Output Video |
|---|---|
raccoon playing a guitar 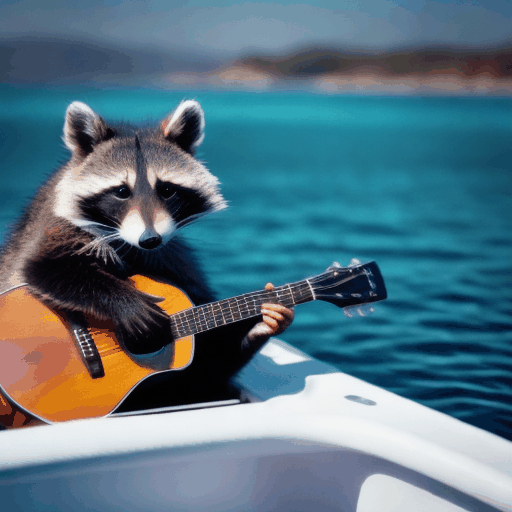 | a panda, playing a guitar, sitting in a pink boat, in the ocean, mountains in background, realistic, high quality  |
AnimateDiffSparseControlNetPipeline
SparseCtrl: 为文本到视频扩散模型添加稀疏控制 由郭宇伟、杨策远、饶安一、Maneesh Agrawala、林大华和戴波提出,旨在通过稀疏控制实现文本到视频扩散模型的受控生成。
论文摘要如下:
近年来,文本到视频(T2V)技术,即根据给定的文本提示生成视频,取得了显著进展。然而,仅依赖文本提示通常会导致因空间不确定性而产生的模糊帧组成。因此,研究社区利用密集结构信号(例如,每帧深度/边缘序列)来增强可控性,这相应地增加了推理的负担。在本工作中,我们提出了 SparseCtrl,通过时间稀疏信号实现灵活的结构控制,仅需一个或少数几个输入,如图1所示。它引入了一个额外的条件编码器来处理这些稀疏信号,同时保持预训练的 T2V 模型不变。所提出的方法兼容多种模态,包括草图、深度图和 RGB 图像,为视频生成提供了更实用的控制,并促进了故事板、深度渲染、关键帧动画和插值等应用。广泛的实验表明,SparseCtrl 在原始和个性化 T2V 生成器上具有良好的泛化能力。代码和模型将在 此链接 公开提供。
SparseCtrl 为受控文本到视频生成引入了以下检查点:
使用 SparseCtrl 草图
python
import torch

from diffusers import AnimateDiffSparseControlNetPipeline
from diffusers.models import AutoencoderKL, MotionAdapter, SparseControlNetModel
from diffusers.schedulers import DPMSolverMultistepScheduler
from diffusers.utils import export_to_gif, load_image


model_id = "SG161222/Realistic_Vision_V5.1_noVAE"
motion_adapter_id = "guoyww/animatediff-motion-adapter-v1-5-3"
controlnet_id = "guoyww/animatediff-sparsectrl-scribble"
lora_adapter_id = "guoyww/animatediff-motion-lora-v1-5-3"
vae_id = "stabilityai/sd-vae-ft-mse"
device = "cuda"

motion_adapter = MotionAdapter.from_pretrained(motion_adapter_id, torch_dtype=torch.float16).to(device)
controlnet = SparseControlNetModel.from_pretrained(controlnet_id, torch_dtype=torch.float16).to(device)
vae = AutoencoderKL.from_pretrained(vae_id, torch_dtype=torch.float16).to(device)
scheduler = DPMSolverMultistepScheduler.from_pretrained(
    model_id,
    subfolder="scheduler",
    beta_schedule="linear",
    algorithm_type="dpmsolver++",
    use_karras_sigmas=True,
)
pipe = AnimateDiffSparseControlNetPipeline.from_pretrained(
    model_id,
    motion_adapter=motion_adapter,
    controlnet=controlnet,
    vae=vae,
    scheduler=scheduler,
    torch_dtype=torch.float16,
).to(device)
pipe.load_lora_weights(lora_adapter_id, adapter_name="motion_lora")
pipe.fuse_lora(lora_scale=1.0)

prompt = "an aerial view of a cyberpunk city, night time, neon lights, masterpiece, high quality"
negative_prompt = "low quality, worst quality, letterboxed"

image_files = [
    "https://huggingface.co/datasets/huggingface/documentation-images/resolve/main/diffusers/animatediff-scribble-1.png",
    "https://huggingface.co/datasets/huggingface/documentation-images/resolve/main/diffusers/animatediff-scribble-2.png",
    "https://huggingface.co/datasets/huggingface/documentation-images/resolve/main/diffusers/animatediff-scribble-3.png"
]
condition_frame_indices = [0, 8, 15]
conditioning_frames = [load_image(img_file) for img_file in image_files]

video = pipe(
    prompt=prompt,
    negative_prompt=negative_prompt,
    num_inference_steps=25,
    conditioning_frames=conditioning_frames,
    controlnet_conditioning_scale=1.0,
    controlnet_frame_indices=condition_frame_indices,
    generator=torch.Generator().manual_seed(1337),
).frames[0]
export_to_gif(video, "output.gif")
这里有一些示例输出:
使用 SparseCtrl RGB
python
import torch

from diffusers import AnimateDiffSparseControlNetPipeline
from diffusers.models import AutoencoderKL, MotionAdapter, SparseControlNetModel
from diffusers.schedulers import DPMSolverMultistepScheduler
from diffusers.utils import export_to_gif, load_image


model_id = "SG161222/Realistic_Vision_V5.1_noVAE"
motion_adapter_id = "guoyww/animatediff-motion-adapter-v1-5-3"
controlnet_id = "guoyww/animatediff-sparsectrl-rgb"
lora_adapter_id = "guoyww/animatediff-motion-lora-v1-5-3"
vae_id = "stabilityai/sd-vae-ft-mse"
device = "cuda"

motion_adapter = MotionAdapter.from_pretrained(motion_adapter_id, torch_dtype=torch.float16).to(device)
controlnet = SparseControlNetModel.from_pretrained(controlnet_id, torch_dtype=torch.float16).to(device)
vae = AutoencoderKL.from_pretrained(vae_id, torch_dtype=torch.float16).to(device)
scheduler = DPMSolverMultistepScheduler.from_pretrained(
    model_id,
    subfolder="scheduler",
    beta_schedule="linear",
    algorithm_type="dpmsolver++",
    use_karras_sigmas=True,
)
pipe = AnimateDiffSparseControlNetPipeline.from_pretrained(
    model_id,
    motion_adapter=motion_adapter,
    controlnet=controlnet,
    vae=vae,
    scheduler=scheduler,
    torch_dtype=torch.float16,
).to(device)
pipe.load_lora_weights(lora_adapter_id, adapter_name="motion_lora")

image = load_image("https://huggingface.co/datasets/huggingface/documentation-images/resolve/main/diffusers/animatediff-firework.png")

video = pipe(
    prompt="closeup face photo of man in black clothes, night city street, bokeh, fireworks in background",
    negative_prompt="low quality, worst quality",
    num_inference_steps=25,
    conditioning_frames=image,
    controlnet_frame_indices=[0],
    controlnet_conditioning_scale=1.0,
    generator=torch.Generator().manual_seed(42),
).frames[0]
export_to_gif(video, "output.gif")
这里有一些示例输出:
AnimateDiffSDXLPipeline
AnimateDiff 也可以与 SDXL 模型一起使用。这目前是一个实验性功能,因为目前只有运动适配器检查点的测试版可用。
python
import torch
from diffusers.models import MotionAdapter
from diffusers import AnimateDiffSDXLPipeline, DDIMScheduler
from diffusers.utils import export_to_gif

adapter = MotionAdapter.from_pretrained("guoyww/animatediff-motion-adapter-sdxl-beta", torch_dtype=torch.float16)

model_id = "stabilityai/stable-diffusion-xl-base-1.0"
scheduler = DDIMScheduler.from_pretrained(
    model_id,
    subfolder="scheduler",
    clip_sample=False,
    timestep_spacing="linspace",
    beta_schedule="linear",
    steps_offset=1,
)
pipe = AnimateDiffSDXLPipeline.from_pretrained(
    model_id,
    motion_adapter=adapter,
    scheduler=scheduler,
    torch_dtype=torch.float16,
    variant="fp16",
).to("cuda")

# enable memory savings
pipe.enable_vae_slicing()
pipe.enable_vae_tiling()

output = pipe(
    prompt="a panda surfing in the ocean, realistic, high quality",
    negative_prompt="low quality, worst quality",
    num_inference_steps=20,
    guidance_scale=8,
    width=1024,
    height=1024,
    num_frames=16,
)

frames = output.frames[0]
export_to_gif(frames, "animation.gif")
AnimateDiffVideoToVideoPipeline
AnimateDiff 还可以用于生成视觉上相似的视频,或者从初始视频开始进行风格/角色/背景等编辑,让你能够无缝探索创意可能性。
python
import imageio
import requests
import torch
from diffusers import AnimateDiffVideoToVideoPipeline, DDIMScheduler, MotionAdapter
from diffusers.utils import export_to_gif
from io import BytesIO
from PIL import Image

# Load the motion adapter
adapter = MotionAdapter.from_pretrained("guoyww/animatediff-motion-adapter-v1-5-2", torch_dtype=torch.float16)
# load SD 1.5 based finetuned model
model_id = "SG161222/Realistic_Vision_V5.1_noVAE"
pipe = AnimateDiffVideoToVideoPipeline.from_pretrained(model_id, motion_adapter=adapter, torch_dtype=torch.float16)
scheduler = DDIMScheduler.from_pretrained(
    model_id,
    subfolder="scheduler",
    clip_sample=False,
    timestep_spacing="linspace",
    beta_schedule="linear",
    steps_offset=1,
)
pipe.scheduler = scheduler

# enable memory savings
pipe.enable_vae_slicing()
pipe.enable_model_cpu_offload()

# helper function to load videos
def load_video(file_path: str):
    images = []

    if file_path.startswith(('http://', 'https://')):
        # If the file_path is a URL
        response = requests.get(file_path)
        response.raise_for_status()
        content = BytesIO(response.content)
        vid = imageio.get_reader(content)
    else:
        # Assuming it's a local file path
        vid = imageio.get_reader(file_path)

    for frame in vid:
        pil_image = Image.fromarray(frame)
        images.append(pil_image)

    return images

video = load_video("https://huggingface.co/datasets/huggingface/documentation-images/resolve/main/diffusers/animatediff-vid2vid-input-1.gif")

output = pipe(
    video = video,
    prompt="panda playing a guitar, on a boat, in the ocean, high quality",
    negative_prompt="bad quality, worse quality",
    guidance_scale=7.5,
    num_inference_steps=25,
    strength=0.5,
    generator=torch.Generator("cpu").manual_seed(42),
)
frames = output.frames[0]
export_to_gif(frames, "animation.gif")
这里有一些示例输出:
| Source Video | Output Video |
|---|---|
| raccoon playing a guitar | panda playing a guitar 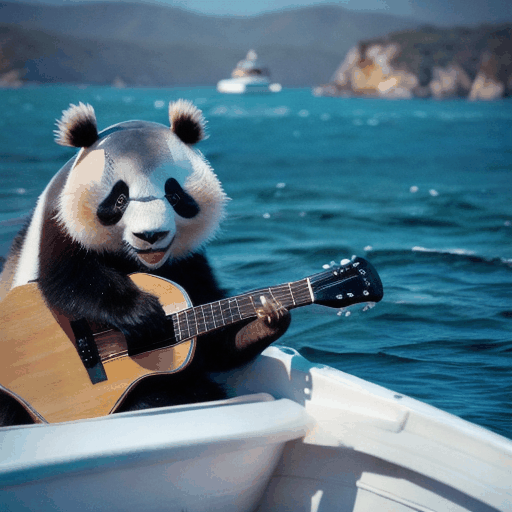 |
closeup of margot robbie, fireworks in the background, high quality 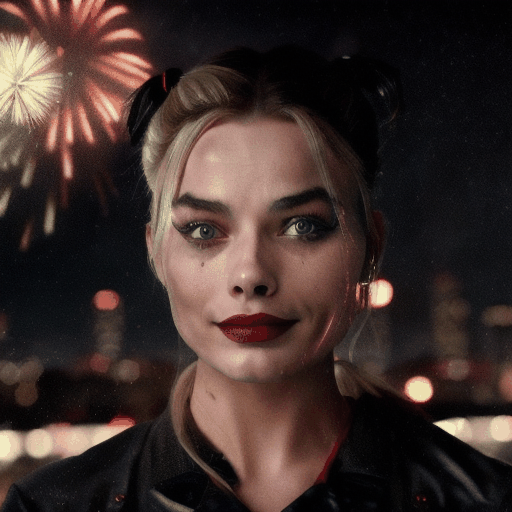 | closeup of tony stark, robert downey jr, fireworks 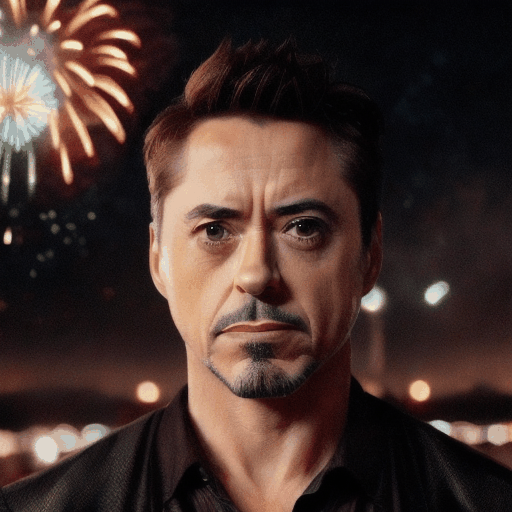 |
AnimateDiffVideoToVideoControlNetPipeline
AnimateDiff 可以与 ControlNets 结合使用,以增强视频到视频的生成,允许对输出进行精确控制。ControlNet 由 Lvmin Zhang、Anyi Rao 和 Maneesh Agrawala 在论文 Adding Conditional Control to Text-to-Image Diffusion Models 中引入,允许你使用额外的控制图像来条件化 Stable Diffusion,以确保视频中的空间信息得以保留。
此管道允许你同时基于原始视频和一系列控制图像来条件化生成。
python
import torch
from PIL import Image
from tqdm.auto import tqdm

from controlnet_aux.processor import OpenposeDetector
from diffusers import AnimateDiffVideoToVideoControlNetPipeline
from diffusers.utils import export_to_gif, load_video
from diffusers import AutoencoderKL, ControlNetModel, MotionAdapter, LCMScheduler

# Load the ControlNet
controlnet = ControlNetModel.from_pretrained("lllyasviel/sd-controlnet-openpose", torch_dtype=torch.float16)
# Load the motion adapter
motion_adapter = MotionAdapter.from_pretrained("wangfuyun/AnimateLCM")
# Load SD 1.5 based finetuned model
vae = AutoencoderKL.from_pretrained("stabilityai/sd-vae-ft-mse", torch_dtype=torch.float16)
pipe = AnimateDiffVideoToVideoControlNetPipeline.from_pretrained(
    "SG161222/Realistic_Vision_V5.1_noVAE",
    motion_adapter=motion_adapter,
    controlnet=controlnet,
    vae=vae,
).to(device="cuda", dtype=torch.float16)

# Enable LCM to speed up inference
pipe.scheduler = LCMScheduler.from_config(pipe.scheduler.config, beta_schedule="linear")
pipe.load_lora_weights("wangfuyun/AnimateLCM", weight_name="AnimateLCM_sd15_t2v_lora.safetensors", adapter_name="lcm-lora")
pipe.set_adapters(["lcm-lora"], [0.8])

video = load_video("https://huggingface.co/datasets/huggingface/documentation-images/resolve/main/diffusers/dance.gif")
video = [frame.convert("RGB") for frame in video]

prompt = "astronaut in space, dancing"
negative_prompt = "bad quality, worst quality, jpeg artifacts, ugly"

# Create controlnet preprocessor
open_pose = OpenposeDetector.from_pretrained("lllyasviel/Annotators").to("cuda")

# Preprocess controlnet images
conditioning_frames = []
for frame in tqdm(video):
    conditioning_frames.append(open_pose(frame))

strength = 0.8
with torch.inference_mode():
    video = pipe(
        video=video,
        prompt=prompt,
        negative_prompt=negative_prompt,
        num_inference_steps=10,
        guidance_scale=2.0,
        controlnet_conditioning_scale=0.75,
        conditioning_frames=conditioning_frames,
        strength=strength,
        generator=torch.Generator().manual_seed(42),
    ).frames[0]

video = [frame.resize(conditioning_frames[0].size) for frame in video]
export_to_gif(video, f"animatediff_vid2vid_controlnet.gif", fps=8)
这里有一些示例输出:
| Source Video | Output Video |
|---|---|
anime girl, dancing  | astronaut in space, dancing  |
灯光和构图是从源视频中转移过来的。
使用 Motion LoRAs
Motion LoRAs 是一组与 guoyww/animatediff-motion-adapter-v1-5-2 检查点配合使用的 LoRAs。这些 LoRAs 负责为动画添加特定类型的运动。
python
import torch
from diffusers import AnimateDiffPipeline, DDIMScheduler, MotionAdapter
from diffusers.utils import export_to_gif

# Load the motion adapter
adapter = MotionAdapter.from_pretrained("guoyww/animatediff-motion-adapter-v1-5-2", torch_dtype=torch.float16)
# load SD 1.5 based finetuned model
model_id = "SG161222/Realistic_Vision_V5.1_noVAE"
pipe = AnimateDiffPipeline.from_pretrained(model_id, motion_adapter=adapter, torch_dtype=torch.float16)
pipe.load_lora_weights(
    "guoyww/animatediff-motion-lora-zoom-out", adapter_name="zoom-out"
)

scheduler = DDIMScheduler.from_pretrained(
    model_id,
    subfolder="scheduler",
    clip_sample=False,
    beta_schedule="linear",
    timestep_spacing="linspace",
    steps_offset=1,
)
pipe.scheduler = scheduler

# enable memory savings
pipe.enable_vae_slicing()
pipe.enable_model_cpu_offload()

output = pipe(
    prompt=(
        "masterpiece, bestquality, highlydetailed, ultradetailed, sunset, "
        "orange sky, warm lighting, fishing boats, ocean waves seagulls, "
        "rippling water, wharf, silhouette, serene atmosphere, dusk, evening glow, "
        "golden hour, coastal landscape, seaside scenery"
    ),
    negative_prompt="bad quality, worse quality",
    num_frames=16,
    guidance_scale=7.5,
    num_inference_steps=25,
    generator=torch.Generator("cpu").manual_seed(42),
)
frames = output.frames[0]
export_to_gif(frames, "animation.gif")
使用 Motion LoRAs 与 PEFT
你也可以利用 PEFT 后端来组合 Motion LoRAs,从而创建更复杂的动画。
首先安装 PEFT:
shell
pip install peft然后你可以使用以下代码来组合 Motion LoRAs。
python
import torch
from diffusers import AnimateDiffPipeline, DDIMScheduler, MotionAdapter
from diffusers.utils import export_to_gif

# Load the motion adapter
adapter = MotionAdapter.from_pretrained("guoyww/animatediff-motion-adapter-v1-5-2", torch_dtype=torch.float16)
# load SD 1.5 based finetuned model
model_id = "SG161222/Realistic_Vision_V5.1_noVAE"
pipe = AnimateDiffPipeline.from_pretrained(model_id, motion_adapter=adapter, torch_dtype=torch.float16)

pipe.load_lora_weights(
    "diffusers/animatediff-motion-lora-zoom-out", adapter_name="zoom-out",
)
pipe.load_lora_weights(
    "diffusers/animatediff-motion-lora-pan-left", adapter_name="pan-left",
)
pipe.set_adapters(["zoom-out", "pan-left"], adapter_weights=[1.0, 1.0])

scheduler = DDIMScheduler.from_pretrained(
    model_id,
    subfolder="scheduler",
    clip_sample=False,
    timestep_spacing="linspace",
    beta_schedule="linear",
    steps_offset=1,
)
pipe.scheduler = scheduler

# enable memory savings
pipe.enable_vae_slicing()
pipe.enable_model_cpu_offload()

output = pipe(
    prompt=(
        "masterpiece, bestquality, highlydetailed, ultradetailed, sunset, "
        "orange sky, warm lighting, fishing boats, ocean waves seagulls, "
        "rippling water, wharf, silhouette, serene atmosphere, dusk, evening glow, "
        "golden hour, coastal landscape, seaside scenery"
    ),
    negative_prompt="bad quality, worse quality",
    num_frames=16,
    guidance_scale=7.5,
    num_inference_steps=25,
    generator=torch.Generator("cpu").manual_seed(42),
)
frames = output.frames[0]
export_to_gif(frames, "animation.gif")
使用 FreeInit
FreeInit: 桥接视频扩散模型中的初始化差距 作者:吴天行、司晨阳、江宇明、黄子奇、刘子微。
FreeInit 是一种有效的方法,可以在不进行任何额外训练的情况下,提高使用视频扩散模型生成的视频的时间一致性和整体质量。它可以在推理时无缝应用于 AnimateDiff、ModelScope、VideoCrafter 和各种其他视频生成模型,并通过迭代细化潜在初始化噪声来工作。更多详细信息请参见论文。
以下示例展示了 FreeInit 的使用方法。
python
import torch
from diffusers import MotionAdapter, AnimateDiffPipeline, DDIMScheduler
from diffusers.utils import export_to_gif

adapter = MotionAdapter.from_pretrained("guoyww/animatediff-motion-adapter-v1-5-2")
model_id = "SG161222/Realistic_Vision_V5.1_noVAE"
pipe = AnimateDiffPipeline.from_pretrained(model_id, motion_adapter=adapter, torch_dtype=torch.float16).to("cuda")
pipe.scheduler = DDIMScheduler.from_pretrained(
    model_id,
    subfolder="scheduler",
    beta_schedule="linear",
    clip_sample=False,
    timestep_spacing="linspace",
    steps_offset=1
)

# enable memory savings
pipe.enable_vae_slicing()
pipe.enable_vae_tiling()

# enable FreeInit
# Refer to the enable_free_init documentation for a full list of configurable parameters
pipe.enable_free_init(method="butterworth", use_fast_sampling=True)

# run inference
output = pipe(
    prompt="a panda playing a guitar, on a boat, in the ocean, high quality",
    negative_prompt="bad quality, worse quality",
    num_frames=16,
    guidance_scale=7.5,
    num_inference_steps=20,
    generator=torch.Generator("cpu").manual_seed(666),
)

# disable FreeInit
pipe.disable_free_init()

frames = output.frames[0]
export_to_gif(frames, "animation.gif")| Without FreeInit enabled | With FreeInit enabled |
|---|---|
panda playing a guitar 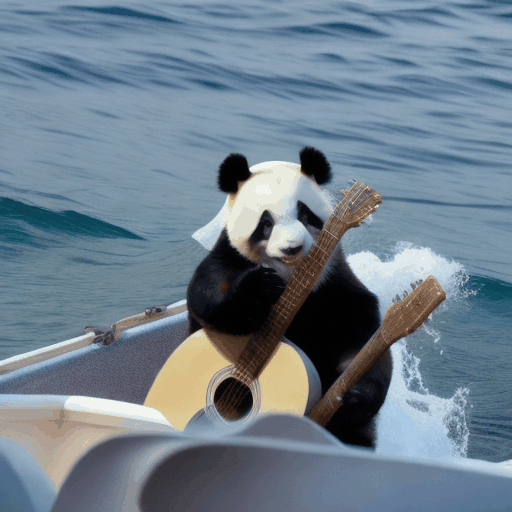 | panda playing a guitar 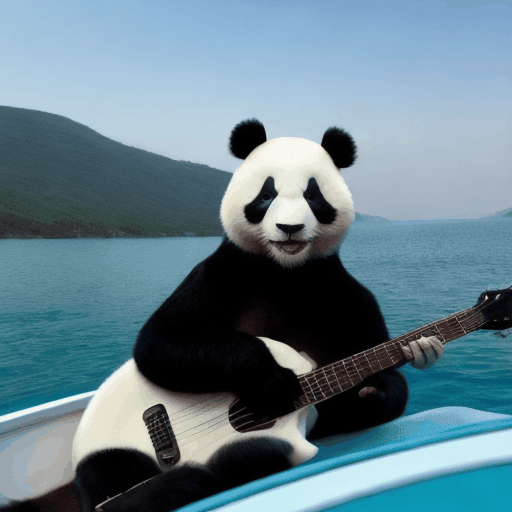 |
使用 AnimateLCM
AnimateLCM 是一个运动模块检查点,也是一个 LCM LoRA,它使用了一种一致性学习策略创建,该策略将图像生成先验和运动生成先验的蒸馏过程解耦。
python
import torch
from diffusers import AnimateDiffPipeline, LCMScheduler, MotionAdapter
from diffusers.utils import export_to_gif

adapter = MotionAdapter.from_pretrained("wangfuyun/AnimateLCM")
pipe = AnimateDiffPipeline.from_pretrained("emilianJR/epiCRealism", motion_adapter=adapter)
pipe.scheduler = LCMScheduler.from_config(pipe.scheduler.config, beta_schedule="linear")

pipe.load_lora_weights("wangfuyun/AnimateLCM", weight_name="sd15_lora_beta.safetensors", adapter_name="lcm-lora")

pipe.enable_vae_slicing()
pipe.enable_model_cpu_offload()

output = pipe(
    prompt="A space rocket with trails of smoke behind it launching into space from the desert, 4k, high resolution",
    negative_prompt="bad quality, worse quality, low resolution",
    num_frames=16,
    guidance_scale=1.5,
    num_inference_steps=6,
    generator=torch.Generator("cpu").manual_seed(0),
)
frames = output.frames[0]
export_to_gif(frames, "animatelcm.gif")
AnimateLCM 也兼容现有的 Motion LoRAs。
python
import torch
from diffusers import AnimateDiffPipeline, LCMScheduler, MotionAdapter
from diffusers.utils import export_to_gif

adapter = MotionAdapter.from_pretrained("wangfuyun/AnimateLCM")
pipe = AnimateDiffPipeline.from_pretrained("emilianJR/epiCRealism", motion_adapter=adapter)
pipe.scheduler = LCMScheduler.from_config(pipe.scheduler.config, beta_schedule="linear")

pipe.load_lora_weights("wangfuyun/AnimateLCM", weight_name="sd15_lora_beta.safetensors", adapter_name="lcm-lora")
pipe.load_lora_weights("guoyww/animatediff-motion-lora-tilt-up", adapter_name="tilt-up")

pipe.set_adapters(["lcm-lora", "tilt-up"], [1.0, 0.8])
pipe.enable_vae_slicing()
pipe.enable_model_cpu_offload()

output = pipe(
    prompt="A space rocket with trails of smoke behind it launching into space from the desert, 4k, high resolution",
    negative_prompt="bad quality, worse quality, low resolution",
    num_frames=16,
    guidance_scale=1.5,
    num_inference_steps=6,
    generator=torch.Generator("cpu").manual_seed(0),
)
frames = output.frames[0]
export_to_gif(frames, "animatelcm-motion-lora.gif")
使用 FreeNoise
FreeNoise: 通过噪声重排生成更长视频的无调优方法 作者:Haonan Qiu, Menghan Xia, Yong Zhang, Yingqing He, Xintao Wang, Ying Shan, Ziwei Liu。
FreeNoise 是一种采样机制,可以通过使用噪声重排、滑动窗口的时间注意力和潜在帧的加权平均,利用短视频生成模型生成更长的视频。它还可以与多个提示一起使用,以生成插值视频。更多详细信息请参阅论文。
目前支持与 FreeNoise 一起使用的 AnimateDiff 管道有:
- [
AnimateDiffPipeline] - [
AnimateDiffControlNetPipeline] - [
AnimateDiffVideoToVideoPipeline] - [
AnimateDiffVideoToVideoControlNetPipeline]
为了使用 FreeNoise,需要在加载管道后在推理代码中添加一行。
diff
+ pipe.enable_free_noise()在此之后,可以使用单个提示,或者将多个提示作为整数-字符串对的字典传递。字典的整数键对应于该提示影响最大的帧索引。每个帧索引应映射到一个字符串提示。对于未在字典中传递的中间帧索引的提示,是通过在传递的帧提示之间插值生成的。默认情况下,使用简单的线性插值。但是,你可以在启用 FreeNoise 时通过回调 prompt_interpolation_callback 参数来自定义此行为。
完整示例:
python
import torch
from diffusers import AutoencoderKL, AnimateDiffPipeline, LCMScheduler, MotionAdapter
from diffusers.utils import export_to_video, load_image

# Load pipeline
dtype = torch.float16
motion_adapter = MotionAdapter.from_pretrained("wangfuyun/AnimateLCM", torch_dtype=dtype)
vae = AutoencoderKL.from_pretrained("stabilityai/sd-vae-ft-mse", torch_dtype=dtype)

pipe = AnimateDiffPipeline.from_pretrained("emilianJR/epiCRealism", motion_adapter=motion_adapter, vae=vae, torch_dtype=dtype)
pipe.scheduler = LCMScheduler.from_config(pipe.scheduler.config, beta_schedule="linear")

pipe.load_lora_weights(
    "wangfuyun/AnimateLCM", weight_name="AnimateLCM_sd15_t2v_lora.safetensors", adapter_name="lcm_lora"
)
pipe.set_adapters(["lcm_lora"], [0.8])

# Enable FreeNoise for long prompt generation
pipe.enable_free_noise(context_length=16, context_stride=4)
pipe.to("cuda")

# Can be a single prompt, or a dictionary with frame timesteps
prompt = {
    0: "A caterpillar on a leaf, high quality, photorealistic",
    40: "A caterpillar transforming into a cocoon, on a leaf, near flowers, photorealistic",
    80: "A cocoon on a leaf, flowers in the backgrond, photorealistic",
    120: "A cocoon maturing and a butterfly being born, flowers and leaves visible in the background, photorealistic",
    160: "A beautiful butterfly, vibrant colors, sitting on a leaf, flowers in the background, photorealistic",
    200: "A beautiful butterfly, flying away in a forest, photorealistic",
    240: "A cyberpunk butterfly, neon lights, glowing",
}
negative_prompt = "bad quality, worst quality, jpeg artifacts"

# Run inference
output = pipe(
    prompt=prompt,
    negative_prompt=negative_prompt,
    num_frames=256,
    guidance_scale=2.5,
    num_inference_steps=10,
    generator=torch.Generator("cpu").manual_seed(0),
)

# Save video
frames = output.frames[0]
export_to_video(frames, "output.mp4", fps=16)
FreeNoise 内存节省
由于 FreeNoise 会同时处理多个帧,因此在建模过程中所需的内存会超过普通消费级 GPU 的可用内存。我们识别出的主要内存瓶颈是空间和时间注意力块、上采样和下采样块、ResNet 块和前馈层。由于这些块中的大多数主要在通道/嵌入维度上有效运行,因此可以在批量维度上进行分块推理。AnimateDiff 中的批量维度可以是空间的([B x F, H x W, C])或时间的(B x H x W, F, C)(请注意,这可能看起来有些反直觉,但这里的批量维度是正确的,因为空间块在 B x F 维度上进行处理,而时间块在 B x H x W 维度上进行处理)。我们引入了一个 SplitInferenceModule,它使得在任何维度上进行分块推理变得更加容易。这可以节省大量内存,但会增加推理所需的时间。
diff
# Load pipeline and adapters
# ...
+ pipe.enable_free_noise_split_inference()
+ pipe.unet.enable_forward_chunking(16)
调用 pipe.enable_free_noise_split_inference 方法接受两个参数:spatial_split_size(默认为 256)和 temporal_split_size(默认为 16)。这些参数可以根据你可用的 VRAM 进行配置。较低的分割大小会导致较低的内存使用但推理速度较慢,而较大的分割大小会导致更快的推理速度,但需要更多的内存。
使用 from_single_file 加载 MotionAdapter
diffusers>=0.30.0 支持通过 from_single_file 以原始格式将 AnimateDiff 检查点加载到 MotionAdapter 中。
python
from diffusers import MotionAdapter

ckpt_path = "https://huggingface.co/Lightricks/LongAnimateDiff/blob/main/lt_long_mm_32_frames.ckpt"

adapter = MotionAdapter.from_single_file(ckpt_path, torch_dtype=torch.float16)
pipe = AnimateDiffPipeline.from_pretrained("emilianJR/epiCRealism", motion_adapter=adapter)
AnimateDiffPipeline
[[autodoc]] AnimateDiffPipeline
- all
- call
AnimateDiffControlNetPipeline
[[autodoc]] AnimateDiffControlNetPipeline
- all
- call
AnimateDiffSparseControlNetPipeline
[[autodoc]] AnimateDiffSparseControlNetPipeline
- all
- call
AnimateDiffSDXLPipeline
[[autodoc]] AnimateDiffSDXLPipeline
- all
- call
AnimateDiffVideoToVideoPipeline
[[autodoc]] AnimateDiffVideoToVideoPipeline
- all
- call
AnimateDiffVideoToVideoControlNetPipeline
[[autodoc]] AnimateDiffVideoToVideoControlNetPipeline
- all
- call
AnimateDiffPipelineOutput
[[autodoc]] pipelines.animatediff.AnimateDiffPipelineOutput