
算力平台:
加载适配器
[[open-in-colab]]
有几种训练技术可以用于个性化扩散模型,以生成特定主题的图像或特定风格的图像。每种训练方法都会生成不同类型的适配器。有些适配器会生成一个全新的模型,而其他适配器只会修改一小部分嵌入或权重。这意味着每种适配器的加载过程也不同。
本指南将向你展示如何加载 DreamBooth、文本反转和 LoRA 权重。
DreamBooth
DreamBooth 通过对某个主题的几张图像进行微调,生成该主题在新风格和新场景中的图像。该方法通过在提示中使用一个特殊词汇,使模型学会将该词汇与主题图像关联起来。在所有训练方法中,DreamBooth 生成的文件大小最大(通常为几 GB),因为它是一个完整的检查点模型。
让我们加载 herge_style 检查点,该检查点仅基于 Hergé 绘制的 10 张图像进行训练,以生成该风格的图像。要使其生效,你需要在提示中包含特殊词汇 herge_style 以触发检查点:
py
from diffusers import AutoPipelineForText2Image
import torch

pipeline = AutoPipelineForText2Image.from_pretrained("sd-dreambooth-library/herge-style", torch_dtype=torch.float16).to("cuda")
prompt = "A cute herge_style brown bear eating a slice of pizza, stunning color scheme, masterpiece, illustration"
image = pipeline(prompt).images[0]
image
文本反转
文本反转 与 DreamBooth 非常相似,它也可以通过少量图像来个性化扩散模型,生成特定的概念(风格、对象)。这种方法通过训练和找到新的嵌入来表示你提供的图像,并在提示中使用一个特殊的词。因此,扩散模型的权重保持不变,训练过程生成一个相对较小(几 KB)的文件。
因为文本反转创建的是嵌入,所以它不能像 DreamBooth 那样单独使用,需要另一个模型。
py
from diffusers import AutoPipelineForText2Image
import torch

pipeline = AutoPipelineForText2Image.from_pretrained("stable-diffusion-v1-5/stable-diffusion-v1-5", torch_dtype=torch.float16).to("cuda")
现在你可以使用 [~loaders.TextualInversionLoaderMixin.load_textual_inversion] 方法加载文本反转嵌入并生成一些图像。让我们加载 sd-concepts-library/gta5-artwork 嵌入,你需要包含特殊单词 `
py
pipeline.load_textual_inversion("sd-concepts-library/gta5-artwork")
prompt = "A cute brown bear eating a slice of pizza, stunning color scheme, masterpiece, illustration, <gta5-artwork> style"
image = pipeline(prompt).images[0]
image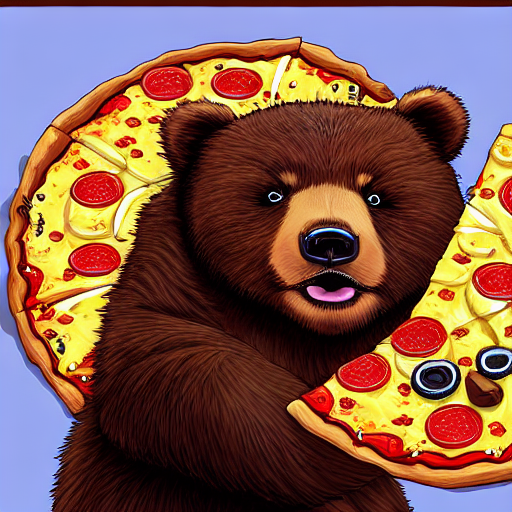
文本反转也可以用于训练不希望出现的事物,以创建负向嵌入,从而阻止模型生成包含这些不希望出现的事物的图像,例如模糊的图像或手上的多余手指。这可以是一种快速改进提示词的简单方法。你将使用 [~loaders.TextualInversionLoaderMixin.load_textual_inversion] 加载嵌入,但这次,你需要两个额外的参数:
weight_name: 指定要加载的权重文件,如果文件是以 🤗 Diffusers 格式并使用特定名称保存的,或者文件存储在 A1111 格式中token: 指定在提示词中使用的特殊词,以触发嵌入
让我们加载 sayakpaul/EasyNegative-test 嵌入:
py
pipeline.load_textual_inversion(
    "sayakpaul/EasyNegative-test", weight_name="EasyNegative.safetensors", token="EasyNegative"
)
现在你可以使用 token 生成带有负向嵌入的图像:
py
prompt = "A cute brown bear eating a slice of pizza, stunning color scheme, masterpiece, illustration, EasyNegative"
negative_prompt = "EasyNegative"

image = pipeline(prompt, negative_prompt=negative_prompt, num_inference_steps=50).images[0]
image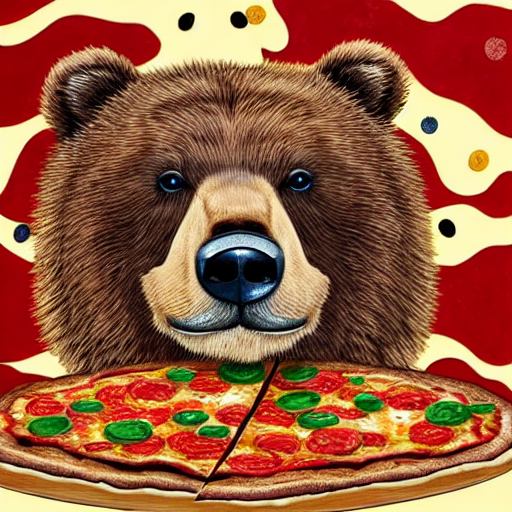
LoRA
低秩适应 (LoRA) 是一种流行的训练技术,因为它速度快且生成的文件大小较小(几百MB)。与其他本指南中的方法一样,LoRA 可以训练模型从少量图像中学习新的风格。它通过在扩散模型中插入新的权重,并且只训练这些新的权重而不是整个模型来实现。这使得 LoRA 的训练速度更快且更容易存储。
LoRAs 也需要与另一个模型一起使用:
py
from diffusers import AutoPipelineForText2Image
import torch

pipeline = AutoPipelineForText2Image.from_pretrained("stabilityai/stable-diffusion-xl-base-1.0", torch_dtype=torch.float16).to("cuda")
然后使用 [~loaders.StableDiffusionLoraLoaderMixin.load_lora_weights] 方法加载 ostris/super-cereal-sdxl-lora 权重,并指定仓库中的权重文件名:
py
pipeline.load_lora_weights("ostris/super-cereal-sdxl-lora", weight_name="cereal_box_sdxl_v1.safetensors")
prompt = "bears, pizza bites"
image = pipeline(prompt).images[0]
image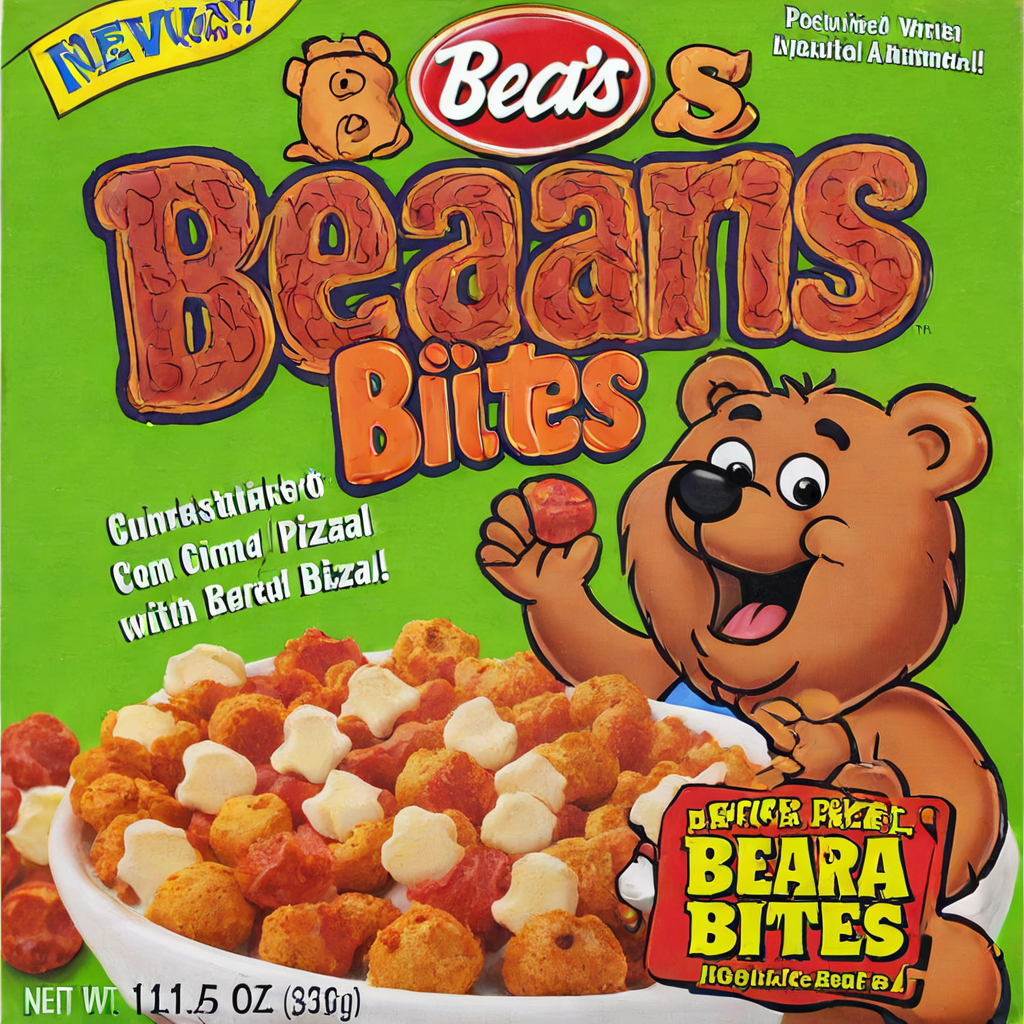
[~loaders.StableDiffusionLoraLoaderMixin.load_lora_weights] 方法将 LoRA 权重加载到 UNet 和文本编码器中。这是加载 LoRA 的首选方法,因为它可以处理以下情况:
- LoRA 权重没有为 UNet 和文本编码器提供单独的标识符
- LoRA 权重为 UNet 和文本编码器提供了单独的标识符
但是,如果你只需要将 LoRA 权重加载到 UNet 中,那么可以使用 [~loaders.UNet2DConditionLoadersMixin.load_attn_procs] 方法。让我们加载 jbilcke-hf/sdxl-cinematic-1 LoRA:
py
from diffusers import AutoPipelineForText2Image
import torch

pipeline = AutoPipelineForText2Image.from_pretrained("stabilityai/stable-diffusion-xl-base-1.0", torch_dtype=torch.float16).to("cuda")
pipeline.unet.load_attn_procs("jbilcke-hf/sdxl-cinematic-1", weight_name="pytorch_lora_weights.safetensors")

# use cnmt in the prompt to trigger the LoRA
prompt = "A cute cnmt eating a slice of pizza, stunning color scheme, masterpiece, illustration"
image = pipeline(prompt).images[0]
image
要卸载 LoRA 权重,使用 [~loaders.StableDiffusionLoraLoaderMixin.unload_lora_weights] 方法来丢弃 LoRA 权重并恢复模型到其原始权重:
py
pipeline.unload_lora_weights()调整 LoRA 权重比例
对于 [~loaders.StableDiffusionLoraLoaderMixin.load_lora_weights] 和 [~loaders.UNet2DConditionLoadersMixin.load_attn_procs],你可以传递 cross_attention_kwargs={"scale": 0.5} 参数来调整使用 LoRA 权重的程度。值为 0 表示仅使用基础模型权重,值为 1 表示使用完全微调的 LoRA。
为了更精细地控制每层使用的 LoRA 权重比例,你可以使用 [~loaders.StableDiffusionLoraLoaderMixin.set_adapters] 并传递一个字典,指定每层权重的缩放比例。
python
pipe = ... # create pipeline
pipe.load_lora_weights(..., adapter_name="my_adapter")
scales = {
    "text_encoder": 0.5,
    "text_encoder_2": 0.5,  # only usable if pipe has a 2nd text encoder
    "unet": {
        "down": 0.9,  # all transformers in the down-part will use scale 0.9
        # "mid"  # in this example "mid" is not given, therefore all transformers in the mid part will use the default scale 1.0
        "up": {
            "block_0": 0.6,  # all 3 transformers in the 0th block in the up-part will use scale 0.6
            "block_1": [0.4, 0.8, 1.0],  # the 3 transformers in the 1st block in the up-part will use scales 0.4, 0.8 and 1.0 respectively
        }
    }
}
pipe.set_adapters("my_adapter", scales)
这同样适用于多个适配器 - 请参阅此指南了解如何操作。
Kohya 和 TheLastBen
社区中其他流行的 LoRA 训练器包括 Kohya 和 TheLastBen 提供的训练器。这些训练器生成的 LoRA 检查点与 🤗 Diffusers 训练的不同,但仍然可以以相同的方式加载。
IP-Adapter
IP-Adapter 是一个轻量级适配器,可以为任何扩散模型启用图像提示功能。该适配器通过解耦图像和文本特征的交叉注意力层来工作。所有其他模型组件都保持冻结状态,只有 UNet 中嵌入的图像特征会进行训练。因此,IP-Adapter 文件通常只有 ~100MB。
你可以在 IP-Adapter 指南中了解如何为不同任务和特定用例使用 IP-Adapter。
TIP
Diffusers 目前仅支持一些最受欢迎的管道中的 IP-Adapter。如果你有一个很酷的用例并希望将 IP-Adapter 集成到不受支持的管道中,请随时提出功能请求! 官方的 IP-Adapter 检查点可以从 h94/IP-Adapter 获取。
首先,加载一个 Stable Diffusion 检查点。
py
from diffusers import AutoPipelineForText2Image
import torch
from diffusers.utils import load_image

pipeline = AutoPipelineForText2Image.from_pretrained("stable-diffusion-v1-5/stable-diffusion-v1-5", torch_dtype=torch.float16).to("cuda")
然后加载 IP-Adapter 权重,并使用 [~loaders.IPAdapterMixin.load_ip_adapter] 方法将其添加到管道中。
py
pipeline.load_ip_adapter("h94/IP-Adapter", subfolder="models", weight_name="ip-adapter_sd15.bin")加载完成后,你可以使用管道,结合图像和文本提示来引导图像生成过程。
py
image = load_image("https://huggingface.co/datasets/huggingface/documentation-images/resolve/main/diffusers/load_neg_embed.png")
generator = torch.Generator(device="cpu").manual_seed(33)
images = pipeline(
    prompt='best quality, high quality, wearing sunglasses',
    ip_adapter_image=image,
    negative_prompt="monochrome, lowres, bad anatomy, worst quality, low quality",
    num_inference_steps=50,
    generator=generator,
).images[0]
images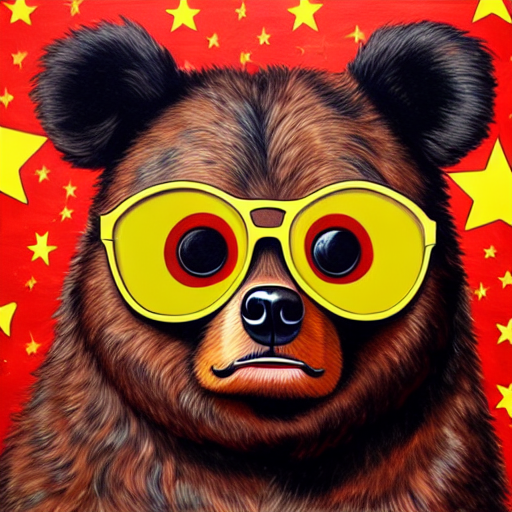
IP-Adapter Plus
IP-Adapter 依赖于图像编码器来生成图像特征。如果 IP-Adapter 仓库中包含一个 image_encoder 子文件夹,图像编码器将自动加载并注册到管道中。否则,你需要显式地加载图像编码器,使用一个 [~transformers.CLIPVisionModelWithProjection] 模型,并将其传递给管道。
这是 IP-Adapter Plus 检查点的情况,它们使用 ViT-H 图像编码器。
py
from transformers import CLIPVisionModelWithProjection

image_encoder = CLIPVisionModelWithProjection.from_pretrained(
    "h94/IP-Adapter",
    subfolder="models/image_encoder",
    torch_dtype=torch.float16
)

pipeline = AutoPipelineForText2Image.from_pretrained(
    "stabilityai/stable-diffusion-xl-base-1.0",
    image_encoder=image_encoder,
    torch_dtype=torch.float16
).to("cuda")

pipeline.load_ip_adapter("h94/IP-Adapter", subfolder="sdxl_models", weight_name="ip-adapter-plus_sdxl_vit-h.safetensors")
IP-Adapter 面部识别模型
IP-Adapter 面部识别模型是实验性的 IP 适配器,使用由 insightface 生成的图像嵌入,而不是 CLIP 图像嵌入。这些模型中的一些还使用 LoRA 来提高 ID 的一致性。 你需要安装 insightface 及其所有依赖项才能使用这些模型。
py
pipeline = AutoPipelineForText2Image.from_pretrained(
    "stabilityai/stable-diffusion-xl-base-1.0",
    torch_dtype=torch.float16
).to("cuda")

pipeline.load_ip_adapter("h94/IP-Adapter-FaceID", subfolder=None, weight_name="ip-adapter-faceid_sdxl.bin", image_encoder_folder=None)
如果你想使用两个 IP-Adapter FaceID Plus 模型中的一个,你还必须加载 CLIP 图像编码器,因为这些模型使用 insightface 和 CLIP 图像嵌入来实现更好的照片真实感。
py
from transformers import CLIPVisionModelWithProjection

image_encoder = CLIPVisionModelWithProjection.from_pretrained(
    "laion/CLIP-ViT-H-14-laion2B-s32B-b79K",
    torch_dtype=torch.float16,
)

pipeline = AutoPipelineForText2Image.from_pretrained(
    "stable-diffusion-v1-5/stable-diffusion-v1-5",
    image_encoder=image_encoder,
    torch_dtype=torch.float16
).to("cuda")

pipeline.load_ip_adapter("h94/IP-Adapter-FaceID", subfolder=None, weight_name="ip-adapter-faceid-plus_sd15.bin")