
算力平台:
加载 LoRAs 用于推理
有许多适配器类型(其中LoRAs 最受欢迎),它们以不同的风格训练,以实现不同的效果。你甚至可以组合多个适配器来创建新的独特图像。
在本教程中,你将学习如何使用 🤗 PEFT 集成到 🤗 Diffusers 中,轻松加载和管理用于推理的适配器。你将使用 LoRA 作为主要的适配器技术,因此你将看到 LoRA 和适配器这两个术语可以互换使用。
让我们首先安装所有必需的库。
bash
!pip install -q transformers accelerate peft diffusers现在,使用 Stable Diffusion XL (SDXL) 检查点加载一个管道:
python
from diffusers import DiffusionPipeline
import torch

pipe_id = "stabilityai/stable-diffusion-xl-base-1.0"
pipe = DiffusionPipeline.from_pretrained(pipe_id, torch_dtype=torch.float16).to("cuda")
接下来,使用 [~diffusers.loaders.StableDiffusionXLLoraLoaderMixin.load_lora_weights] 方法加载一个 CiroN2022/toy-face 适配器。借助 🤗 PEFT 集成,你可以为检查点分配一个特定的 adapter_name,这使你能够轻松地在不同的 LoRA 检查点之间切换。让我们将此适配器命名为 "toy"。
python
pipe.load_lora_weights("CiroN2022/toy-face", weight_name="toy_face_sdxl.safetensors", adapter_name="toy")确保在提示中包含 toy_face 令牌,然后你可以执行推理:
python
prompt = "toy_face of a hacker with a hoodie"

lora_scale = 0.9
image = pipe(
    prompt, num_inference_steps=30, cross_attention_kwargs={"scale": lora_scale}, generator=torch.manual_seed(0)
).images[0]
image
使用 adapter_name 参数,使用另一个适配器进行推理非常容易!加载已针对生成像素艺术图像进行微调的 nerijs/pixel-art-xl 适配器,并将其称为 "pixel"。
管道会自动将第一个加载的适配器 ("toy") 设置为活动适配器,但你可以使用 [~diffusers.loaders.UNet2DConditionLoadersMixin.set_adapters] 方法激活 "pixel" 适配器:
python
pipe.load_lora_weights("nerijs/pixel-art-xl", weight_name="pixel-art-xl.safetensors", adapter_name="pixel")
pipe.set_adapters("pixel")
确保在你的提示中包含 pixel art 令牌以生成像素艺术图像:
python
prompt = "a hacker with a hoodie, pixel art"
image = pipe(
    prompt, num_inference_steps=30, cross_attention_kwargs={"scale": lora_scale}, generator=torch.manual_seed(0)
).images[0]
image
合并适配器
你也可以合并不同的适配器检查点以进行推理,以将它们的风格融合在一起。
再次使用 [~diffusers.loaders.UNet2DConditionLoadersMixin.set_adapters] 方法来激活 pixel 和 toy 适配器,并指定它们应该如何合并的权重。
python
pipe.set_adapters(["pixel", "toy"], adapter_weights=[0.5, 1.0])扩散模型社区中的 LoRA 检查点几乎总是使用 DreamBooth 获得。DreamBooth 训练通常依赖于输入文本提示中的"触发词",以便生成结果看起来符合预期。当你组合多个 LoRA 检查点时,重要的是要确保对应 LoRA 检查点的触发词出现在输入文本提示中。
python
prompt = "toy_face of a hacker with a hoodie, pixel art"
image = pipe(
    prompt, num_inference_steps=30, cross_attention_kwargs={"scale": 1.0}, generator=torch.manual_seed(0)
).images[0]
image
太棒了!如你所见,模型生成了一个融合了两个适配器特征的图像。
TIP
通过其 PEFT 集成,Diffusers 还提供了更有效的合并方法,你可以在 合并 LoRAs 指南中了解!
要恢复仅使用一个适配器,请使用 [~diffusers.loaders.UNet2DConditionLoadersMixin.set_adapters] 方法激活 "toy" 适配器:
python
pipe.set_adapters("toy")

prompt = "toy_face of a hacker with a hoodie"
lora_scale = 0.9
image = pipe(
    prompt, num_inference_steps=30, cross_attention_kwargs={"scale": lora_scale}, generator=torch.manual_seed(0)
).images[0]
image
或者要完全禁用所有适配器,请使用 [~diffusers.loaders.UNet2DConditionLoadersMixin.disable_lora] 方法恢复基础模型。
python
pipe.disable_lora()

prompt = "toy_face of a hacker with a hoodie"
image = pipe(prompt, num_inference_steps=30, generator=torch.manual_seed(0)).images[0]
image
自定义适配器强度
为了实现更个性化的定制,你可以控制适配器对管道各个部分的影响程度。为此,请将包含控制强度(称为"比例")的字典传递给 [~diffusers.loaders.UNet2DConditionLoadersMixin.set_adapters].
例如,以下是如何开启 down 部分的适配器,但关闭 mid 和 up 部分的适配器:
python
pipe.enable_lora()  # enable lora again, after we disabled it above
prompt = "toy_face of a hacker with a hoodie, pixel art"
adapter_weight_scales = { "unet": { "down": 1, "mid": 0, "up": 0} }
pipe.set_adapters("pixel", adapter_weight_scales)
image = pipe(prompt, num_inference_steps=30, generator=torch.manual_seed(0)).images[0]
image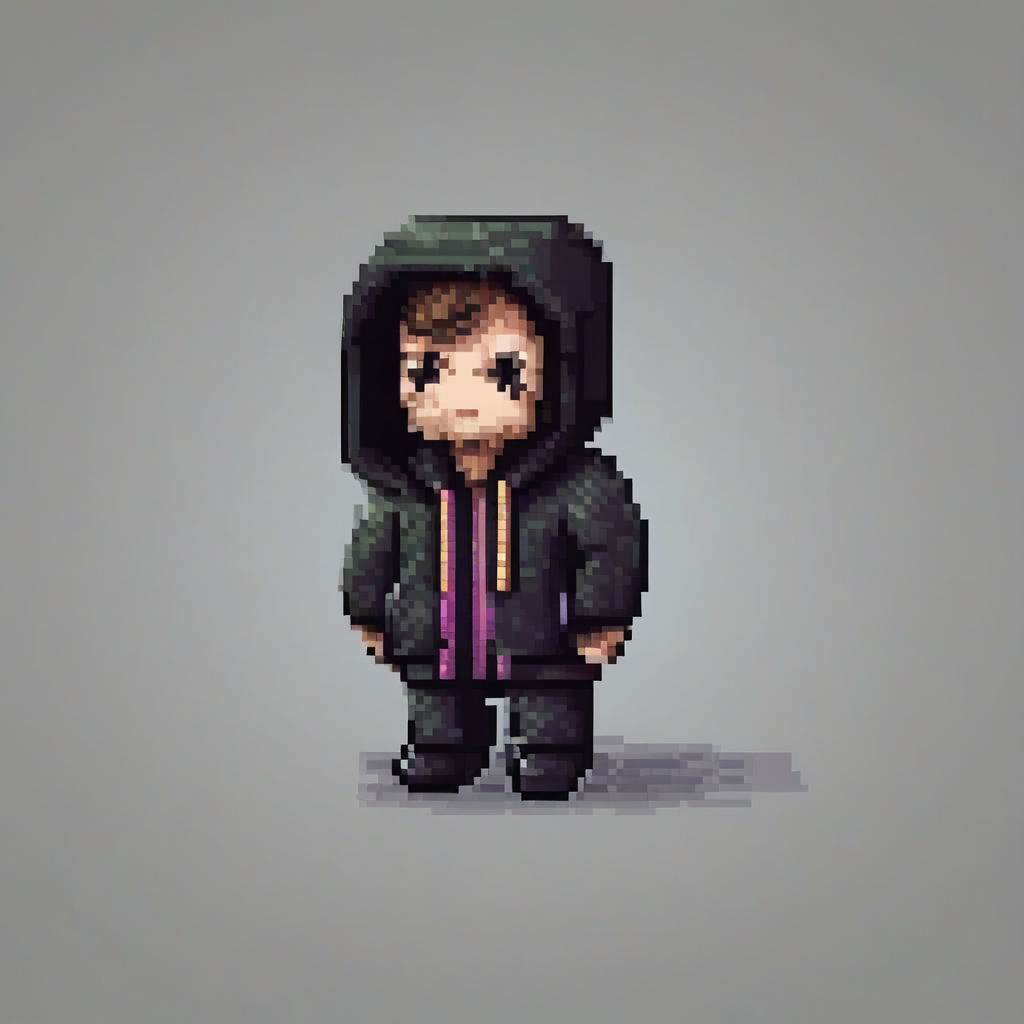
让我们看看分别关闭 down 部分并开启 mid 和 up 部分是如何改变图像的。
python
adapter_weight_scales = { "unet": { "down": 0, "mid": 1, "up": 0} }
pipe.set_adapters("pixel", adapter_weight_scales)
image = pipe(prompt, num_inference_steps=30, generator=torch.manual_seed(0)).images[0]
image
看起来很酷!
这是一个非常强大的功能。你可以用它来控制适配器强度,甚至可以控制到每个 Transformer 层级。你甚至可以将它用于多个适配器。
python
adapter_weight_scales = { "unet": { "down": 0, "mid": 0, "up": 1} }
pipe.set_adapters("pixel", adapter_weight_scales)
image = pipe(prompt, num_inference_steps=30, generator=torch.manual_seed(0)).images[0]
image
看起来很酷!
这是一个非常强大的功能。你可以用它来控制适配器强度,甚至可以控制到每个 Transformer 层级。你甚至可以将它用于多个适配器。
python
adapter_weight_scales_toy = 0.5
adapter_weight_scales_pixel = {
    "unet": {
        "down": 0.9,  # all transformers in the down-part will use scale 0.9
        # "mid"  # because, in this example, "mid" is not given, all transformers in the mid part will use the default scale 1.0
        "up": {
            "block_0": 0.6,  # all 3 transformers in the 0th block in the up-part will use scale 0.6
            "block_1": [0.4, 0.8, 1.0],  # the 3 transformers in the 1st block in the up-part will use scales 0.4, 0.8 and 1.0 respectively
        }
    }
}
pipe.set_adapters(["toy", "pixel"], [adapter_weight_scales_toy, adapter_weight_scales_pixel])
image = pipe(prompt, num_inference_steps=30, generator=torch.manual_seed(0)).images[0]
image
管理活动适配器
在本教程中,你已经附加了多个适配器,如果你对哪些适配器已附加到管道的组件感到困惑,可以使用 [~diffusers.loaders.StableDiffusionLoraLoaderMixin.get_active_adapters] 方法来检查活动适配器的列表:
py
active_adapters = pipe.get_active_adapters()
active_adapters
["toy", "pixel"]
你也可以使用 [~diffusers.loaders.StableDiffusionLoraLoaderMixin.get_list_adapters] 获取每个管道组件的活动适配器:
py
list_adapters_component_wise = pipe.get_list_adapters()
list_adapters_component_wise
{"text_encoder": ["toy", "pixel"], "unet": ["toy", "pixel"], "text_encoder_2": ["toy", "pixel"]}