算力平台:
加速文本到图像扩散模型的推理
扩散模型比其GAN对手慢,这是由于迭代和顺序的反向扩散过程。有几种技术可以解决这一限制,例如逐步时间步蒸馏(LCM LoRA)、模型压缩(SSD-1B)以及重用去噪器的相邻特征(DeepCache)。
然而,你并不一定需要使用这些技术来加速推理。仅使用PyTorch 2,你就可以将文本到图像扩散管道的推理延迟加速高达3倍。本教程将向你展示如何逐步应用PyTorch 2中的优化来减少推理延迟。在本教程中,你将使用Stable Diffusion XL (SDXL)管道,但这些技术也适用于其他文本到图像扩散管道。
确保你使用的是最新版本的Diffusers:
bash
pip install -U diffusers然后升级其他所需的库:
bash
pip install -U transformers accelerate peft安装 PyTorch nightly 以受益于最新的和最快的内核:
bash
pip3 install --pre torch --index-url https://download.pytorch.org/whl/nightly/cu121TIP
以下报告的结果来自一个80GB 400W的A100,其时钟速率设置为最大值。 如果你对完整的基准测试代码感兴趣,可以查看 huggingface/diffusion-fast。
基线
让我们从一个基线开始。禁用降低精度和 scaled_dot_product_attention (SDPA) 函数,该函数由Diffusers自动使用:
python
from diffusers import StableDiffusionXLPipeline
# Load the pipeline in full-precision and place its model components on CUDA.
pipe = StableDiffusionXLPipeline.from_pretrained(
"stabilityai/stable-diffusion-xl-base-1.0"
).to("cuda")
# Run the attention ops without SDPA.
pipe.unet.set_default_attn_processor()
pipe.vae.set_default_attn_processor()
prompt = "Astronaut in a jungle, cold color palette, muted colors, detailed, 8k"
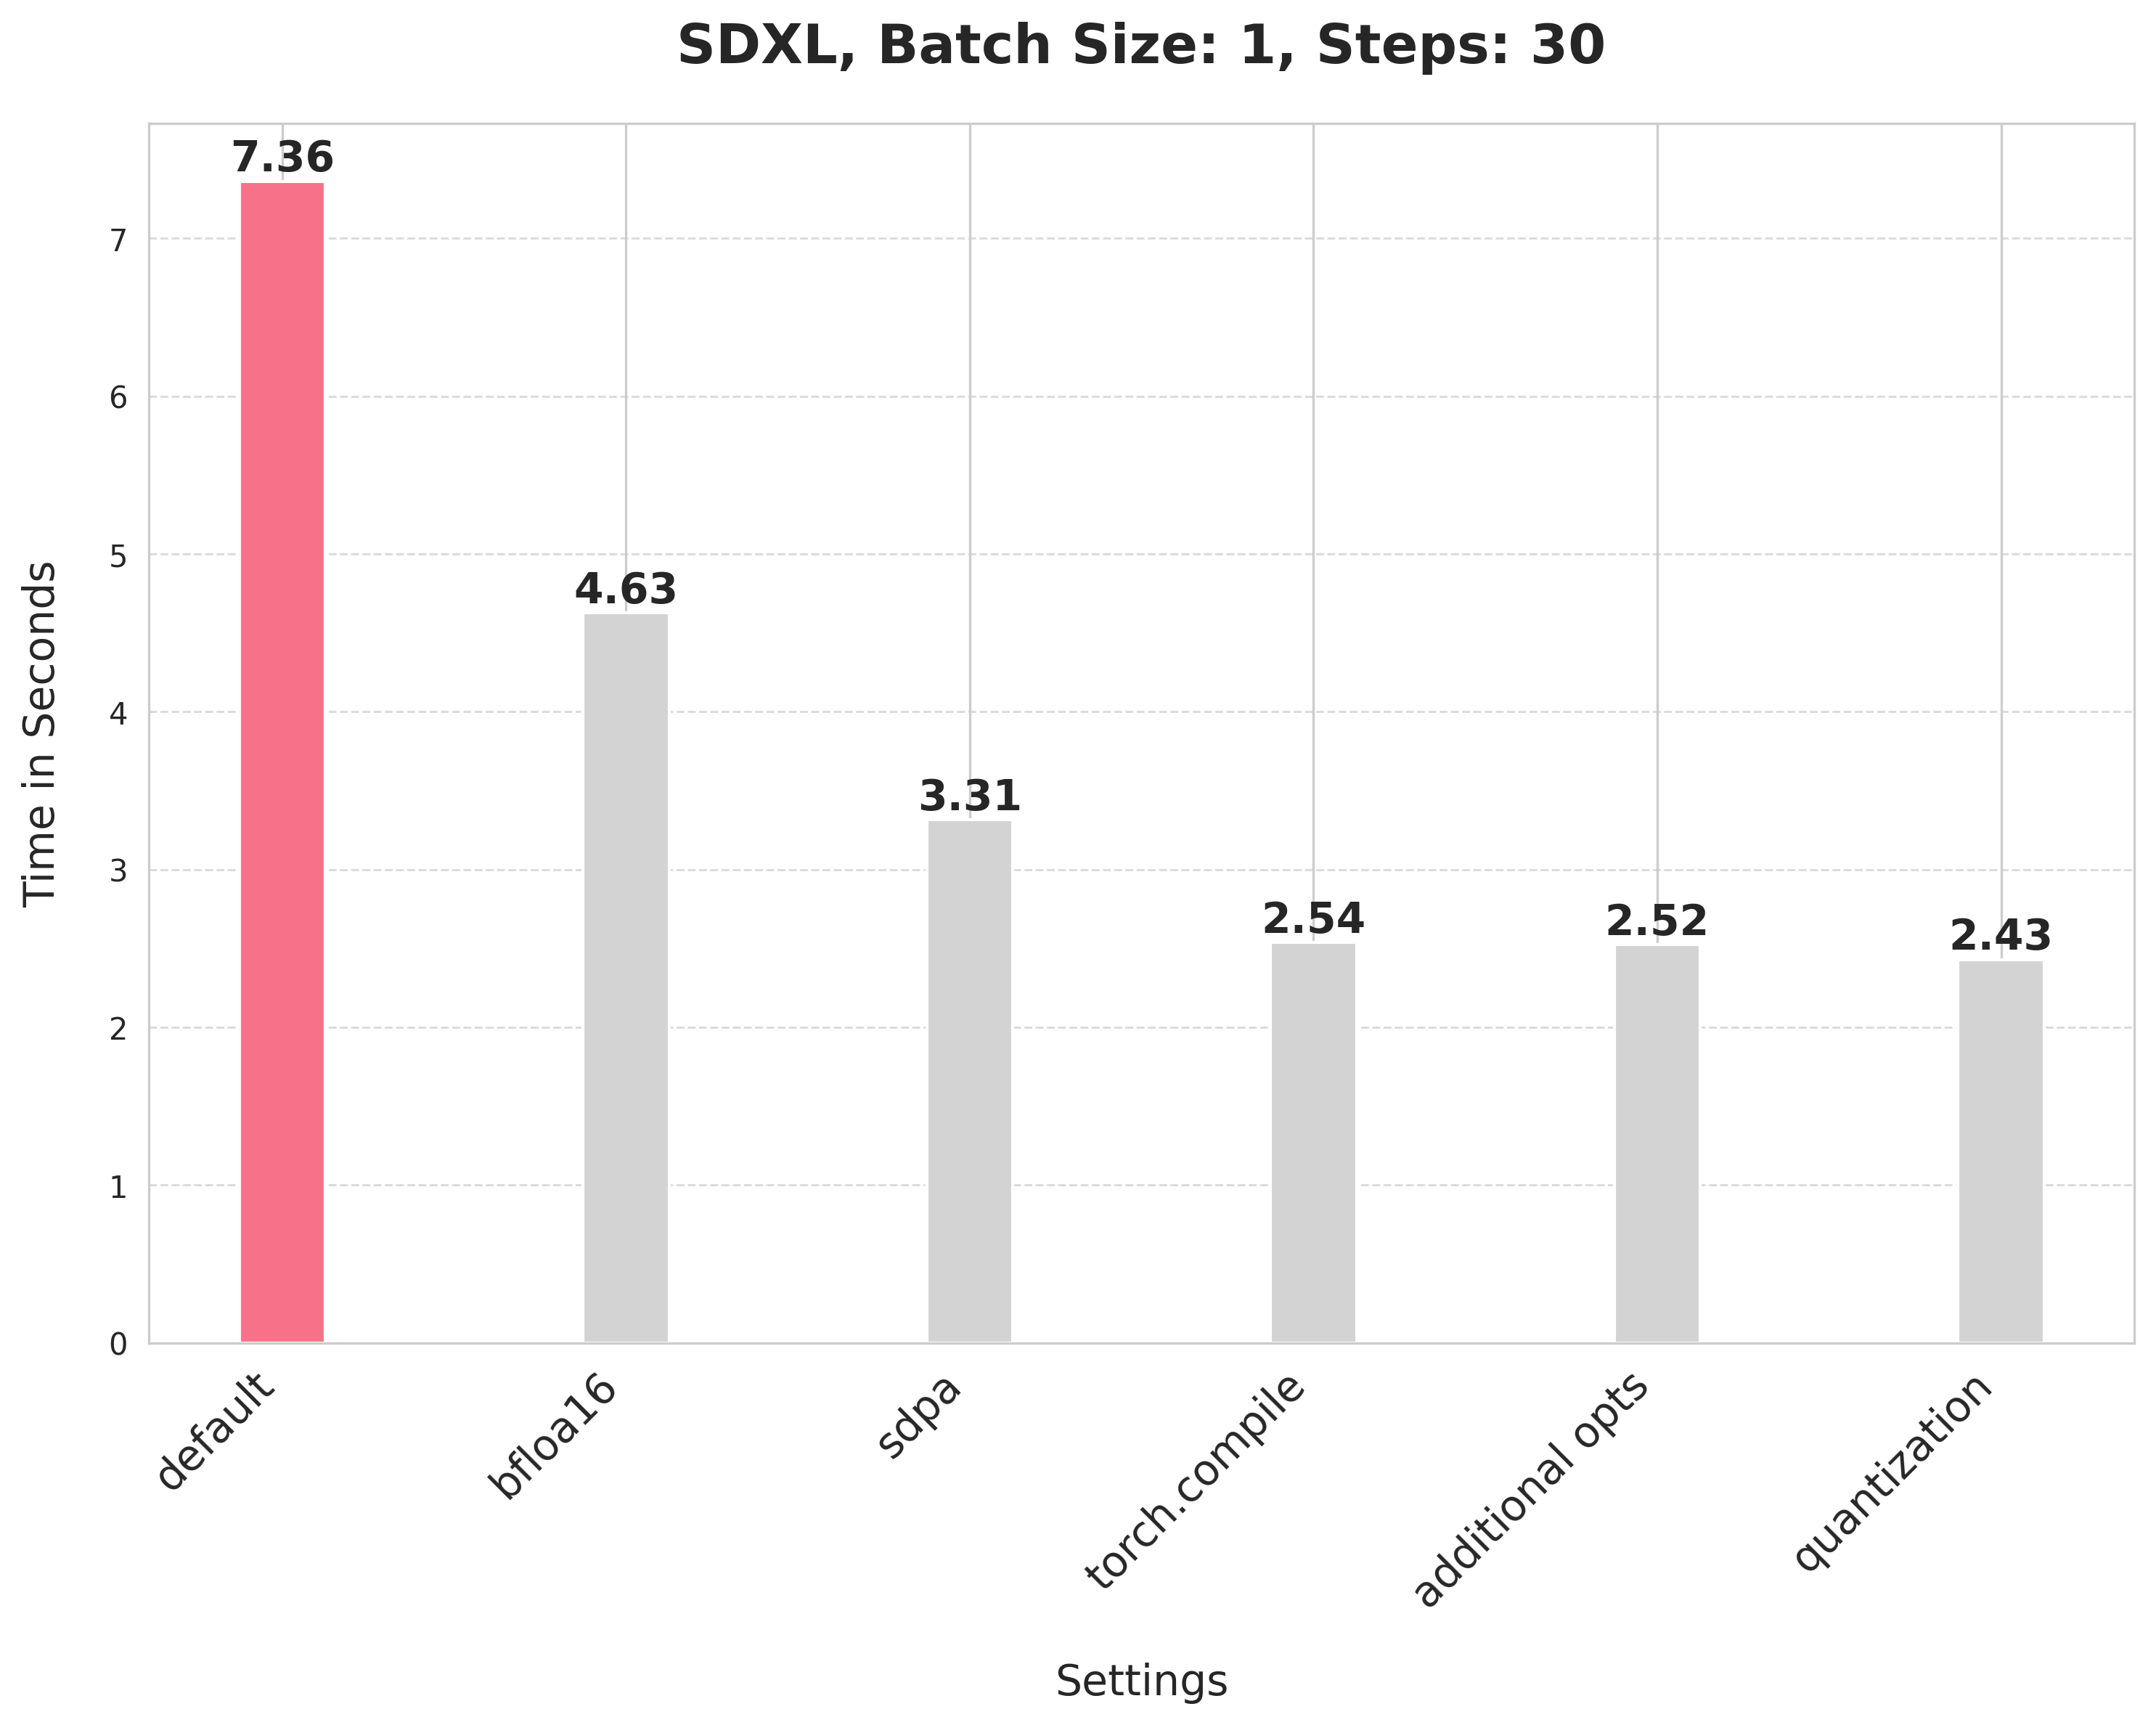
image = pipe(prompt, num_inference_steps=30).images[0]这个默认设置需要7.36秒。
bfloat16
启用第一个优化,即降低精度或更具体地说使用bfloat16。使用降低精度有以下几个好处:
- 使用降低的数值精度(如float16或bfloat16)进行推理不会影响生成质量,但能显著提高延迟。
- 与float16相比,使用bfloat16的好处取决于硬件,但现代GPU往往更倾向于bfloat16。
- 与float16相比,bfloat16在使用量化时更具弹性,但我们使用的最新版本的量化库(torchao)在float16上没有数值问题。
python
from diffusers import StableDiffusionXLPipeline
import torch
pipe = StableDiffusionXLPipeline.from_pretrained(
"stabilityai/stable-diffusion-xl-base-1.0", torch_dtype=torch.bfloat16
).to("cuda")
# Run the attention ops without SDPA.
pipe.unet.set_default_attn_processor()
pipe.vae.set_default_attn_processor()
prompt = "Astronaut in a jungle, cold color palette, muted colors, detailed, 8k"
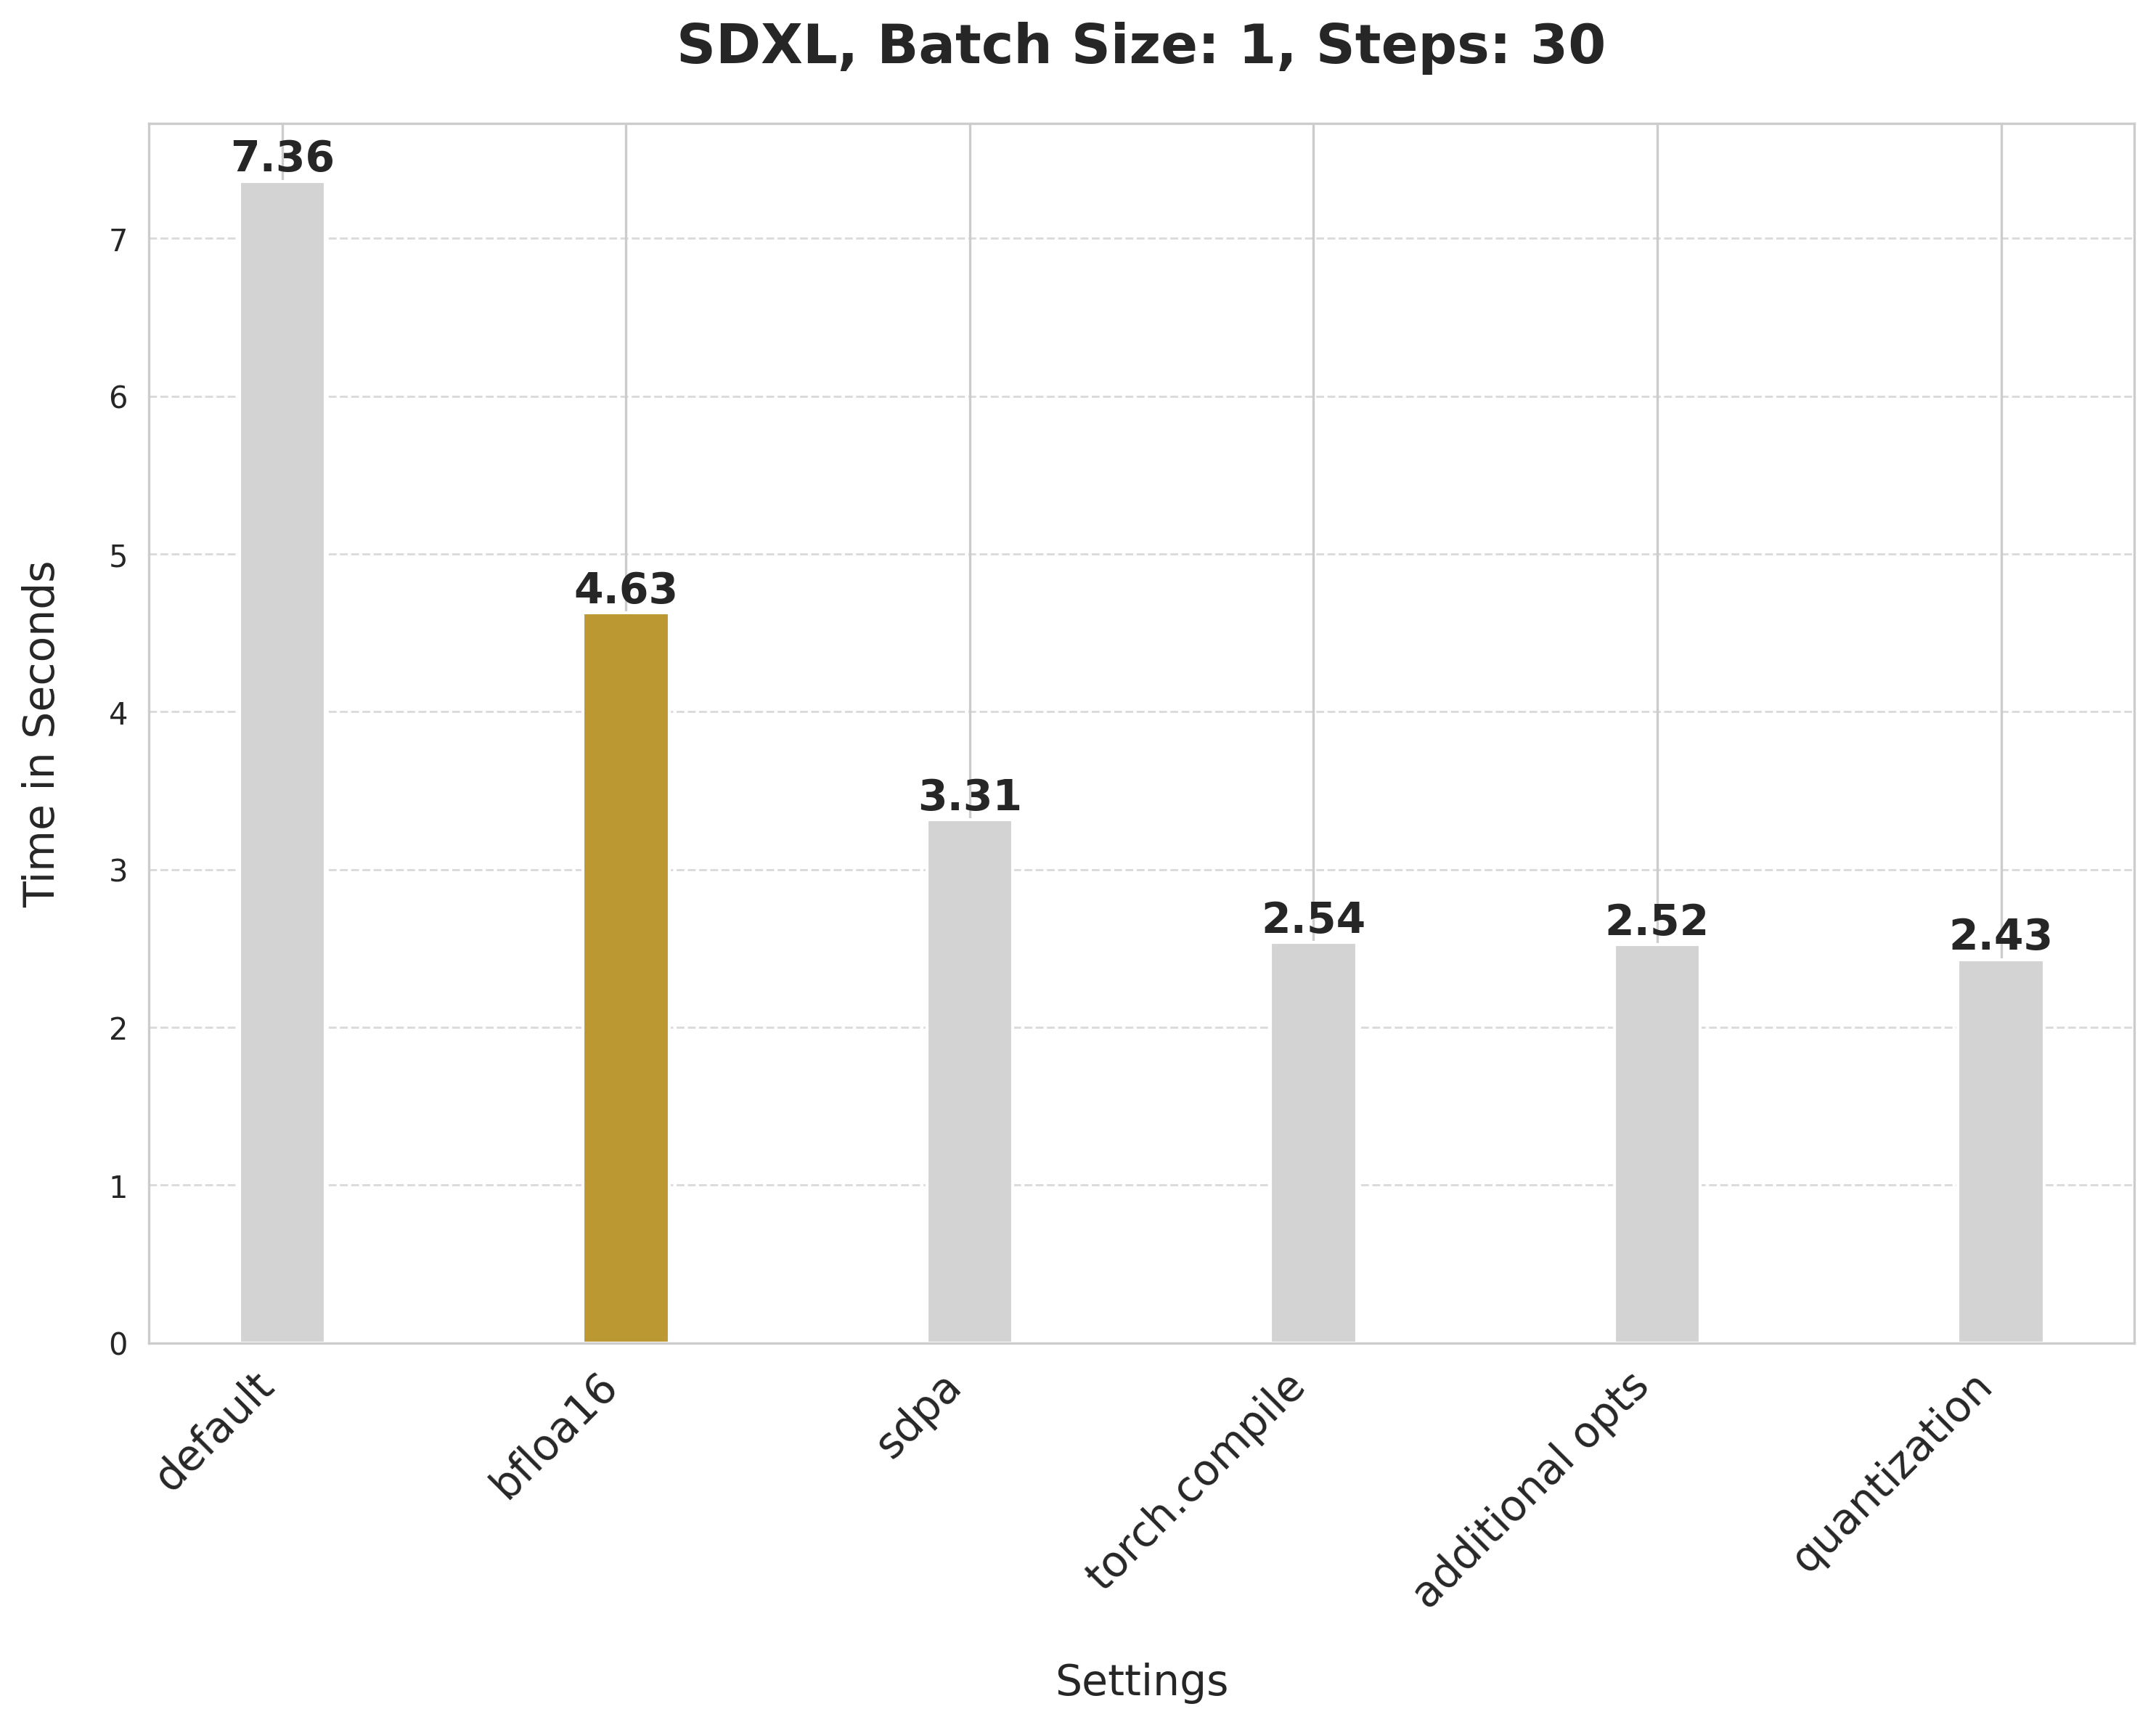
image = pipe(prompt, num_inference_steps=30).images[0]bfloat16将延迟从7.36秒降低到4.63秒。
查看 加速推理 指南,了解更多关于使用降低精度运行推理的信息。
SDPA
注意力块的运行非常密集。但通过 PyTorch 的 scaled_dot_product_attention 函数,它的效率大大提高。这个函数在 Diffusers 中默认使用,因此你不需要对代码做任何改动。
python
from diffusers import StableDiffusionXLPipeline
import torch
pipe = StableDiffusionXLPipeline.from_pretrained(
"stabilityai/stable-diffusion-xl-base-1.0", torch_dtype=torch.bfloat16
).to("cuda")
prompt = "Astronaut in a jungle, cold color palette, muted colors, detailed, 8k"
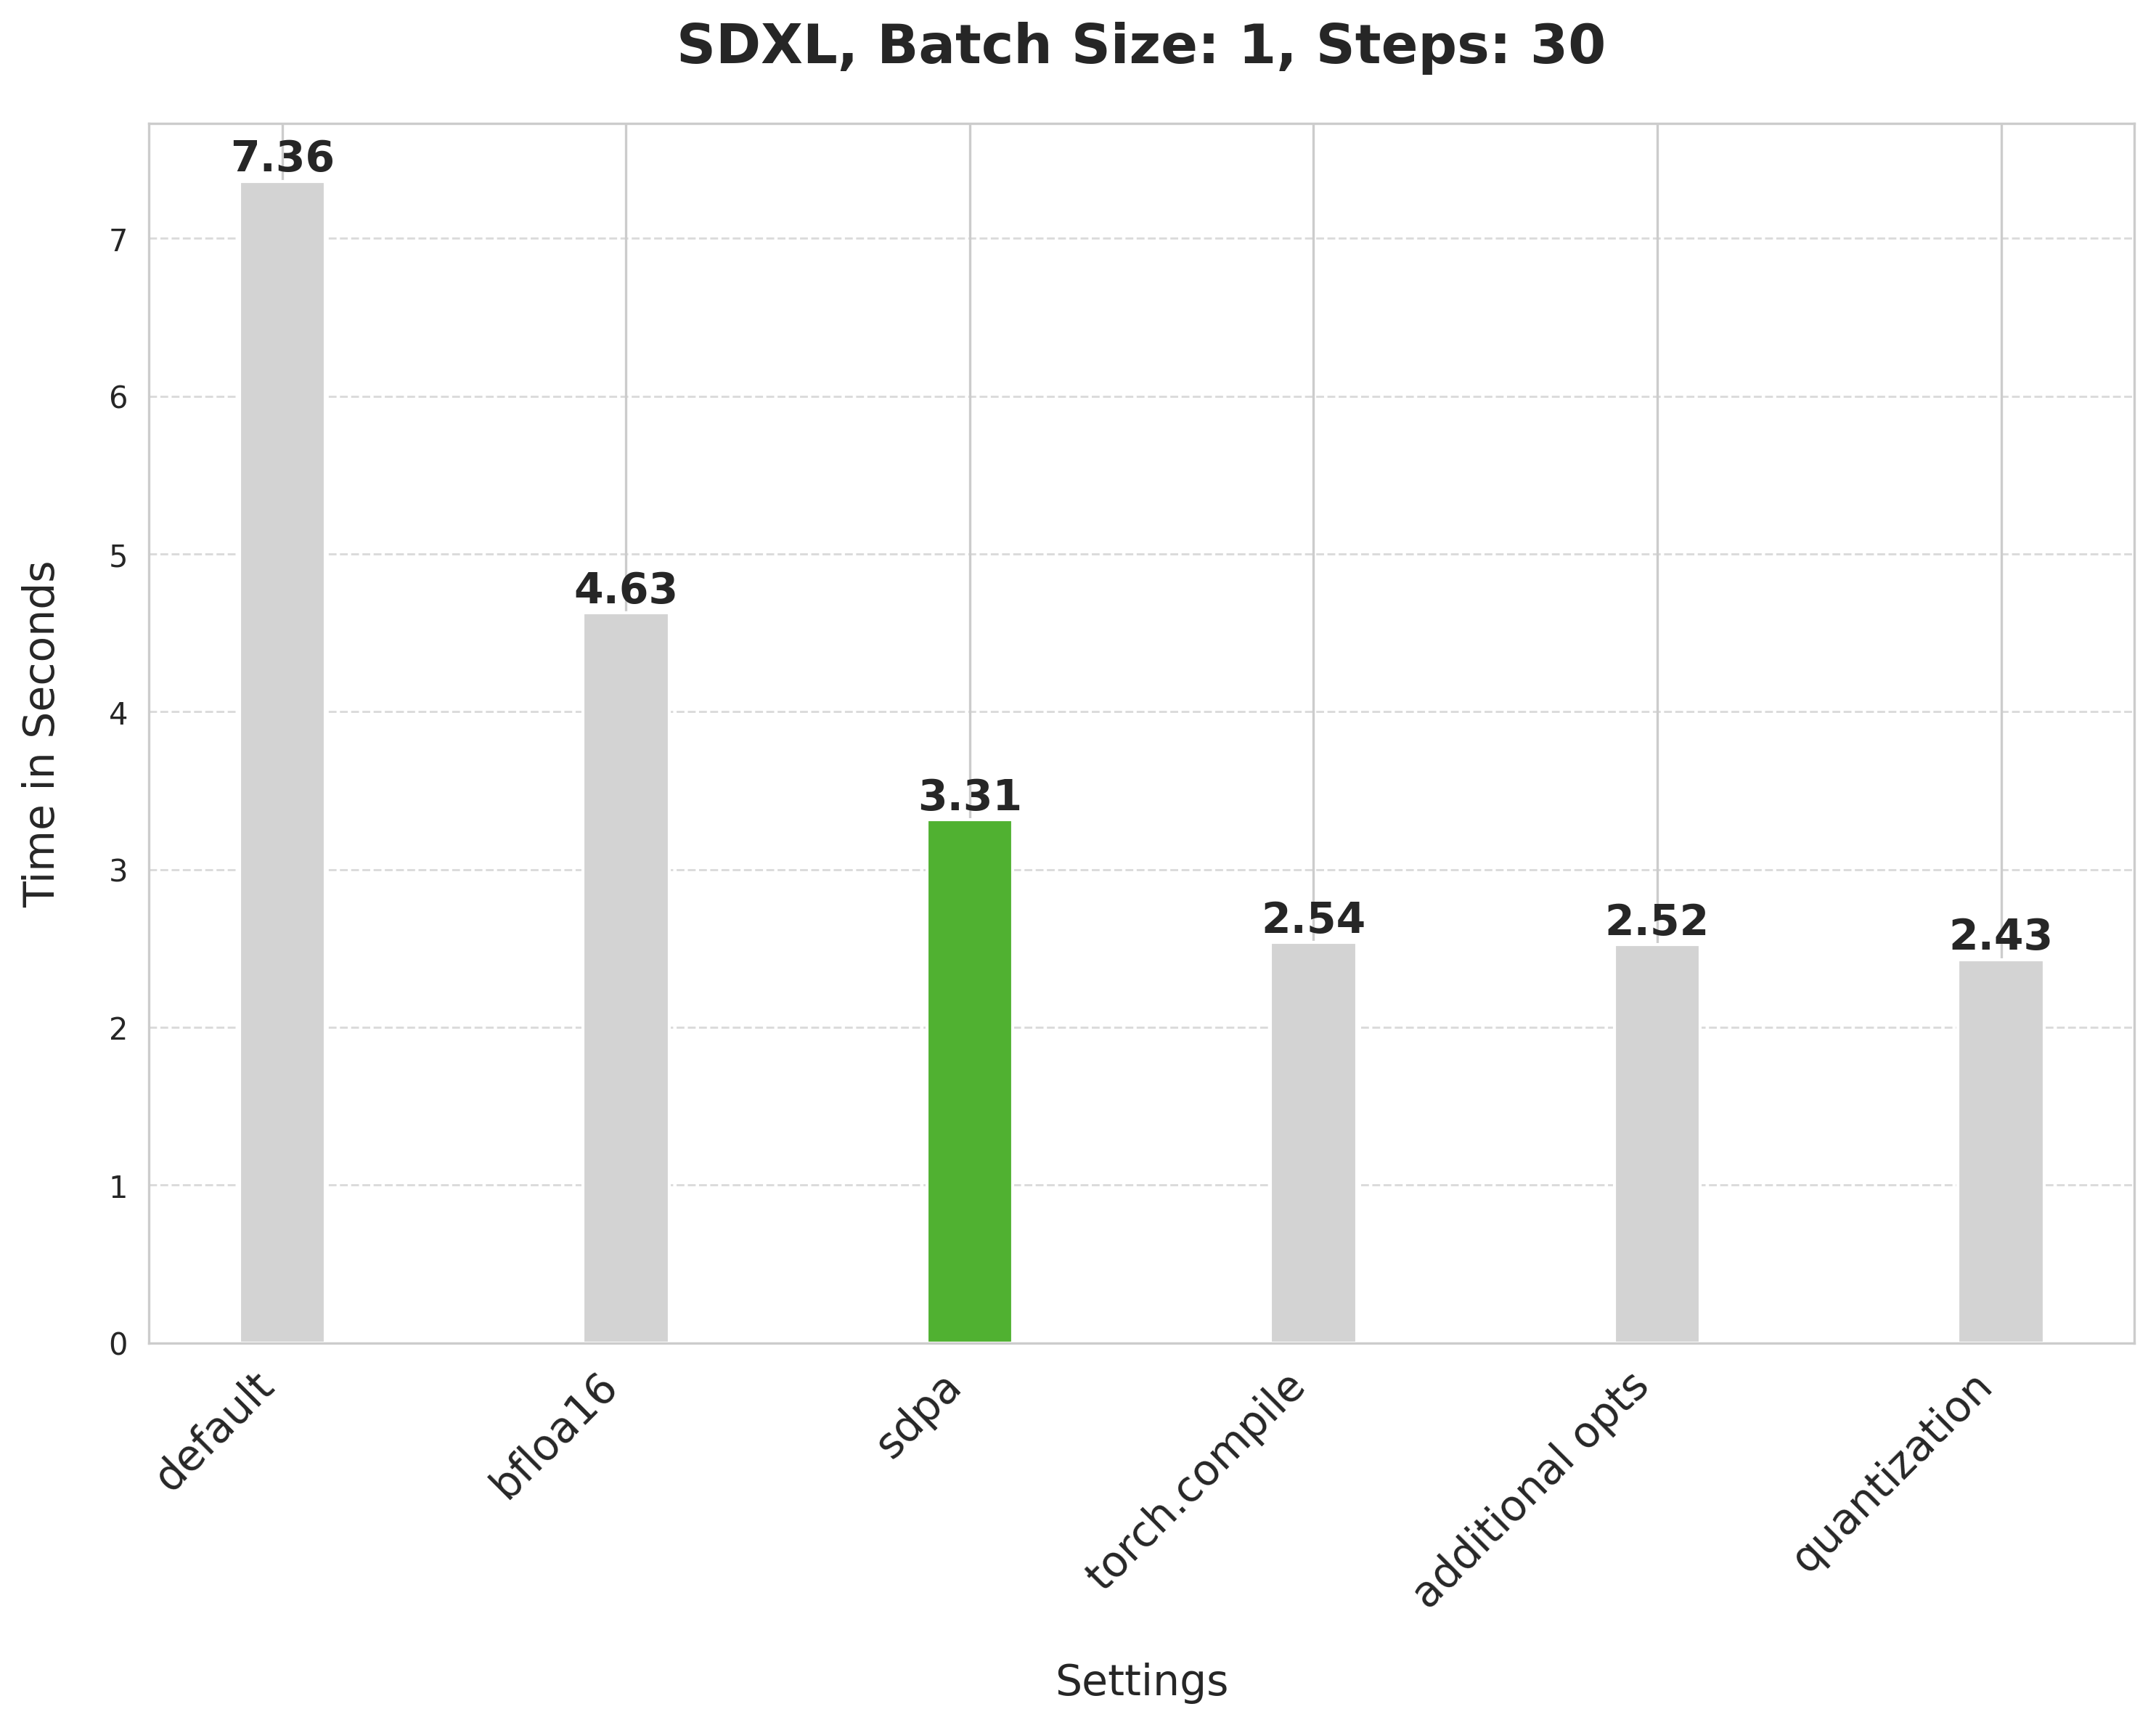
image = pipe(prompt, num_inference_steps=30).images[0]缩放点积注意力将延迟从 4.63 秒降低到 3.31 秒。
torch.compile
PyTorch 2 包含了 torch.compile,它使用快速且优化的内核。在 Diffusers 中,UNet 和 VAE 通常会被编译,因为这些是最计算密集型的模块。首先,配置一些编译器标志(参考 完整列表 了解更多选项):
python
from diffusers import StableDiffusionXLPipeline
import torch

torch._inductor.config.conv_1x1_as_mm = True
torch._inductor.config.coordinate_descent_tuning = True
torch._inductor.config.epilogue_fusion = False
torch._inductor.config.coordinate_descent_check_all_directions = True
在编译时将 UNet 和 VAE 的内存布局更改为 "channels_last" 也很重要,以确保最大速度。
python
pipe.unet.to(memory_format=torch.channels_last)
pipe.vae.to(memory_format=torch.channels_last)
现在编译并执行推理:
python
# Compile the UNet and VAE.
pipe.unet = torch.compile(pipe.unet, mode="max-autotune", fullgraph=True)
pipe.vae.decode = torch.compile(pipe.vae.decode, mode="max-autotune", fullgraph=True)
prompt = "Astronaut in a jungle, cold color palette, muted colors, detailed, 8k"
# First call to `pipe` is slow, subsequent ones are faster.
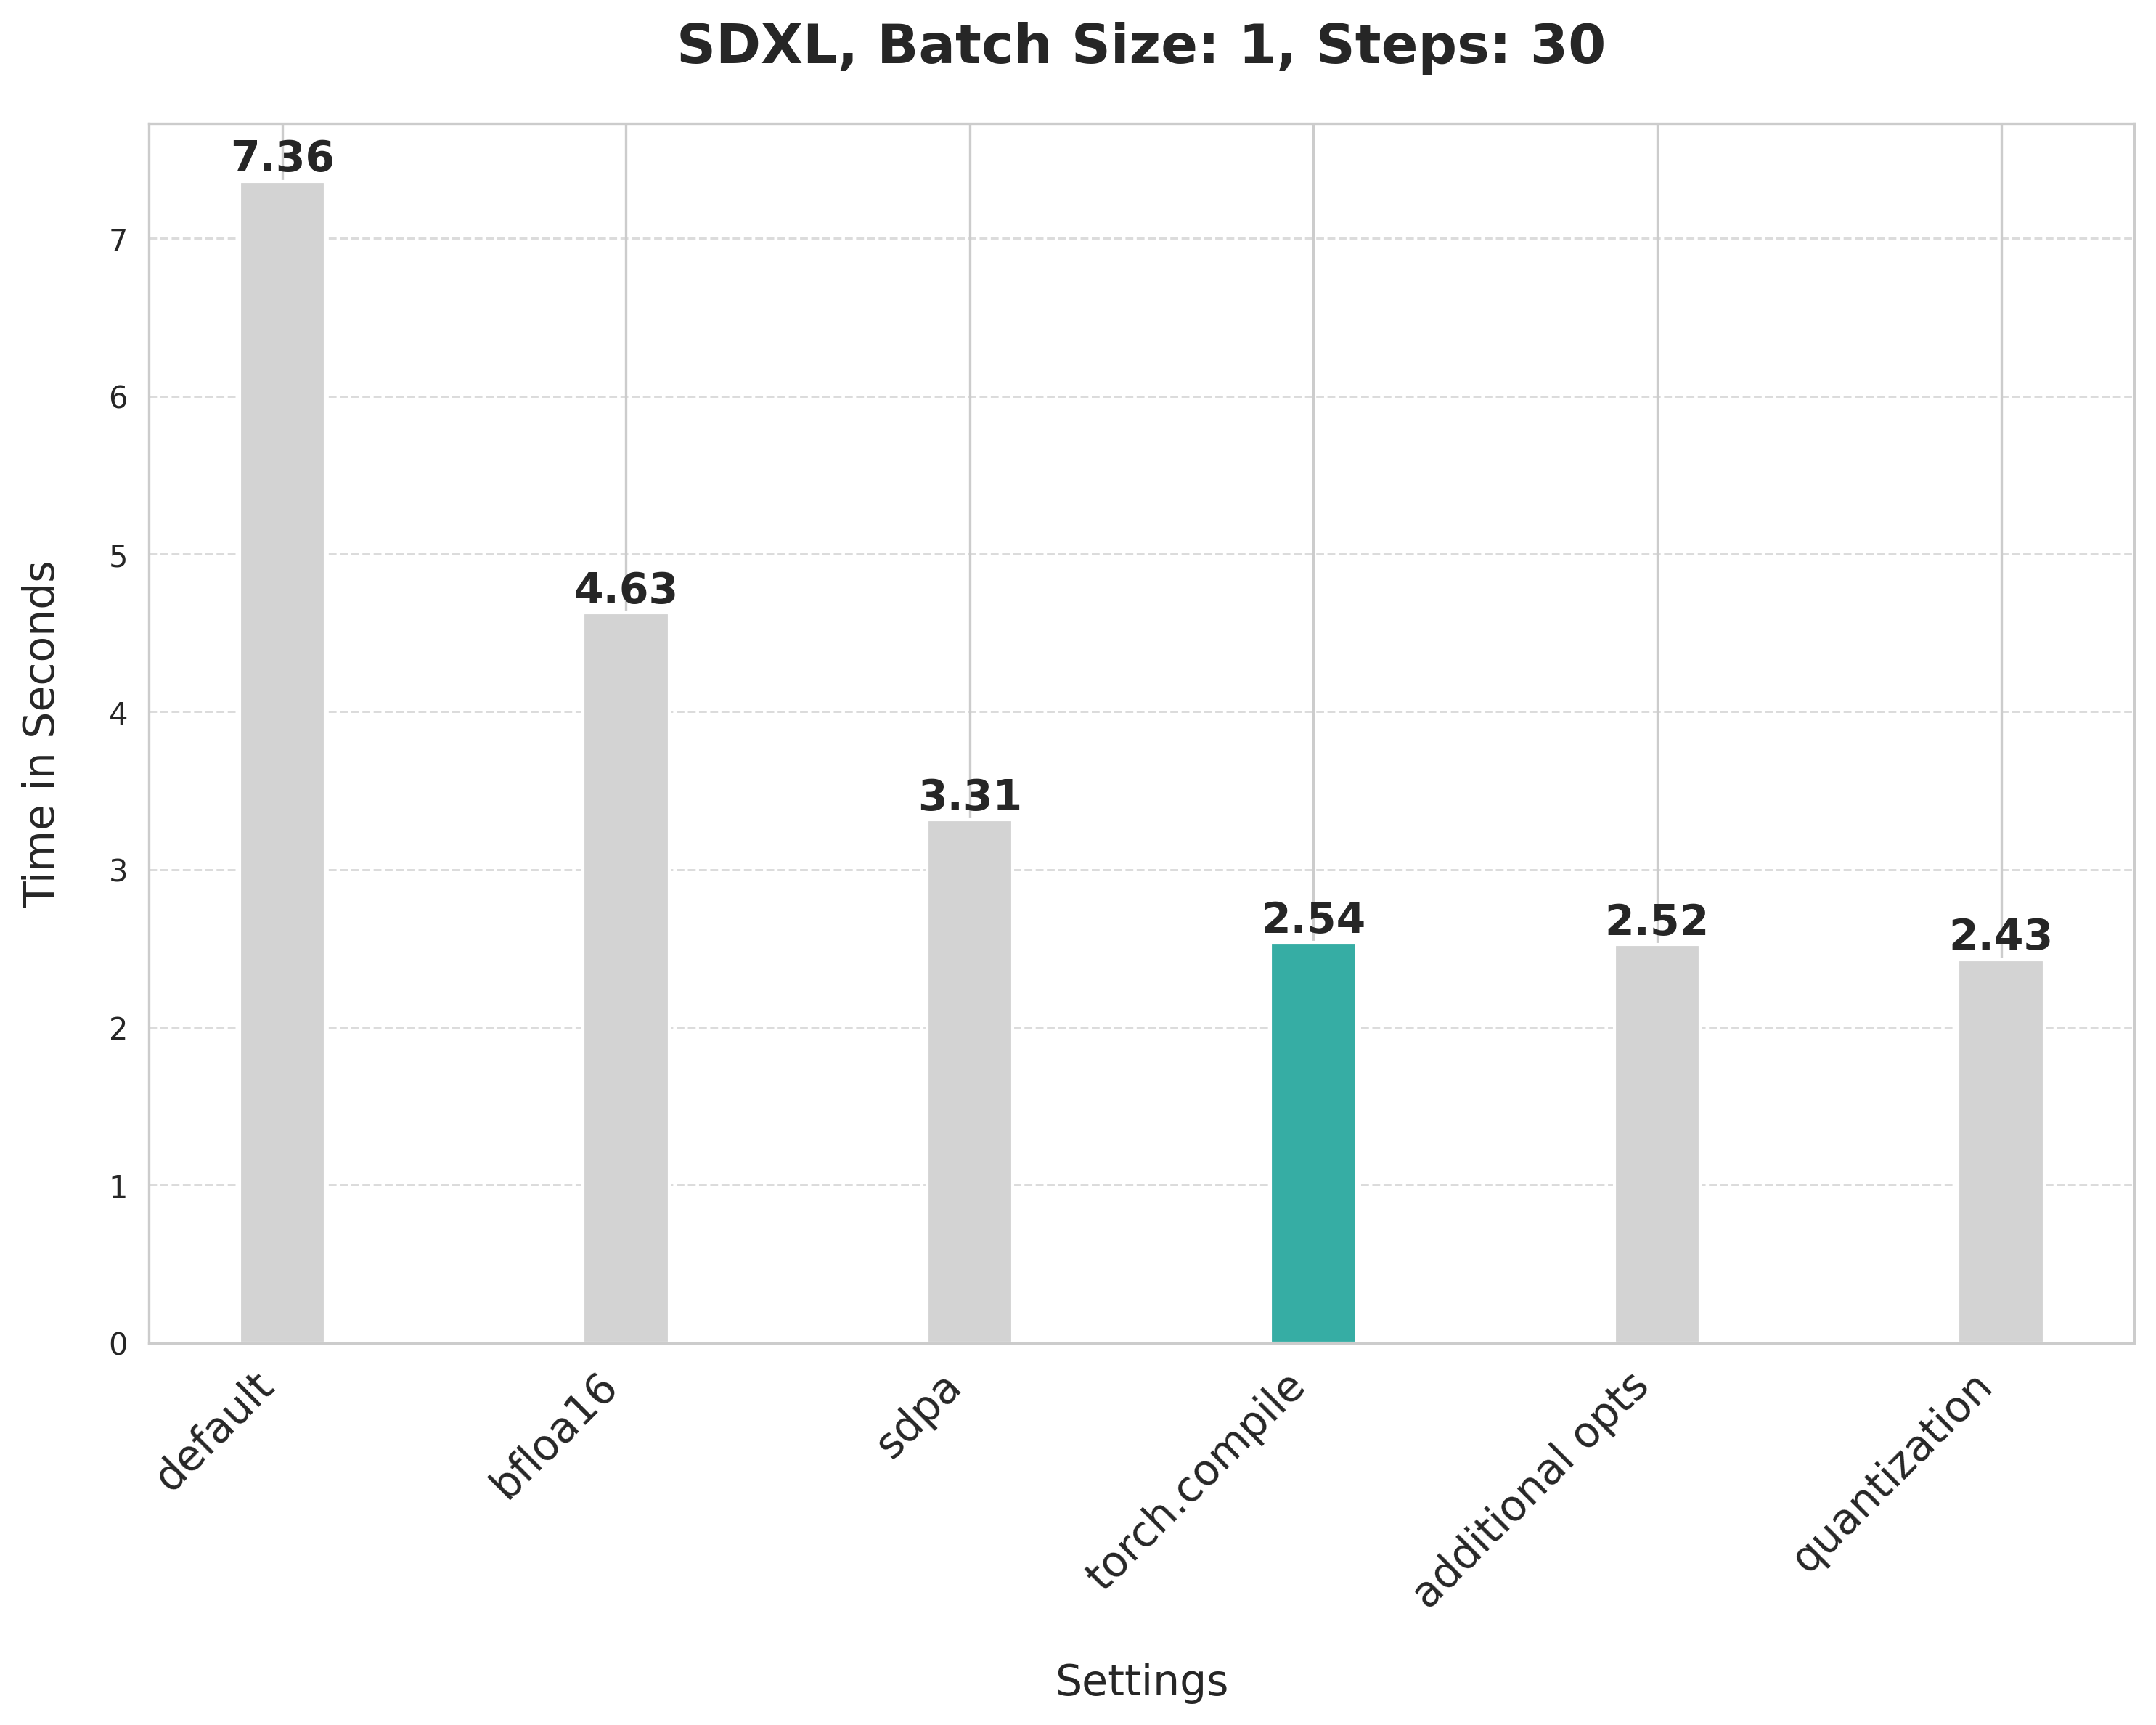
image = pipe(prompt, num_inference_steps=30).images[0]torch.compile 提供了不同的后端和模式。为了获得最大的推理速度,请为 inductor 后端使用 "max-autotune"。"max-autotune" 使用 CUDA 图并专门针对延迟优化编译图。CUDA 图通过使用一种机制通过单个 CPU 操作启动多个 GPU 操作,大大减少了启动 GPU 操作的开销。
使用 SDPA 注意力和编译 UNet 和 VAE 将延迟从 3.31 秒减少到 2.54 秒。
TIP
从 PyTorch 2.3.1 开始,你可以控制 torch.compile() 的缓存行为。这对于 "max-autotune" 等编译模式特别有益,因为它会在多个编译标志上进行网格搜索,以找到最佳配置。更多信息请参阅 torch.compile 中的编译时缓存 教程。
防止图中断
指定 fullgraph=True 可以确保底层模型中没有图中断,从而充分利用 torch.compile 而不会出现性能下降。对于 UNet 和 VAE,这意味着你需要改变访问返回变量的方式。
diff
- latents = unet(
-   latents, timestep=timestep, encoder_hidden_states=prompt_embeds
-).sample

+ latents = unet(
+   latents, timestep=timestep, encoder_hidden_states=prompt_embeds, return_dict=False
+)[0]
编译后移除GPU同步
在迭代反向扩散过程中,每次去噪器预测出较少噪声的潜在嵌入后,都会在调度器上调用step()函数。在step()内部,sigmas变量会被索引,当其放置在GPU上时,会导致CPU和GPU之间的通信同步。这会引入延迟,尤其是在去噪器已经编译完成后更为明显。
但如果sigmas数组始终保持在CPU上,CPU和GPU之间的同步就不会发生,你也不会遇到任何延迟。通常情况下,任何CPU和GPU之间的通信同步应尽可能少,因为这会影响推理延迟。
合并注意力块的投影矩阵
SDXL中的UNet和VAE使用了类似Transformer的块,这些块由注意力块和前馈块组成。
在注意力块中,输入通过三个不同的投影矩阵——Q、K和V——投影到三个子空间中。这些投影分别对输入进行。但我们可以将这些投影矩阵水平合并为一个矩阵,并在一步中完成投影。这增加了输入投影的矩阵乘法规模,并提高了量化的影响。
你可以通过一行代码来合并投影矩阵:
python
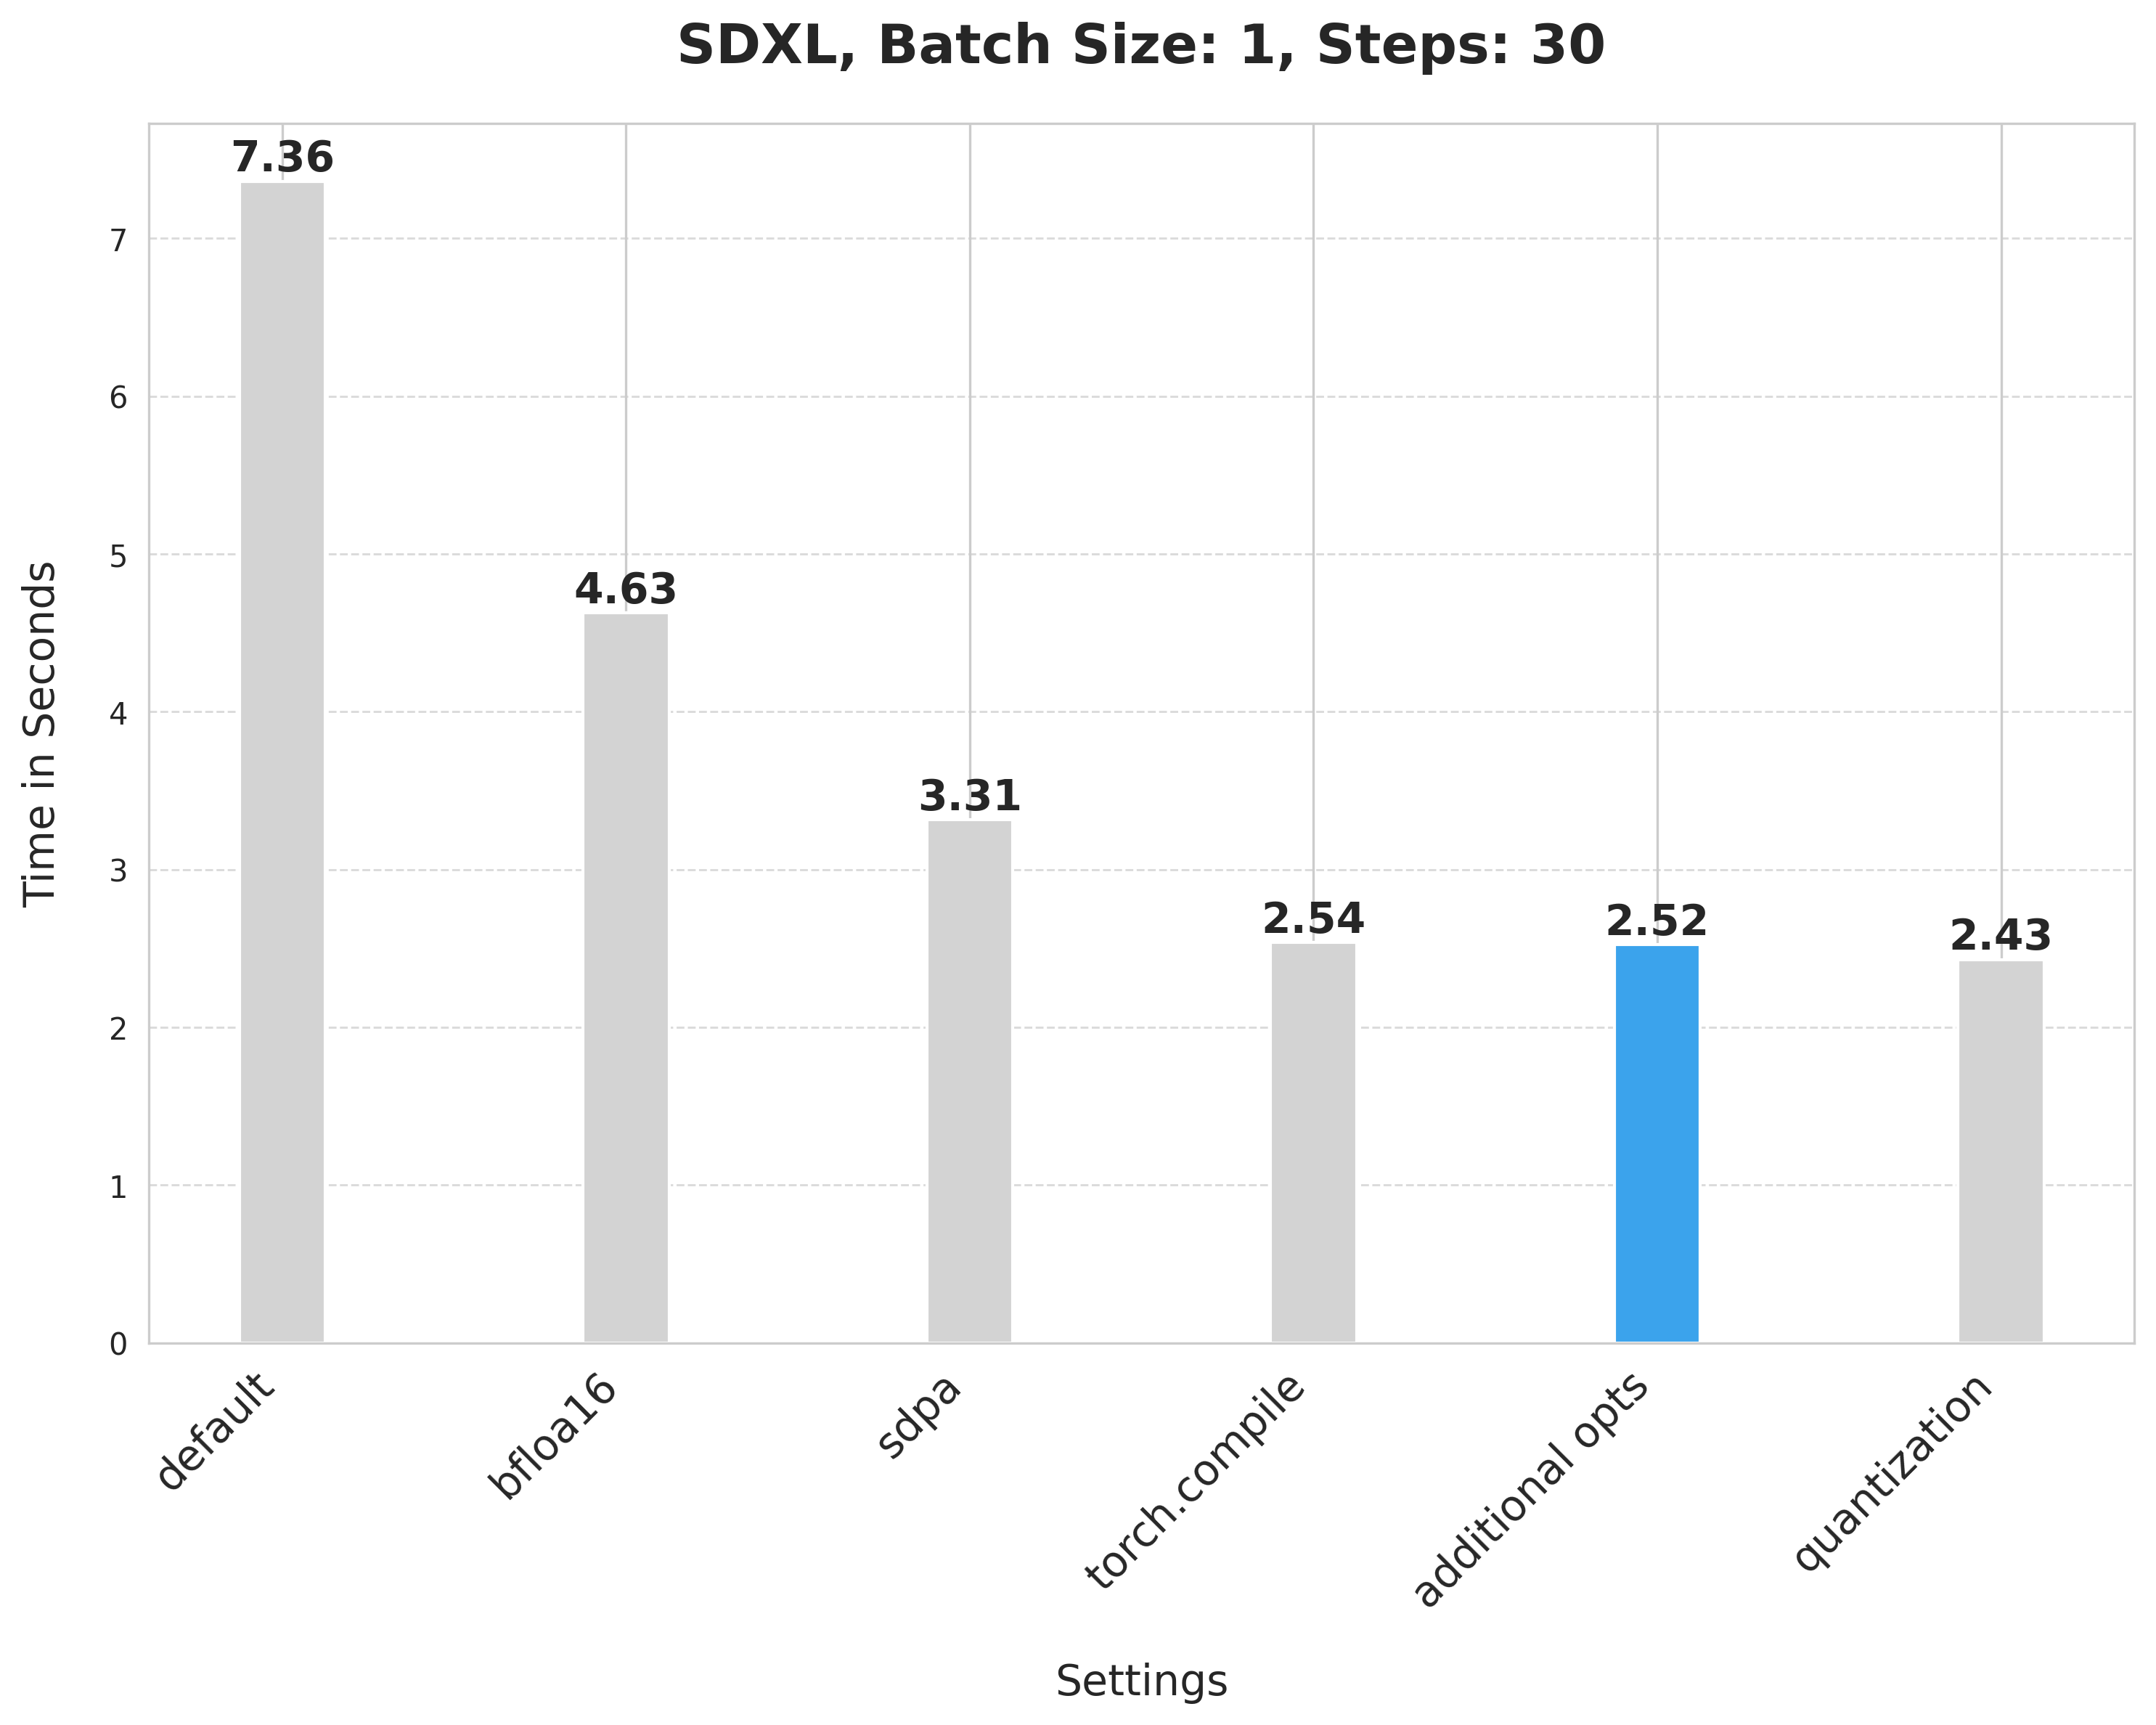
pipe.fuse_qkv_projections()这使得时间从2.54秒略微缩短到2.52秒。
动态量化
你还可以使用超轻量级的PyTorch量化库torchao(提交SHA 54bcd5a10d0abbe7b0c045052029257099f83fd9),将动态int8量化应用于UNet和VAE。量化会为模型增加额外的转换开销,但希望这些开销能通过更快的矩阵乘法(动态量化)得到补偿。如果矩阵乘法太小,这些技术可能会降低性能。
首先,配置所有编译器标签:
python
from diffusers import StableDiffusionXLPipeline
import torch

# Notice the two new flags at the end.
torch._inductor.config.conv_1x1_as_mm = True
torch._inductor.config.coordinate_descent_tuning = True
torch._inductor.config.epilogue_fusion = False
torch._inductor.config.coordinate_descent_check_all_directions = True
torch._inductor.config.force_fuse_int_mm_with_mul = True
torch._inductor.config.use_mixed_mm = True某些UNet和VAE中的线性层无法从动态int8量化中受益。你可以使用下面展示的dynamic_quant_filter_fn来过滤掉这些层。
python
def dynamic_quant_filter_fn(mod, *args):
    return (
        isinstance(mod, torch.nn.Linear)
        and mod.in_features > 16
        and (mod.in_features, mod.out_features)
        not in [
            (1280, 640),
            (1920, 1280),
            (1920, 640),
            (2048, 1280),
            (2048, 2560),
            (2560, 1280),
            (256, 128),
            (2816, 1280),
            (320, 640),
            (512, 1536),
            (512, 256),
            (512, 512),
            (640, 1280),
            (640, 1920),
            (640, 320),
            (640, 5120),
            (640, 640),
            (960, 320),
            (960, 640),
        ]
    )


def conv_filter_fn(mod, *args):
    return (
        isinstance(mod, torch.nn.Conv2d) and mod.kernel_size == (1, 1) and 128 in [mod.in_channels, mod.out_channels]
    )
最后,应用所有前面讨论的优化:
python
# SDPA + bfloat16.
pipe = StableDiffusionXLPipeline.from_pretrained(
    "stabilityai/stable-diffusion-xl-base-1.0", torch_dtype=torch.bfloat16
).to("cuda")

# Combine attention projection matrices.
pipe.fuse_qkv_projections()

# Change the memory layout.
pipe.unet.to(memory_format=torch.channels_last)
pipe.vae.to(memory_format=torch.channels_last)
由于动态量化仅限于线性层,将适当的逐点卷积层转换为线性层以最大化其效益。
python
from torchao import swap_conv2d_1x1_to_linear

swap_conv2d_1x1_to_linear(pipe.unet, conv_filter_fn)
swap_conv2d_1x1_to_linear(pipe.vae, conv_filter_fn)
应用动态量化:
python
from torchao import apply_dynamic_quant

apply_dynamic_quant(pipe.unet, dynamic_quant_filter_fn)
apply_dynamic_quant(pipe.vae, dynamic_quant_filter_fn)
最后,编译并执行推理:
python
pipe.unet = torch.compile(pipe.unet, mode="max-autotune", fullgraph=True)
pipe.vae.decode = torch.compile(pipe.vae.decode, mode="max-autotune", fullgraph=True)
prompt = "Astronaut in a jungle, cold color palette, muted colors, detailed, 8k"
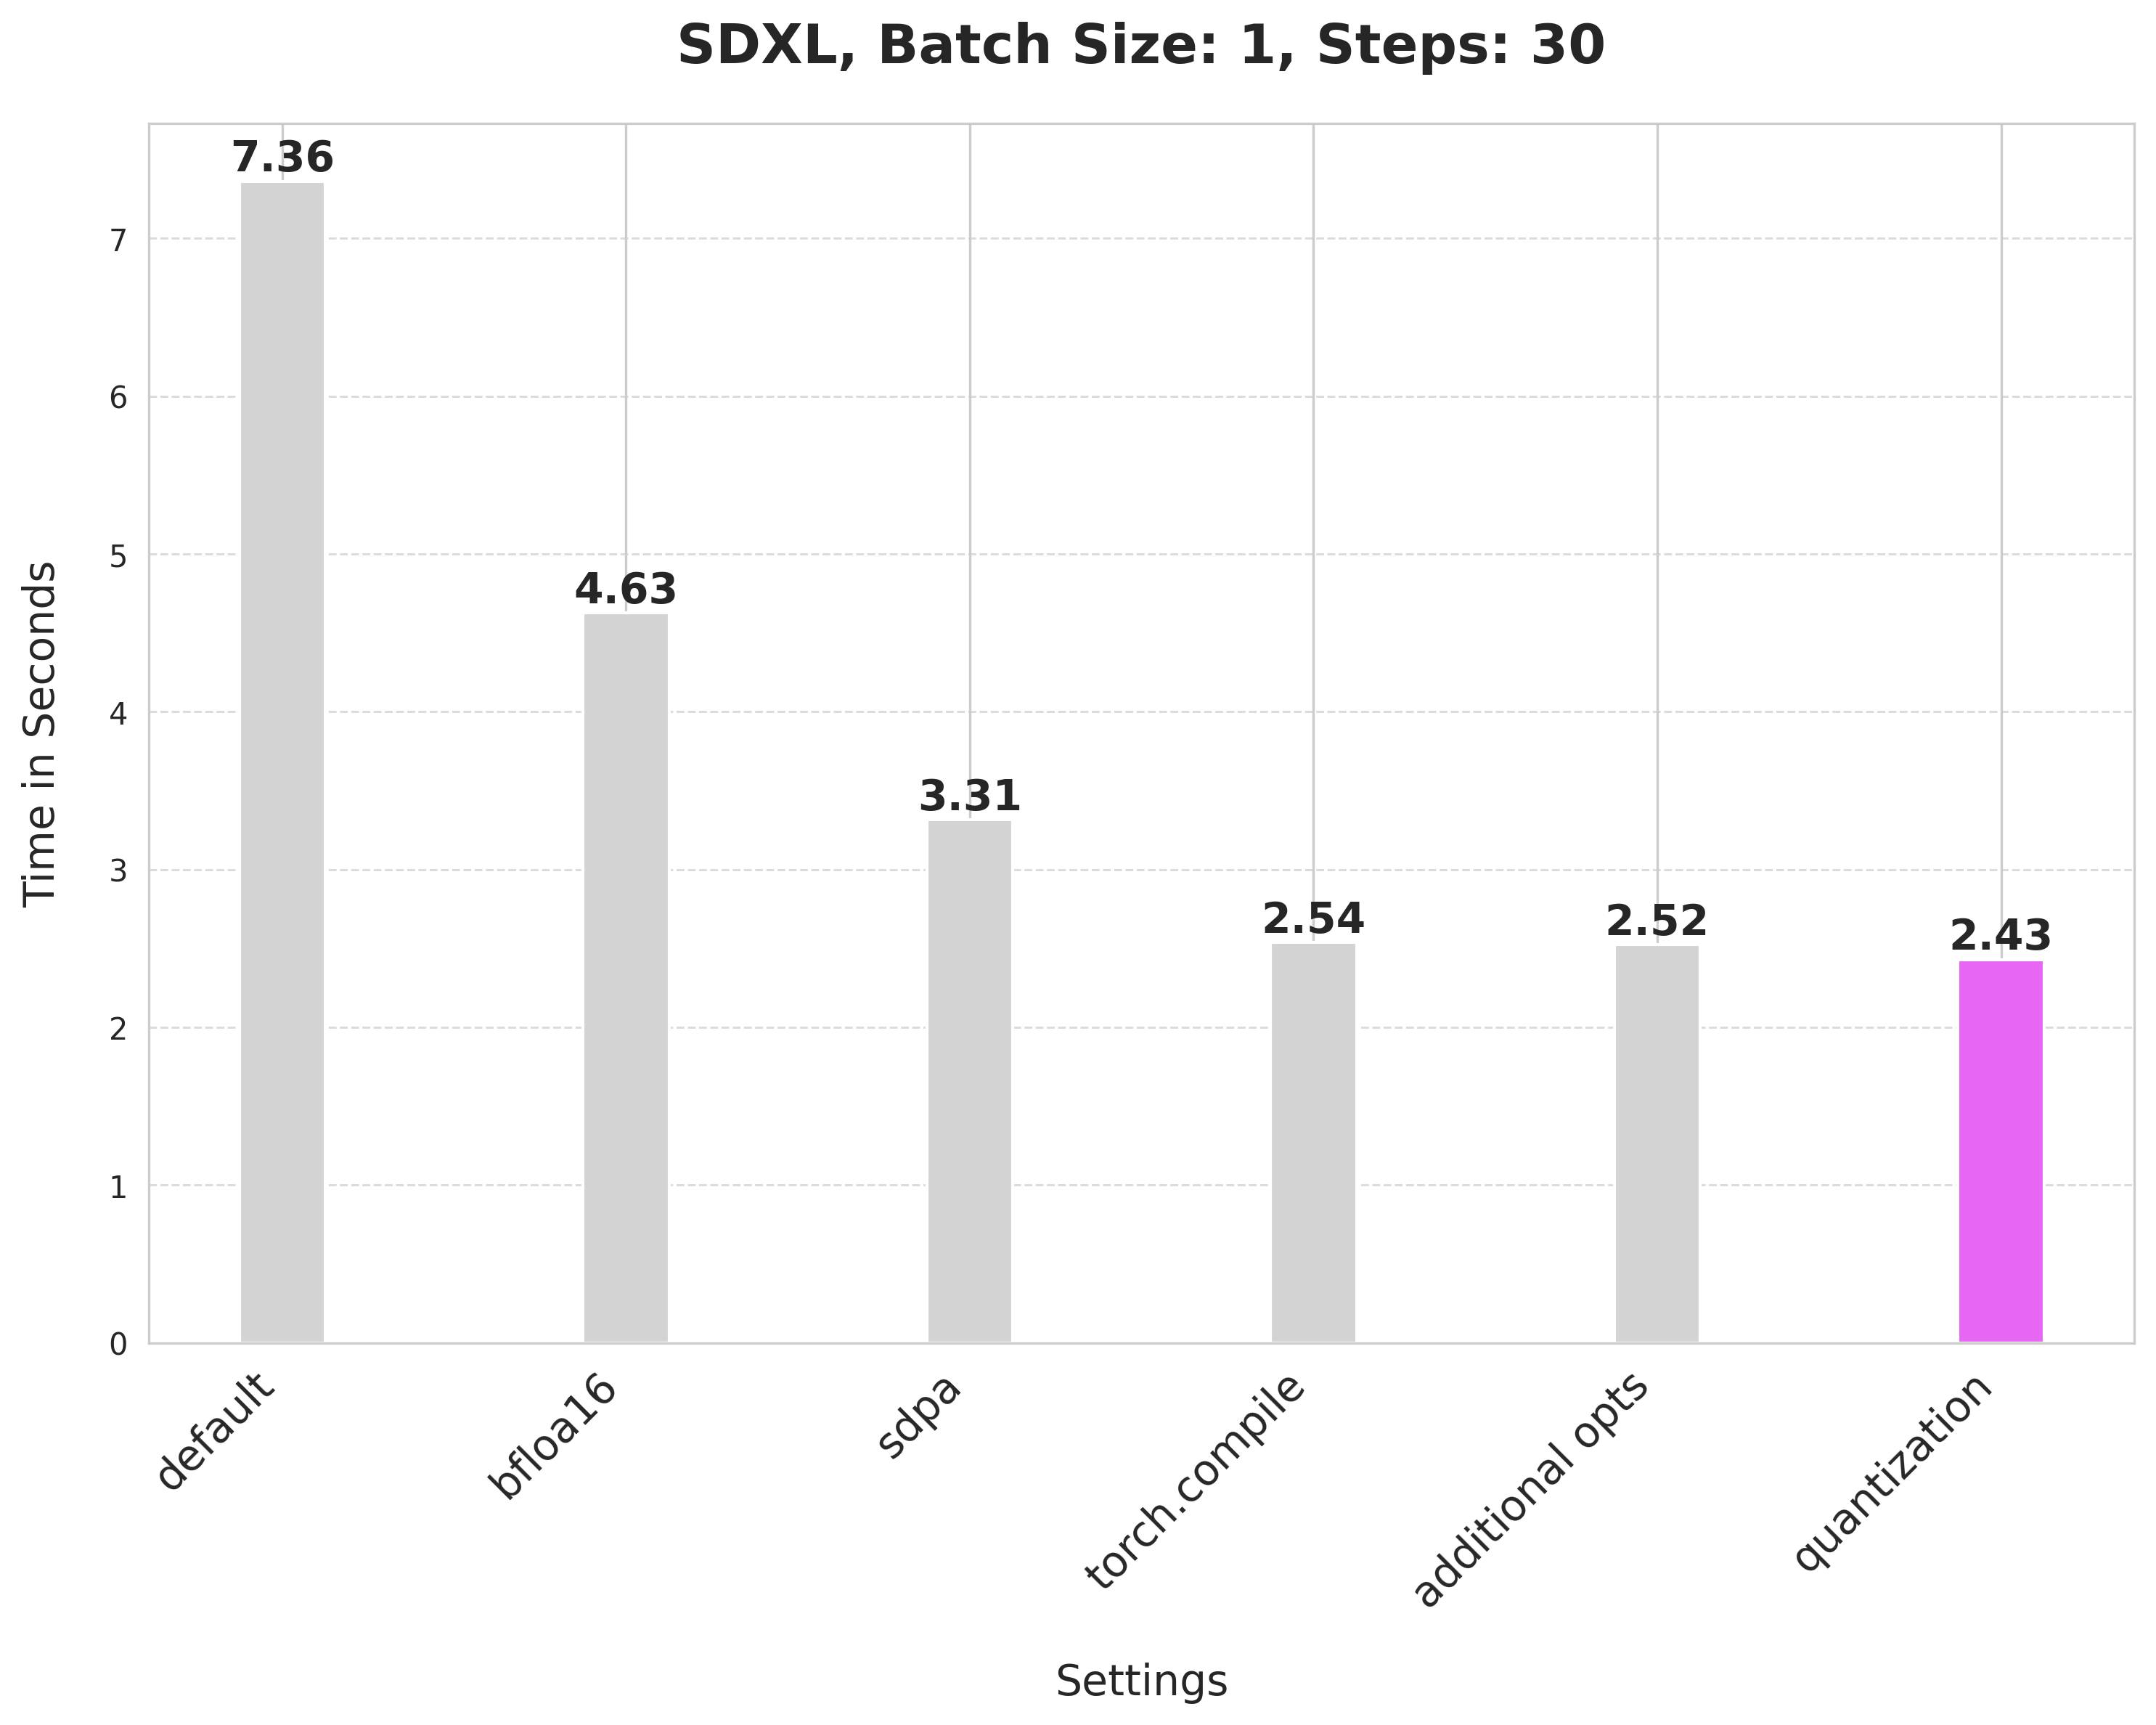
image = pipe(prompt, num_inference_steps=30).images[0]应用动态量化将延迟从2.52秒降低到2.43秒。