
算力平台:
图像修复
[[open-in-colab]]
图像修复可以替换或编辑图像中的特定区域。这使其成为图像修复的有用工具,例如去除缺陷和伪影,甚至用全新的内容替换图像区域。图像修复依赖于一个掩码来确定要填充的图像区域;要修复的区域由白色像素表示,要保留的区域由黑色像素表示。白色像素由提示内容填充。
使用 🤗 Diffusers,你可以这样进行图像修复:
- 使用 [
AutoPipelineForInpainting] 类加载图像修复检查点。这将自动检测并加载基于检查点的适当管道类:
py
import torch
from diffusers import AutoPipelineForInpainting
from diffusers.utils import load_image, make_image_grid

pipeline = AutoPipelineForInpainting.from_pretrained(
    "kandinsky-community/kandinsky-2-2-decoder-inpaint", torch_dtype=torch.float16
)
pipeline.enable_model_cpu_offload()
# remove following line if xFormers is not installed or you have PyTorch 2.0 or higher installed
pipeline.enable_xformers_memory_efficient_attention()- 加载基础图像和蒙版图像:
py
init_image = load_image("https://huggingface.co/datasets/huggingface/documentation-images/resolve/main/diffusers/inpaint.png")
mask_image = load_image("https://huggingface.co/datasets/huggingface/documentation-images/resolve/main/diffusers/inpaint_mask.png")- 创建一个提示,用于在图像中进行修复,并将其与基础图像和掩码图像一起传递给管道:
py
prompt = "a black cat with glowing eyes, cute, adorable, disney, pixar, highly detailed, 8k"
negative_prompt = "bad anatomy, deformed, ugly, disfigured"
image = pipeline(prompt=prompt, negative_prompt=negative_prompt, image=init_image, mask_image=mask_image).images[0]
make_image_grid([init_image, mask_image, image], rows=1, cols=3)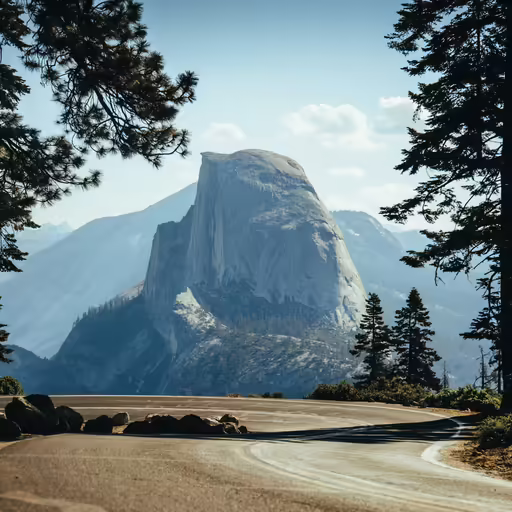


创建遮罩图像
在整个指南中,为了方便起见,所有代码示例中都提供了遮罩图像。你可以对自定义图像进行修复,但需要为它创建一个遮罩图像。使用下面的空间轻松创建遮罩图像。
上传一个基础图像进行修复,并使用绘图工具绘制遮罩。完成后,点击 运行 生成并下载遮罩图像。
遮罩模糊
[~VaeImageProcessor.blur] 方法提供了如何将原始图像和修复区域混合的选项。模糊的程度由 blur_factor 参数决定。增加 blur_factor 会增加应用于遮罩边缘的模糊量,从而软化原始图像和修复区域之间的过渡。较低或为零的 blur_factor 会保留遮罩的锐利边缘。
要使用此功能,可以使用图像处理器创建一个模糊的遮罩。
py
import torch
from diffusers import AutoPipelineForInpainting
from diffusers.utils import load_image
from PIL import Image

pipeline = AutoPipelineForInpainting.from_pretrained("stable-diffusion-v1-5/stable-diffusion-v1-5", torch_dtype=torch.float16).to('cuda')

mask = load_image("https://huggingface.co/datasets/YiYiXu/testing-images/resolve/main/seashore_mask.png")
blurred_mask = pipeline.mask_processor.blur(mask, blur_factor=33)
blurred_mask

流行的模型
Stable Diffusion Inpainting、Stable Diffusion XL (SDXL) Inpainting 和 Kandinsky 2.2 Inpainting 是最受欢迎的修复模型。SDXL 通常生成的图像分辨率比 Stable Diffusion v1.5 更高,而 Kandinsky 2.2 也能生成高质量的图像。
Stable Diffusion Inpainting
Stable Diffusion Inpainting 是一个在 512x512 图像上进行修复的潜在扩散模型。它是一个很好的起点,因为它相对较快且生成的图像质量良好。要使用此模型进行修复,你需要向管道传递一个提示、基础图像和掩码图像:
py
import torch
from diffusers import AutoPipelineForInpainting
from diffusers.utils import load_image, make_image_grid

pipeline = AutoPipelineForInpainting.from_pretrained(
    "runwayml/stable-diffusion-inpainting", torch_dtype=torch.float16, variant="fp16"
)
pipeline.enable_model_cpu_offload()
# remove following line if xFormers is not installed or you have PyTorch 2.0 or higher installed
pipeline.enable_xformers_memory_efficient_attention()

# load base and mask image
init_image = load_image("https://huggingface.co/datasets/huggingface/documentation-images/resolve/main/diffusers/inpaint.png")
mask_image = load_image("https://huggingface.co/datasets/huggingface/documentation-images/resolve/main/diffusers/inpaint_mask.png")

generator = torch.Generator("cuda").manual_seed(92)
prompt = "concept art digital painting of an elven castle, inspired by lord of the rings, highly detailed, 8k"
image = pipeline(prompt=prompt, image=init_image, mask_image=mask_image, generator=generator).images[0]
make_image_grid([init_image, mask_image, image], rows=1, cols=3)
Stable Diffusion XL (SDXL) 图像修复
SDXL 是 Stable Diffusion v1.5 的更大、更强大的版本。该模型可以遵循两阶段模型过程(尽管每个模型也可以单独使用);基础模型生成图像,而精炼模型则在此图像基础上进一步增强其细节和质量。请参阅 SDXL 指南,以获取更详细的使用和配置参数的指南。
py
import torch
from diffusers import AutoPipelineForInpainting
from diffusers.utils import load_image, make_image_grid

pipeline = AutoPipelineForInpainting.from_pretrained(
    "diffusers/stable-diffusion-xl-1.0-inpainting-0.1", torch_dtype=torch.float16, variant="fp16"
)
pipeline.enable_model_cpu_offload()
# remove following line if xFormers is not installed or you have PyTorch 2.0 or higher installed
pipeline.enable_xformers_memory_efficient_attention()

# load base and mask image
init_image = load_image("https://huggingface.co/datasets/huggingface/documentation-images/resolve/main/diffusers/inpaint.png")
mask_image = load_image("https://huggingface.co/datasets/huggingface/documentation-images/resolve/main/diffusers/inpaint_mask.png")

generator = torch.Generator("cuda").manual_seed(92)
prompt = "concept art digital painting of an elven castle, inspired by lord of the rings, highly detailed, 8k"
image = pipeline(prompt=prompt, image=init_image, mask_image=mask_image, generator=generator).images[0]
make_image_grid([init_image, mask_image, image], rows=1, cols=3)
Kandinsky 2.2 图像修复
Kandinsky 模型家族与 SDXL 类似,因为它也使用了两个模型;图像先验模型生成图像嵌入,而扩散模型则从这些嵌入中生成图像。你可以分别加载图像先验模型和扩散模型,但使用 Kandinsky 2.2 最简单的方法是将其加载到 [AutoPipelineForInpainting] 类中,该类在内部使用了 [KandinskyV22InpaintCombinedPipeline]。
py
import torch
from diffusers import AutoPipelineForInpainting
from diffusers.utils import load_image, make_image_grid

pipeline = AutoPipelineForInpainting.from_pretrained(
    "kandinsky-community/kandinsky-2-2-decoder-inpaint", torch_dtype=torch.float16
)
pipeline.enable_model_cpu_offload()
# remove following line if xFormers is not installed or you have PyTorch 2.0 or higher installed
pipeline.enable_xformers_memory_efficient_attention()

# load base and mask image
init_image = load_image("https://huggingface.co/datasets/huggingface/documentation-images/resolve/main/diffusers/inpaint.png")
mask_image = load_image("https://huggingface.co/datasets/huggingface/documentation-images/resolve/main/diffusers/inpaint_mask.png")

generator = torch.Generator("cuda").manual_seed(92)
prompt = "concept art digital painting of an elven castle, inspired by lord of the rings, highly detailed, 8k"
image = pipeline(prompt=prompt, image=init_image, mask_image=mask_image, generator=generator).images[0]
make_image_grid([init_image, mask_image, image], rows=1, cols=3)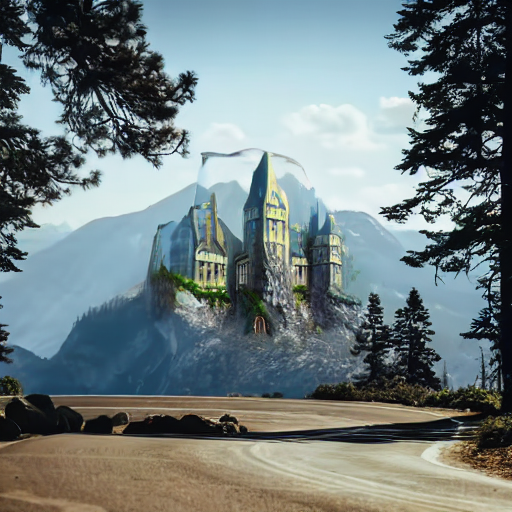


非特定修复检查点
到目前为止,本指南使用了特定的修复检查点,例如 stable-diffusion-v1-5/stable-diffusion-inpainting。但你也可以使用常规检查点,如 stable-diffusion-v1-5/stable-diffusion-v1-5。让我们比较这两种检查点的结果。
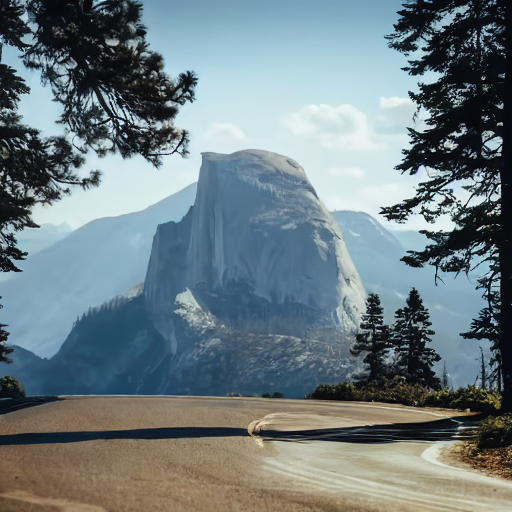
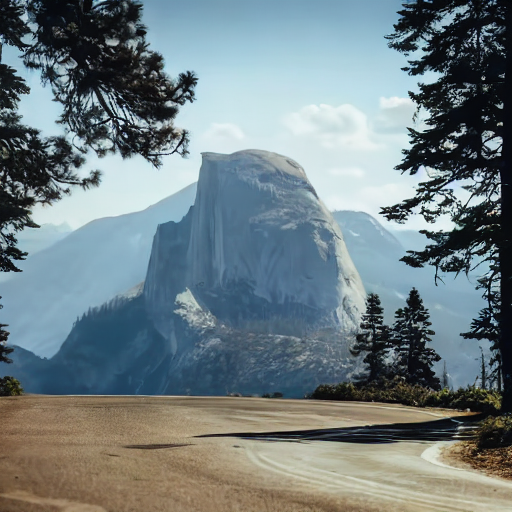
左边的图像是从常规检查点生成的,而右边的图像是从修复检查点生成的。你会立即注意到左边的图像不够干净,仍然可以看到模型需要修复的区域的轮廓。右边的图像则更干净,修复的区域看起来更加自然。


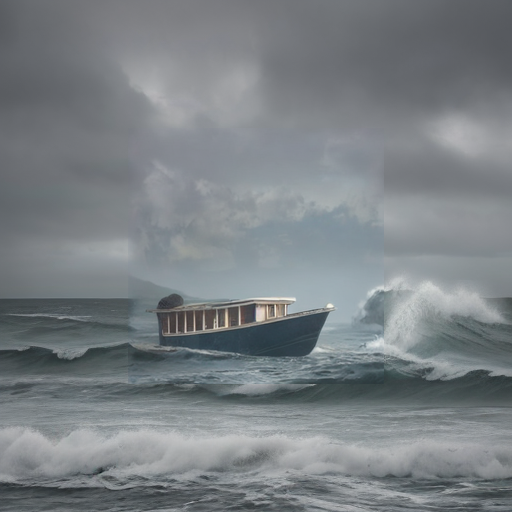
然而,对于一些基本任务,比如从图像中删除一个对象(例如,道路上的石头),普通的检查点就能产生相当不错的效果。普通检查点和修复检查点之间的差异并不那么明显。
使用非特定于修复的检查点的权衡是整体图像质量可能会较低,但它通常倾向于保留掩码区域(这就是为什么你可以看到掩码轮廓)。特定于修复的检查点是专门训练用于生成更高质量的修复图像,这包括在掩码区域和非掩码区域之间创建更自然的过渡。因此,这些检查点更有可能改变你的非掩码区域。
如果你的任务中保留非掩码区域很重要,可以使用 [VaeImageProcessor.apply_overlay] 方法来强制图像的非掩码区域保持不变,但这可能会导致掩码区域和非掩码区域之间的过渡显得更不自然。
py
import PIL
import numpy as np
import torch

from diffusers import AutoPipelineForInpainting
from diffusers.utils import load_image, make_image_grid

device = "cuda"
pipeline = AutoPipelineForInpainting.from_pretrained(
    "runwayml/stable-diffusion-inpainting",
    torch_dtype=torch.float16,
)
pipeline = pipeline.to(device)

img_url = "https://raw.githubusercontent.com/CompVis/latent-diffusion/main/data/inpainting_examples/overture-creations-5sI6fQgYIuo.png"
mask_url = "https://raw.githubusercontent.com/CompVis/latent-diffusion/main/data/inpainting_examples/overture-creations-5sI6fQgYIuo_mask.png"

init_image = load_image(img_url).resize((512, 512))
mask_image = load_image(mask_url).resize((512, 512))

prompt = "Face of a yellow cat, high resolution, sitting on a park bench"
repainted_image = pipeline(prompt=prompt, image=init_image, mask_image=mask_image).images[0]
repainted_image.save("repainted_image.png")

unmasked_unchanged_image = pipeline.image_processor.apply_overlay(mask_image, init_image, repainted_image)
unmasked_unchanged_image.save("force_unmasked_unchanged.png")
make_image_grid([init_image, mask_image, repainted_image, unmasked_unchanged_image], rows=2, cols=2)
配置管道参数
图像特征——如质量与“创意”——取决于管道参数。了解这些参数的作用对于获得你想要的结果至关重要。让我们来看看最重要的参数,并看看改变它们如何影响输出。
强度
strength 是衡量添加到基础图像的噪声量的指标,这会影响输出图像与基础图像的相似程度。
- 📈 较高的
strength值意味着添加到图像的噪声更多,去噪过程会更长,但你会得到质量更高的图像,这些图像与基础图像的差异更大 - 📉 较低的
strength值意味着添加到图像的噪声更少,去噪过程更快,但图像质量可能不会那么好,生成的图像与基础图像更相似
py
import torch
from diffusers import AutoPipelineForInpainting
from diffusers.utils import load_image, make_image_grid

pipeline = AutoPipelineForInpainting.from_pretrained(
    "runwayml/stable-diffusion-inpainting", torch_dtype=torch.float16, variant="fp16"
)
pipeline.enable_model_cpu_offload()
# remove following line if xFormers is not installed or you have PyTorch 2.0 or higher installed
pipeline.enable_xformers_memory_efficient_attention()

# load base and mask image
init_image = load_image("https://huggingface.co/datasets/huggingface/documentation-images/resolve/main/diffusers/inpaint.png")
mask_image = load_image("https://huggingface.co/datasets/huggingface/documentation-images/resolve/main/diffusers/inpaint_mask.png")

prompt = "concept art digital painting of an elven castle, inspired by lord of the rings, highly detailed, 8k"
image = pipeline(prompt=prompt, image=init_image, mask_image=mask_image, strength=0.6).images[0]
make_image_grid([init_image, mask_image, image], rows=1, cols=3)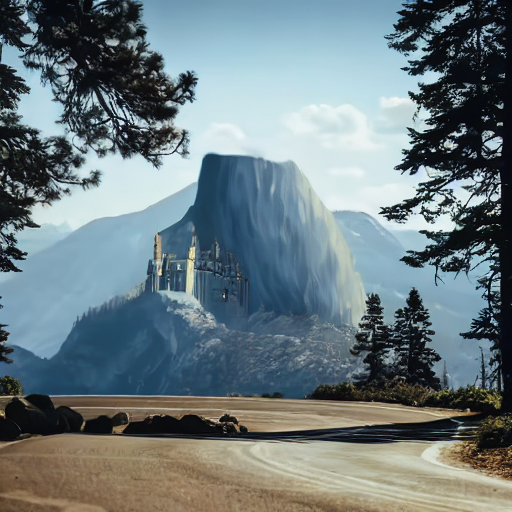


指导尺度
guidance_scale 影响文本提示和生成图像之间的对齐程度。
- 📈 较高的
guidance_scale值意味着提示和生成的图像紧密对齐,因此输出是对提示的更严格解释 - 📉 较低的
guidance_scale值意味着提示和生成的图像对齐较松散,因此输出可能与提示有更大的差异
你可以结合使用 strength 和 guidance_scale 来更精细地控制模型的表达能力。例如,较高的 strength 和 guidance_scale 值组合可以给模型最大的创意自由度。
py
import torch
from diffusers import AutoPipelineForInpainting
from diffusers.utils import load_image, make_image_grid

pipeline = AutoPipelineForInpainting.from_pretrained(
    "runwayml/stable-diffusion-inpainting", torch_dtype=torch.float16, variant="fp16"
)
pipeline.enable_model_cpu_offload()
# remove following line if xFormers is not installed or you have PyTorch 2.0 or higher installed
pipeline.enable_xformers_memory_efficient_attention()

# load base and mask image
init_image = load_image("https://huggingface.co/datasets/huggingface/documentation-images/resolve/main/diffusers/inpaint.png")
mask_image = load_image("https://huggingface.co/datasets/huggingface/documentation-images/resolve/main/diffusers/inpaint_mask.png")

prompt = "concept art digital painting of an elven castle, inspired by lord of the rings, highly detailed, 8k"
image = pipeline(prompt=prompt, image=init_image, mask_image=mask_image, guidance_scale=2.5).images[0]
make_image_grid([init_image, mask_image, image], rows=1, cols=3)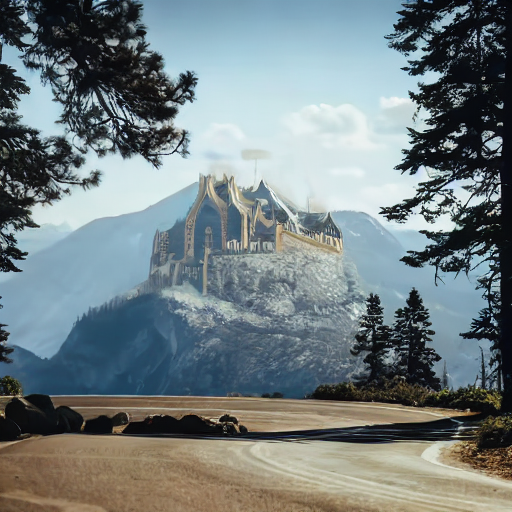


负面提示
负面提示的作用与普通提示相反;它引导模型避免在图像中生成某些内容。这有助于快速提高图像质量,并防止模型生成你不希望出现的内容。
py
import torch
from diffusers import AutoPipelineForInpainting
from diffusers.utils import load_image, make_image_grid

pipeline = AutoPipelineForInpainting.from_pretrained(
    "runwayml/stable-diffusion-inpainting", torch_dtype=torch.float16, variant="fp16"
)
pipeline.enable_model_cpu_offload()
# remove following line if xFormers is not installed or you have PyTorch 2.0 or higher installed
pipeline.enable_xformers_memory_efficient_attention()

# load base and mask image
init_image = load_image("https://huggingface.co/datasets/huggingface/documentation-images/resolve/main/diffusers/inpaint.png")
mask_image = load_image("https://huggingface.co/datasets/huggingface/documentation-images/resolve/main/diffusers/inpaint_mask.png")

prompt = "concept art digital painting of an elven castle, inspired by lord of the rings, highly detailed, 8k"
negative_prompt = "bad architecture, unstable, poor details, blurry"
image = pipeline(prompt=prompt, negative_prompt=negative_prompt, image=init_image, mask_image=mask_image).images[0]
make_image_grid([init_image, mask_image, image], rows=1, cols=3)
填充掩码裁剪
提高图像修复质量的一种方法是使用 padding_mask_crop 参数。启用此选项后,它会根据用户指定的填充值裁剪掩码区域,并且也会从原始图像中裁剪相同的区域。图像和掩码会被放大到更高的分辨率进行修复,然后再叠加到原始图像上。这是一种快速且简单的方法,可以在不使用单独的管道(如 [StableDiffusionUpscalePipeline])的情况下提高图像质量。
在管道调用中添加 padding_mask_crop 参数,并将其设置为你希望的填充值。
py
import torch
from diffusers import AutoPipelineForInpainting
from diffusers.utils import load_image
from PIL import Image

generator = torch.Generator(device='cuda').manual_seed(0)
pipeline = AutoPipelineForInpainting.from_pretrained("stable-diffusion-v1-5/stable-diffusion-v1-5", torch_dtype=torch.float16).to('cuda')

base = load_image("https://huggingface.co/datasets/YiYiXu/testing-images/resolve/main/seashore.png")
mask = load_image("https://huggingface.co/datasets/YiYiXu/testing-images/resolve/main/seashore_mask.png")

image = pipeline("boat", image=base, mask_image=mask, strength=0.75, generator=generator, padding_mask_crop=32).images[0]
image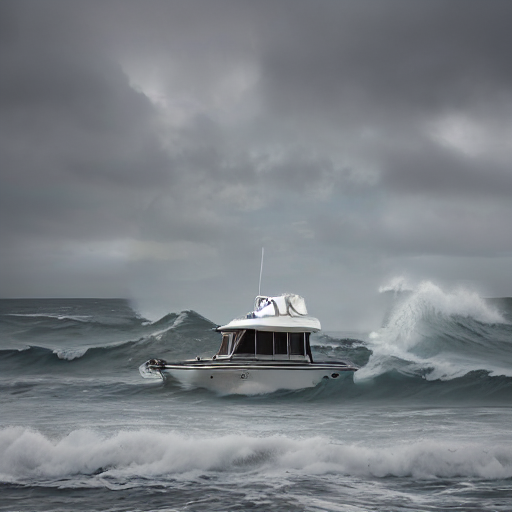
连接的图像修复管道
[AutoPipelineForInpainting] 可以与其他 🤗 Diffusers 管道连接,以编辑它们的输出。这通常有助于提高其他扩散管道的输出质量,如果你使用多个管道,将它们连接起来可以更高效地利用内存,因为可以在潜在空间中保持输出并重用相同的管道组件。
文本到图像到修复
将文本到图像和修复管道连接起来,可以让你修复生成的图像,而无需提供基础图像。这使得编辑你最喜欢的文本到图像输出变得非常方便,而无需生成全新的图像。
首先使用文本到图像管道创建一座城堡:
py
import torch
from diffusers import AutoPipelineForText2Image, AutoPipelineForInpainting
from diffusers.utils import load_image, make_image_grid

pipeline = AutoPipelineForText2Image.from_pretrained(
    "stable-diffusion-v1-5/stable-diffusion-v1-5", torch_dtype=torch.float16, variant="fp16", use_safetensors=True
)
pipeline.enable_model_cpu_offload()
# remove following line if xFormers is not installed or you have PyTorch 2.0 or higher installed
pipeline.enable_xformers_memory_efficient_attention()

text2image = pipeline("concept art digital painting of an elven castle, inspired by lord of the rings, highly detailed, 8k").images[0]
加载上面输出的掩码图像:
py
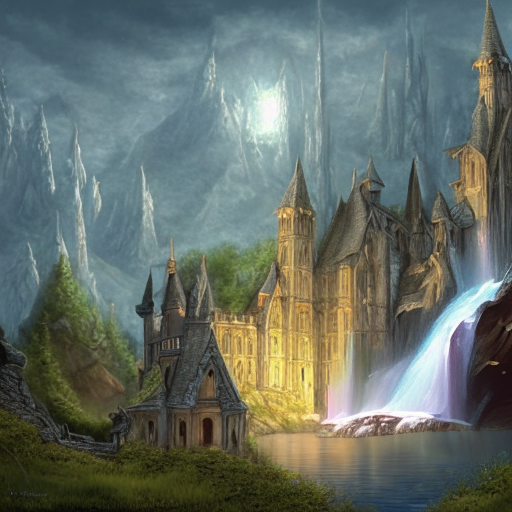
mask_image = load_image("https://huggingface.co/datasets/huggingface/documentation-images/resolve/main/diffusers/inpaint_text-chain-mask.png")让我们用瀑布来填充遮罩区域:
py
pipeline = AutoPipelineForInpainting.from_pretrained(
    "kandinsky-community/kandinsky-2-2-decoder-inpaint", torch_dtype=torch.float16
)
pipeline.enable_model_cpu_offload()
# remove following line if xFormers is not installed or you have PyTorch 2.0 or higher installed
pipeline.enable_xformers_memory_efficient_attention()

prompt = "digital painting of a fantasy waterfall, cloudy"
image = pipeline(prompt=prompt, image=text2image, mask_image=mask_image).images[0]
make_image_grid([text2image, mask_image, image], rows=1, cols=3)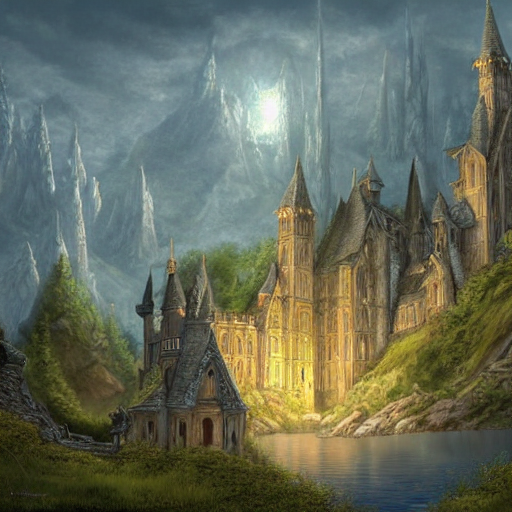
从修复到图像到图像
你也可以在另一个管道(如图像到图像或放大器)之前连接一个修复管道,以提高质量。
首先对图像进行修复:
py
import torch
from diffusers import AutoPipelineForInpainting, AutoPipelineForImage2Image
from diffusers.utils import load_image, make_image_grid

pipeline = AutoPipelineForInpainting.from_pretrained(
    "runwayml/stable-diffusion-inpainting", torch_dtype=torch.float16, variant="fp16"
)
pipeline.enable_model_cpu_offload()
# remove following line if xFormers is not installed or you have PyTorch 2.0 or higher installed
pipeline.enable_xformers_memory_efficient_attention()

# load base and mask image
init_image = load_image("https://huggingface.co/datasets/huggingface/documentation-images/resolve/main/diffusers/inpaint.png")
mask_image = load_image("https://huggingface.co/datasets/huggingface/documentation-images/resolve/main/diffusers/inpaint_mask.png")

prompt = "concept art digital painting of an elven castle, inspired by lord of the rings, highly detailed, 8k"
image_inpainting = pipeline(prompt=prompt, image=init_image, mask_image=mask_image).images[0]

# resize image to 1024x1024 for SDXL
image_inpainting = image_inpainting.resize((1024, 1024))
现在让我们将图像传递给另一个使用 SDXL 的 refiner 模型的修复管道,以增强图像的细节和质量:
py
pipeline = AutoPipelineForInpainting.from_pretrained(
    "stabilityai/stable-diffusion-xl-refiner-1.0", torch_dtype=torch.float16, variant="fp16"
)
pipeline.enable_model_cpu_offload()
# remove following line if xFormers is not installed or you have PyTorch 2.0 or higher installed
pipeline.enable_xformers_memory_efficient_attention()

image = pipeline(prompt=prompt, image=image_inpainting, mask_image=mask_image, output_type="latent").images[0]
最后,你可以将这张图片传递给图像到图像的管道,以完成最后的润色。使用 [~AutoPipelineForImage2Image.from_pipe] 方法重用现有的管道组件会更高效,从而避免不必要的将所有管道组件再次加载到内存中。
py
pipeline = AutoPipelineForImage2Image.from_pipe(pipeline)
# remove following line if xFormers is not installed or you have PyTorch 2.0 or higher installed
pipeline.enable_xformers_memory_efficient_attention()

image = pipeline(prompt=prompt, image=image).images[0]
make_image_grid([init_image, mask_image, image_inpainting, image], rows=2, cols=2)
图像到图像和修复实际上是相当相似的任务。图像到图像生成一张与提供的现有图像相似的新图像。修复也做同样的事情,但它仅转换由掩码定义的图像区域,而图像的其余部分保持不变。你可以将修复视为一个更精确的工具,用于进行特定的更改,而图像到图像则具有更广泛的范围,可以进行更广泛的更改。
控制图像生成
让图像完全按照你想要的样子生成是具有挑战性的,因为去噪过程是随机的。虽然你可以通过配置 negative_prompt 等参数来控制生成的某些方面,但还有更好、更高效的方法来控制图像生成。
提示权重
提示权重提供了一种可量化的手段来调整提示中概念的表示。你可以使用它来增加或减少提示中每个概念的文本嵌入向量的幅度,从而决定生成的每个概念的多少。Compel 库提供了一种直观的语法来调整提示权重并生成嵌入。请参阅 提示权重 指南,了解如何创建嵌入。
生成嵌入后,将它们传递给 [AutoPipelineForInpainting] 中的 prompt_embeds(如果你使用了负提示,则传递 negative_prompt_embeds)参数。嵌入将替换 prompt 参数:
py
import torch
from diffusers import AutoPipelineForInpainting
from diffusers.utils import make_image_grid

pipeline = AutoPipelineForInpainting.from_pretrained(
    "runwayml/stable-diffusion-inpainting", torch_dtype=torch.float16,
)
pipeline.enable_model_cpu_offload()
# remove following line if xFormers is not installed or you have PyTorch 2.0 or higher installed
pipeline.enable_xformers_memory_efficient_attention()

image = pipeline(prompt_embeds=prompt_embeds, # generated from Compel
    negative_prompt_embeds=negative_prompt_embeds, # generated from Compel
    image=init_image,
    mask_image=mask_image
).images[0]
make_image_grid([init_image, mask_image, image], rows=1, cols=3)
ControlNet
ControlNet 模型与其他扩散模型(如 Stable Diffusion)结合使用,提供了一种更加灵活和准确的图像生成控制方式。ControlNet 接受一个额外的条件图像输入,该输入指导扩散模型保留其中的特征。
例如,让我们使用在修复图像上预训练的 ControlNet 来条件化一个图像:
py
import torch
import numpy as np
from diffusers import ControlNetModel, StableDiffusionControlNetInpaintPipeline
from diffusers.utils import load_image, make_image_grid
# load ControlNet
controlnet = ControlNetModel.from_pretrained("lllyasviel/control_v11p_sd15_inpaint", torch_dtype=torch.float16, variant="fp16")
# pass ControlNet to the pipeline
pipeline = StableDiffusionControlNetInpaintPipeline.from_pretrained(
"runwayml/stable-diffusion-inpainting", controlnet=controlnet, torch_dtype=torch.float16, variant="fp16"
)
pipeline.enable_model_cpu_offload()
# remove following line if xFormers is not installed or you have PyTorch 2.0 or higher installed
pipeline.enable_xformers_memory_efficient_attention()
# load base and mask image
init_image = load_image("https://huggingface.co/datasets/huggingface/documentation-images/resolve/main/diffusers/inpaint.png")
mask_image = load_image("https://huggingface.co/datasets/huggingface/documentation-images/resolve/main/diffusers/inpaint_mask.png")
# prepare control image
def make_inpaint_condition(init_image, mask_image):
init_image = np.array(init_image.convert("RGB")).astype(np.float32) / 255.0
mask_image = np.array(mask_image.convert("L")).astype(np.float32) / 255.0
assert init_image.shape[0:1] == mask_image.shape[0:1], "image and image_mask must have the same image size"
init_image[mask_image > 0.5] = -1.0 # set as masked pixel
init_image = np.expand_dims(init_image, 0).transpose(0, 3, 1, 2)
init_image = torch.from_numpy(init_image)
return init_image
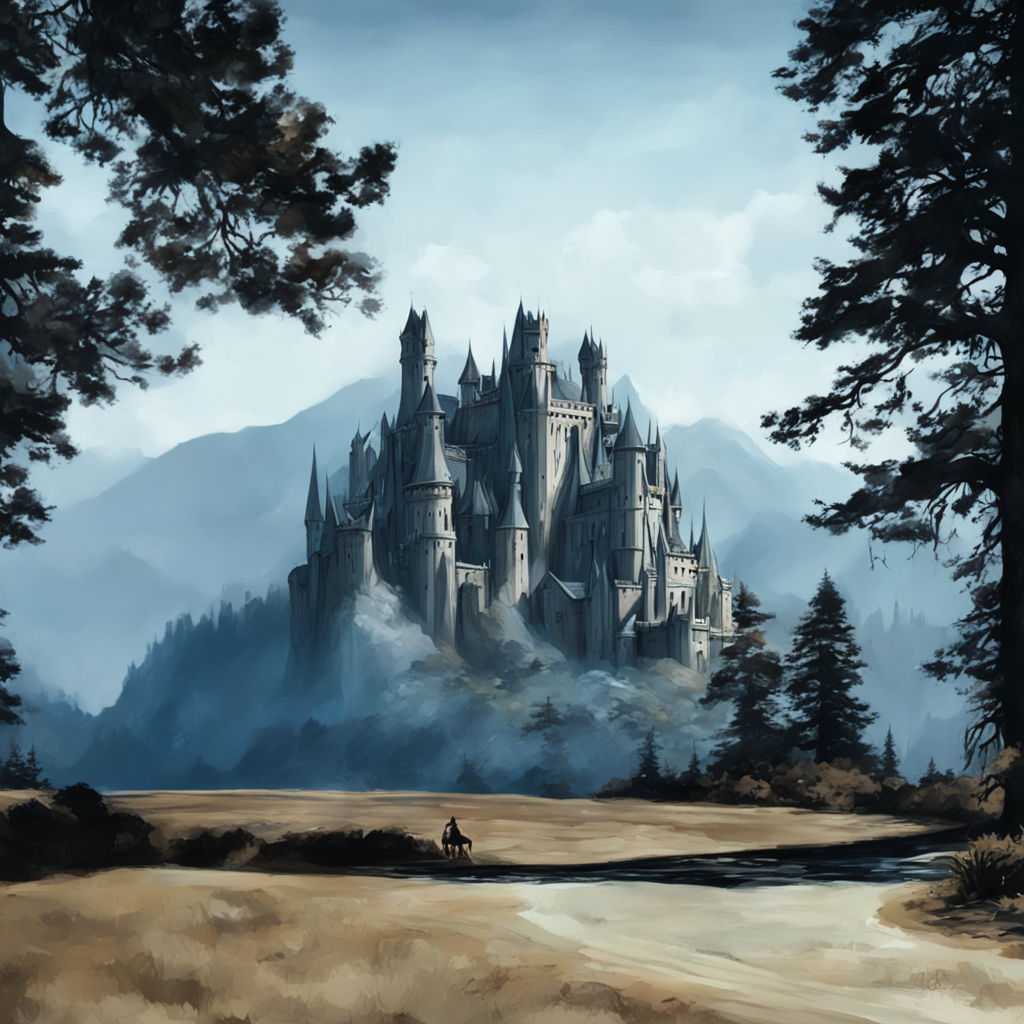
control_image = make_inpaint_condition(init_image, mask_image)现在从基础图像、掩码图像和控制图像生成一张图像。你会注意到,生成的图像中强烈保留了基础图像的特征。
py
prompt = "concept art digital painting of an elven castle, inspired by lord of the rings, highly detailed, 8k"
image = pipeline(prompt=prompt, image=init_image, mask_image=mask_image, control_image=control_image).images[0]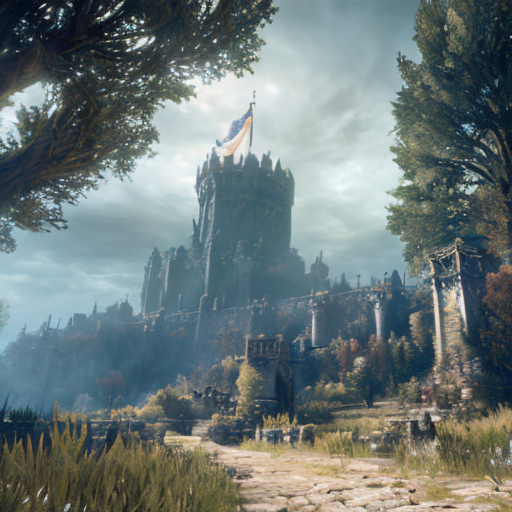
make_image_grid([init_image, mask_image, PIL.Image.fromarray(np.uint8(control_image[0][0])).convert('RGB'), image], rows=2, cols=2)你可以更进一步,将它与图像到图像的管道链起来,以应用新的风格:
py
from diffusers import AutoPipelineForImage2Image

pipeline = AutoPipelineForImage2Image.from_pretrained(
    "nitrosocke/elden-ring-diffusion", torch_dtype=torch.float16,
)
pipeline.enable_model_cpu_offload()
# remove following line if xFormers is not installed or you have PyTorch 2.0 or higher installed
pipeline.enable_xformers_memory_efficient_attention()

prompt = "elden ring style castle" # include the token "elden ring style" in the prompt
negative_prompt = "bad architecture, deformed, disfigured, poor details"

image_elden_ring = pipeline(prompt, negative_prompt=negative_prompt, image=image).images[0]
make_image_grid([init_image, mask_image, image, image_elden_ring], rows=2, cols=2)
优化
如果你的资源有限,运行扩散模型可能会很困难且缓慢,但通过一些优化技巧,这并不一定如此。你可以启用的最大(也是最简单的)优化之一是切换到内存高效的注意力机制。如果你使用的是 PyTorch 2.0,缩放点积注意力 会自动启用,你无需进行其他操作。对于非 PyTorch 2.0 用户,你可以安装并使用 xFormers 的内存高效注意力机制实现。这两种选项都能减少内存使用并加速推理。
你还可以将模型卸载到 CPU 以节省更多内存:
diff
+ pipeline.enable_xformers_memory_efficient_attention()
+ pipeline.enable_model_cpu_offload()
要进一步加速你的推理代码,可以使用 torch_compile。你应该将 torch.compile 包裹在管道中最耗时的组件上,通常是 UNet:
py
pipeline.unet = torch.compile(pipeline.unet, mode="reduce-overhead", fullgraph=True)