算力平台:
[[open-in-colab]]
快速导览
扩散模型被训练用于逐步去噪随机高斯噪声,以生成感兴趣的样本,例如图像或音频。这引发了生成式 AI 的极大兴趣,你可能已经在互联网上看到过扩散生成的图像。🧨 Diffusers 是一个旨在让扩散模型广泛可用的库。
无论你是开发者还是普通用户,本快速导览将向你介绍 🧨 Diffusers,并帮助你快速上手生成内容!该库有三个主要组件需要了解:
- [
DiffusionPipeline] 是一个高级的端到端类,旨在从预训练的扩散模型中快速生成样本用于推理。 - 流行的预训练 模型 架构和模块,可用作创建扩散系统的构建块。
- 许多不同的 调度器 - 控制训练时如何添加噪声以及推理时如何生成去噪图像的算法。
本快速导览将向你展示如何使用 [DiffusionPipeline] 进行推理,然后逐步介绍如何组合模型和调度器以复制 [DiffusionPipeline] 内部发生的过程。
在开始之前,请确保你已安装所有必要的库:
py
# uncomment to install the necessary libraries in Colab
#!pip install --upgrade diffusers accelerate transformers- 🤗 Accelerate 加速了模型加载以进行推理和训练。
- 🤗 Transformers 是运行最流行的扩散模型(如 Stable Diffusion)所必需的。
DiffusionPipeline
[DiffusionPipeline] 是使用预训练扩散系统进行推理的最简单方式。它是一个端到端的系统,包含了模型和调度器。你可以直接使用 [DiffusionPipeline] 来完成许多任务。查看下表了解一些支持的任务,要查看完整的支持任务列表,请查看 🧨 Diffusers 概述。
| Task | Description | Pipeline |
|---|---|---|
| Unconditional Image Generation | generate an image from Gaussian noise | unconditional_image_generation |
| Text-Guided Image Generation | generate an image given a text prompt | conditional_image_generation |
| Text-Guided Image-to-Image Translation | adapt an image guided by a text prompt | img2img |
| Text-Guided Image-Inpainting | fill the masked part of an image given the image, the mask and a text prompt | inpaint |
| Text-Guided Depth-to-Image Translation | adapt parts of an image guided by a text prompt while preserving structure via depth estimation | depth2img |
首先创建一个[DiffusionPipeline]实例,并指定你想要下载的管道检查点。 你可以使用[DiffusionPipeline]加载存储在Hugging Face Hub上的任何检查点。 在本快速游览中,你将加载用于文本到图像生成的stable-diffusion-v1-5检查点。
使用[~DiffusionPipeline.from_pretrained]方法加载模型:
python
>>> from diffusers import DiffusionPipeline

>>> pipeline = DiffusionPipeline.from_pretrained("stable-diffusion-v1-5/stable-diffusion-v1-5", use_safetensors=True)[DiffusionPipeline]会下载并缓存所有建模、标记化和调度组件。你会看到,Stable Diffusion 管道由[UNet2DConditionModel]和[PNDMScheduler]等组件组成:
py
>>> pipeline
StableDiffusionPipeline {
  "_class_name": "StableDiffusionPipeline",
  "_diffusers_version": "0.21.4",
  ...,
  "scheduler": [
    "diffusers",
    "PNDMScheduler"
  ],
  ...,
  "unet": [
    "diffusers",
    "UNet2DConditionModel"
  ],
  "vae": [
    "diffusers",
    "AutoencoderKL"
  ]
}
我们强烈建议在 GPU 上运行管道,因为模型大约包含 14 亿个参数。你可以像在 PyTorch 中一样将生成器对象移动到 GPU:
python
>>> pipeline.to("cuda")现在你可以将文本提示传递给 pipeline 以生成图像,然后访问去噪后的图像。默认情况下,图像输出被包装在PIL.Image对象中。
python
>>> image = pipeline("An image of a squirrel in Picasso style").images[0]
>>> image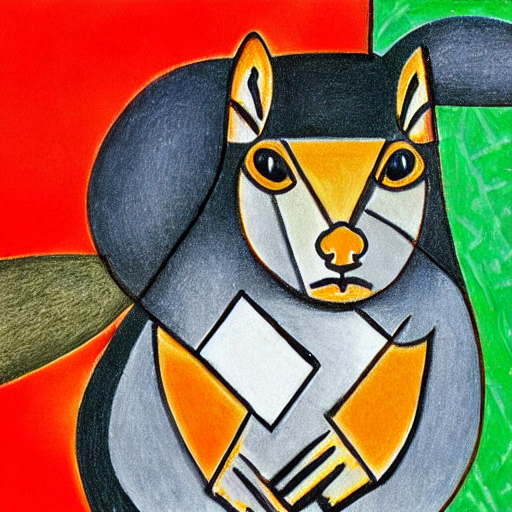
通过调用 save 保存图像:
python
>>> image.save("image_of_squirrel_painting.png")本地管道
你也可以在本地使用管道。唯一的区别是你需要先下载权重:
bash
!git lfs install
!git clone https://huggingface.co/stable-diffusion-v1-5/stable-diffusion-v1-5
然后将保存的权重加载到管道中:
python
>>> pipeline = DiffusionPipeline.from_pretrained("./stable-diffusion-v1-5", use_safetensors=True)现在,你可以像上面部分那样运行流水线。
切换调度器
不同的调度器具有不同的去噪速度和质量权衡。找出哪个调度器最适合你的最佳方法是尝试它们!🧨 Diffusers 的主要功能之一是允许你轻松地在调度器之间切换。例如,要将默认的 [PNDMScheduler] 替换为 [EulerDiscreteScheduler],可以使用 [~diffusers.ConfigMixin.from_config] 方法加载它:
py
>>> from diffusers import EulerDiscreteScheduler

>>> pipeline = DiffusionPipeline.from_pretrained("stable-diffusion-v1-5/stable-diffusion-v1-5", use_safetensors=True)
>>> pipeline.scheduler = EulerDiscreteScheduler.from_config(pipeline.scheduler.config)
尝试使用新的调度器生成一张图像,看看你是否能注意到差异!
在下一节中,你将深入了解构成[DiffusionPipeline]的组件——模型和调度器,并学习如何使用这些组件生成一张猫的图像。
模型
大多数模型接受一个带有噪声的样本,并在每个时间步预测噪声残差(其他模型直接学习预测前一个样本或速度或v-prediction),即较少噪声的图像与输入图像之间的差异。你可以混合和匹配模型来创建其他扩散系统。
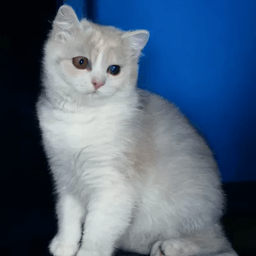
模型通过[~ModelMixin.from_pretrained]方法进行初始化,该方法还会在本地缓存模型权重,以便下次加载模型时速度更快。在本快速导览中,你将加载[UNet2DModel],这是一个在猫图像上训练的基本无条件图像生成模型:
py
>>> from diffusers import UNet2DModel

>>> repo_id = "google/ddpm-cat-256"
>>> model = UNet2DModel.from_pretrained(repo_id, use_safetensors=True)
要访问模型参数,请调用 model.config:
py
>>> model.config模型配置是一个🧊冻结🧊的字典,这意味着在模型创建后,这些参数无法更改。这是有意为之,以确保在模型架构定义之初使用的参数保持不变,而其他参数在推理过程中仍然可以调整。
其中一些最重要的参数包括:
sample_size:输入样本的高度和宽度维度。in_channels:输入样本的输入通道数。down_block_types和up_block_types:用于创建UNet架构的下采样和上采样块的类型。block_out_channels:下采样块的输出通道数;也按相反顺序用于上采样块的输入通道数。layers_per_block:每个UNet块中存在的ResNet块的数量。
要使用模型进行推理,请使用随机高斯噪声创建图像形状。它应该有一个batch轴,因为模型可以接收多个随机噪声,一个对应于输入通道数的channel轴,以及一个用于图像高度和宽度的sample_size轴:
py
>>> import torch

>>> torch.manual_seed(0)

>>> noisy_sample = torch.randn(1, model.config.in_channels, model.config.sample_size, model.config.sample_size)
>>> noisy_sample.shape
torch.Size([1, 3, 256, 256])在进行推理时,将噪声图像和timestep传递给模型。timestep表示输入图像的噪声程度,开始时噪声较多,结束时噪声较少。这有助于模型确定其在扩散过程中的位置,是更接近开始还是结束。使用sample方法获取模型输出:
py
>>> with torch.no_grad():
...     noisy_residual = model(sample=noisy_sample, timestep=2).sample
要生成实际的示例,你需要一个调度器来指导去噪过程。在下一节中,你将学习如何将模型与调度器结合使用。
调度器
调度器管理从噪声样本到较少噪声样本的过程,给定模型输出——在这种情况下,它是noisy_residual。
对于快速游览,你将使用其[~diffusers.ConfigMixin.from_config]方法实例化[DDPMScheduler]:
py
>>> from diffusers import DDPMScheduler

>>> scheduler = DDPMScheduler.from_pretrained(repo_id)
>>> scheduler
DDPMScheduler {
  "_class_name": "DDPMScheduler",
  "_diffusers_version": "0.21.4",
  "beta_end": 0.02,
  "beta_schedule": "linear",
  "beta_start": 0.0001,
  "clip_sample": true,
  "clip_sample_range": 1.0,
  "dynamic_thresholding_ratio": 0.995,
  "num_train_timesteps": 1000,
  "prediction_type": "epsilon",
  "sample_max_value": 1.0,
  "steps_offset": 0,
  "thresholding": false,
  "timestep_spacing": "leading",
  "trained_betas": null,
  "variance_type": "fixed_small"
}
一些最重要的参数包括:
num_train_timesteps:去噪过程的长度,换句话说,是将随机高斯噪声处理成数据样本所需的步数。beta_schedule:用于推理和训练的噪声调度类型。beta_start和beta_end:噪声调度的起始和结束噪声值。
要预测稍微不那么嘈杂的图像,请将以下内容传递给调度器的 [~diffusers.DDPMScheduler.step] 方法:模型输出、timestep 和当前 sample。
py
>>> less_noisy_sample = scheduler.step(model_output=noisy_residual, timestep=2, sample=noisy_sample).prev_sample
>>> less_noisy_sample.shape
torch.Size([1, 3, 256, 256])
可以将 less_noisy_sample 传递到下一个 timestep,在那里它会变得更不嘈杂!现在让我们将所有内容整合在一起,并可视化整个去噪过程。
首先,创建一个函数,用于后处理并将去噪后的图像显示为 PIL.Image:
py
>>> import PIL.Image
>>> import numpy as np


>>> def display_sample(sample, i):
...     image_processed = sample.cpu().permute(0, 2, 3, 1)
...     image_processed = (image_processed + 1.0) * 127.5
...     image_processed = image_processed.numpy().astype(np.uint8)

...     image_pil = PIL.Image.fromarray(image_processed[0])
...     display(f"Image at step {i}")
...     display(image_pil)
为了加快去噪过程,将输入和模型移动到 GPU:
py
>>> model.to("cuda")
>>> noisy_sample = noisy_sample.to("cuda")
现在创建一个去噪循环,预测较少噪声样本的残差,并使用调度器计算较少噪声的样本:
py
>>> import tqdm

>>> sample = noisy_sample

>>> for i, t in enumerate(tqdm.tqdm(scheduler.timesteps)):
...     # 1. predict noise residual
...     with torch.no_grad():
...         residual = model(sample, t).sample

...     # 2. compute less noisy image and set x_t -> x_t-1
...     sample = scheduler.step(residual, t, sample).prev_sample

...     # 3. optionally look at image
...     if (i + 1) % 50 == 0:
...         display_sample(sample, i + 1)
坐下来,看着一只猫从纯粹的噪声中生成!😻
下一步
希望你在这个快速导览中使用🧨 Diffusers生成了一些酷炫的图像!接下来,你可以:
- 在训练教程中训练或微调模型,以生成你自己的图像。
- 查看官方和社区的训练或微调脚本示例,适用于各种用例。
- 在使用不同的调度器指南中了解更多关于加载、访问、更改和比较调度器的信息。
- 探索提示工程、速度和内存优化,以及生成更高质量图像的技巧和窍门,请参阅稳定扩散指南。
- 深入了解如何通过在GPU上优化PyTorch的指南,以及在Apple Silicon (M1/M2)上运行稳定扩散和ONNX Runtime的推理指南,来加速🧨 Diffusers。