
算力平台:
Text2Video-Zero
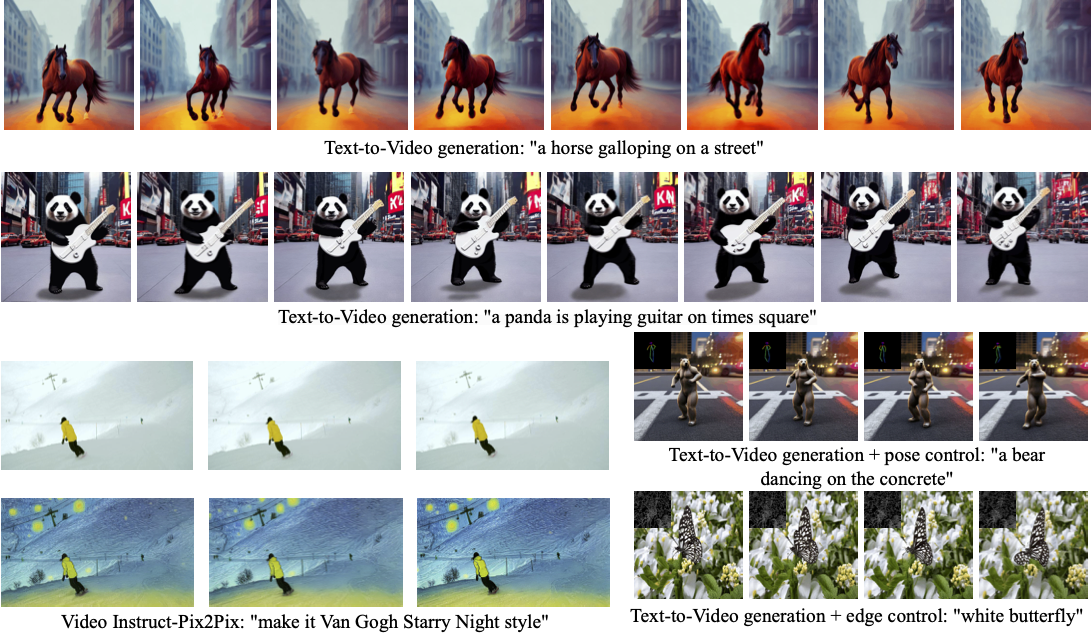
Text2Video-Zero: 文本到图像扩散模型是零样本视频生成器 由 Levon Khachatryan、Andranik Movsisyan、Vahram Tadevosyan、Roberto Henschel、Zhangyang Wang、Shant Navasardyan、Humphrey Shi 撰写。
Text2Video-Zero 通过以下方式实现零样本视频生成:
- 文本提示
- 结合姿态或边缘引导的提示
- 视频 Instruct-Pix2Pix(指令引导的视频编辑)
生成的结果在时间上保持一致,并且紧密遵循引导和文本提示。
论文的摘要如下:
最近的文本到视频生成方法依赖于计算量大的训练,并需要大规模的视频数据集。在本文中,我们引入了一个新的零样本文本到视频生成任务,并通过利用现有的文本到图像合成方法(例如,Stable Diffusion)的强大功能,提出了一种低成本的方法(无需任何训练或优化),使其适用于视频领域。 我们的关键修改包括(i)通过运动动态丰富生成帧的潜在代码,以保持全局场景和背景的时间一致性;以及(ii)使用每帧对第一帧的新跨帧注意力重新编程帧级自注意力,以保留前景对象的上下文、外观和身份。 实验表明,这导致了低开销、高质量且非常一致的视频生成。此外,我们的方法不仅限于文本到视频合成,还适用于其他任务,如条件和内容专业化的视频生成,以及视频 Instruct-Pix2Pix,即指令引导的视频编辑。 实验表明,尽管没有在额外的视频数据上进行训练,我们的方法在性能上与最近的方法相当,有时甚至更好。
你可以在 项目页面、论文 和 原始代码库 上找到有关 Text2Video-Zero 的更多信息。
使用示例
文本到视频
要根据提示生成视频,请运行以下 Python 代码:
python
import torch
from diffusers import TextToVideoZeroPipeline
import imageio

model_id = "stable-diffusion-v1-5/stable-diffusion-v1-5"
pipe = TextToVideoZeroPipeline.from_pretrained(model_id, torch_dtype=torch.float16).to("cuda")

prompt = "A panda is playing guitar on times square"
result = pipe(prompt=prompt).images
result = [(r * 255).astype("uint8") for r in result]
imageio.mimsave("video.mp4", result, fps=4)
你可以在管道调用中更改这些参数:
- 运动场强度(参见论文,第3.3.1节):
motion_field_strength_x和motion_field_strength_y。默认值:motion_field_strength_x=12,motion_field_strength_y=12
T和T'(参见论文,第3.3.1节)t0和t1在范围{0, ..., num_inference_steps}内。默认值:t0=45,t1=48
- 视频长度:
video_length,要生成的视频帧数。默认值:video_length=8
我们还可以通过分块处理的方式生成更长的视频:
python
import torch
from diffusers import TextToVideoZeroPipeline
import numpy as np

model_id = "stable-diffusion-v1-5/stable-diffusion-v1-5"
pipe = TextToVideoZeroPipeline.from_pretrained(model_id, torch_dtype=torch.float16).to("cuda")
seed = 0
video_length = 24  #24 ÷ 4fps = 6 seconds
chunk_size = 8
prompt = "A panda is playing guitar on times square"

# Generate the video chunk-by-chunk
result = []
chunk_ids = np.arange(0, video_length, chunk_size - 1)
generator = torch.Generator(device="cuda")
for i in range(len(chunk_ids)):
    print(f"Processing chunk {i + 1} / {len(chunk_ids)}")
    ch_start = chunk_ids[i]
    ch_end = video_length if i == len(chunk_ids) - 1 else chunk_ids[i + 1]
    # Attach the first frame for Cross Frame Attention
    frame_ids = [0] + list(range(ch_start, ch_end))
    # Fix the seed for the temporal consistency
    generator.manual_seed(seed)
    output = pipe(prompt=prompt, video_length=len(frame_ids), generator=generator, frame_ids=frame_ids)
    result.append(output.images[1:])

# Concatenate chunks and save
result = np.concatenate(result)
result = [(r * 255).astype("uint8") for r in result]
imageio.mimsave("video.mp4", result, fps=4)
SDXL 支持
为了在使用提示生成视频时使用 SDXL 模型,请使用 TextToVideoZeroSDXLPipeline 管道:
python
import torch
from diffusers import TextToVideoZeroSDXLPipeline

model_id = "stabilityai/stable-diffusion-xl-base-1.0"
pipe = TextToVideoZeroSDXLPipeline.from_pretrained(
    model_id, torch_dtype=torch.float16, variant="fp16", use_safetensors=True
).to("cuda")
带姿态控制的文本转视频
要从提示生成带有额外姿态控制的视频
- 下载一个演示视频
python
    from huggingface_hub import hf_hub_download

    filename = "__assets__/poses_skeleton_gifs/dance1_corr.mp4"
    repo_id = "PAIR/Text2Video-Zero"
    video_path = hf_hub_download(repo_type="space", repo_id=repo_id, filename=filename)
    ```

2. 读取包含提取姿态图像的视频

```python
    from PIL import Image
    import imageio

    reader = imageio.get_reader(video_path, "ffmpeg")
    frame_count = 8
    pose_images = [Image.fromarray(reader.get_data(i)) for i in range(frame_count)]
    ```

要从实际视频中提取姿势,请阅读[ControlNet文档](controlnet)。

3. 使用我们的自定义注意力处理器运行`StableDiffusionControlNetPipeline`

```python
    import torch
    from diffusers import StableDiffusionControlNetPipeline, ControlNetModel
    from diffusers.pipelines.text_to_video_synthesis.pipeline_text_to_video_zero import CrossFrameAttnProcessor

    model_id = "stable-diffusion-v1-5/stable-diffusion-v1-5"
    controlnet = ControlNetModel.from_pretrained("lllyasviel/sd-controlnet-openpose", torch_dtype=torch.float16)
    pipe = StableDiffusionControlNetPipeline.from_pretrained(
        model_id, controlnet=controlnet, torch_dtype=torch.float16
    ).to("cuda")

    # Set the attention processor
    pipe.unet.set_attn_processor(CrossFrameAttnProcessor(batch_size=2))
    pipe.controlnet.set_attn_processor(CrossFrameAttnProcessor(batch_size=2))

    # fix latents for all frames
    latents = torch.randn((1, 4, 64, 64), device="cuda", dtype=torch.float16).repeat(len(pose_images), 1, 1, 1)

    prompt = "Darth Vader dancing in a desert"
    result = pipe(prompt=[prompt] * len(pose_images), image=pose_images, latents=latents).images
    imageio.mimsave("video.mp4", result, fps=4)
    ```

- #### SDXL支持

	由于我们的注意力处理器也适用于SDXL,因此可以利用它通过由SDXL驱动的ControlNet模型从提示生成视频:

```python
	import torch
	from diffusers import StableDiffusionXLControlNetPipeline, ControlNetModel
	from diffusers.pipelines.text_to_video_synthesis.pipeline_text_to_video_zero import CrossFrameAttnProcessor

	controlnet_model_id = 'thibaud/controlnet-openpose-sdxl-1.0'
	model_id = 'stabilityai/stable-diffusion-xl-base-1.0'

	controlnet = ControlNetModel.from_pretrained(controlnet_model_id, torch_dtype=torch.float16)
	pipe = StableDiffusionControlNetPipeline.from_pretrained(
		model_id, controlnet=controlnet, torch_dtype=torch.float16
	).to('cuda')

	# Set the attention processor
	pipe.unet.set_attn_processor(CrossFrameAttnProcessor(batch_size=2))
	pipe.controlnet.set_attn_processor(CrossFrameAttnProcessor(batch_size=2))

	# fix latents for all frames
	latents = torch.randn((1, 4, 128, 128), device="cuda", dtype=torch.float16).repeat(len(pose_images), 1, 1, 1)

	prompt = "Darth Vader dancing in a desert"
	result = pipe(prompt=[prompt] * len(pose_images), image=pose_images, latents=latents).images
	imageio.mimsave("video.mp4", result, fps=4)
	```

### 边缘控制的文本到视频

要通过额外的Canny边缘控制从提示生成视频,请按照上述使用[Canny边缘ControlNet模型](https://huggingface.co/lllyasviel/sd-controlnet-canny)进行姿势引导生成的相同步骤操作。

### 视频Instruct-Pix2Pix

要进行文本引导的视频编辑(使用[InstructPix2Pix](pix2pix)):

1. 下载一个演示视频

```python
    from huggingface_hub import hf_hub_download

    filename = "__assets__/pix2pix video/camel.mp4"
    repo_id = "PAIR/Text2Video-Zero"
    video_path = hf_hub_download(repo_type="space", repo_id=repo_id, filename=filename)
    ```

2. 从路径读取视频

```python
    from PIL import Image
    import imageio

    reader = imageio.get_reader(video_path, "ffmpeg")
    frame_count = 8
    video = [Image.fromarray(reader.get_data(i)) for i in range(frame_count)]
    ```

3. 使用我们的自定义注意力处理器运行`StableDiffusionInstructPix2PixPipeline`

```python
    import torch
    from diffusers import StableDiffusionInstructPix2PixPipeline
    from diffusers.pipelines.text_to_video_synthesis.pipeline_text_to_video_zero import CrossFrameAttnProcessor

    model_id = "timbrooks/instruct-pix2pix"
    pipe = StableDiffusionInstructPix2PixPipeline.from_pretrained(model_id, torch_dtype=torch.float16).to("cuda")
    pipe.unet.set_attn_processor(CrossFrameAttnProcessor(batch_size=3))

    prompt = "make it Van Gogh Starry Night style"
    result = pipe(prompt=[prompt] * len(video), image=video).images
    imageio.mimsave("edited_video.mp4", result, fps=4)
    ```

### DreamBooth 专业化

方法 **文本到视频**、**带姿势控制的文本到视频** 和 **带边缘控制的文本到视频** 可以使用自定义的 [DreamBooth](../../training/dreambooth) 模型运行,如下所示,使用 [Canny 边缘 ControlNet 模型](https://huggingface.co/lllyasviel/sd-controlnet-canny) 和 [Avatar 风格 DreamBooth](https://huggingface.co/PAIR/text2video-zero-controlnet-canny-avatar) 模型:

1. 下载一个演示视频

```python
    from huggingface_hub import hf_hub_download

    filename = "__assets__/canny_videos_mp4/girl_turning.mp4"
    repo_id = "PAIR/Text2Video-Zero"
    video_path = hf_hub_download(repo_type="space", repo_id=repo_id, filename=filename)
    ```

2. 从路径读取视频

```python
    from PIL import Image
    import imageio

    reader = imageio.get_reader(video_path, "ffmpeg")
    frame_count = 8
    canny_edges = [Image.fromarray(reader.get_data(i)) for i in range(frame_count)]
    ```

3. 使用自定义训练的 DreamBooth 模型运行 `StableDiffusionControlNetPipeline`

```python
    import torch
    from diffusers import StableDiffusionControlNetPipeline, ControlNetModel
    from diffusers.pipelines.text_to_video_synthesis.pipeline_text_to_video_zero import CrossFrameAttnProcessor

    # set model id to custom model
    model_id = "PAIR/text2video-zero-controlnet-canny-avatar"
    controlnet = ControlNetModel.from_pretrained("lllyasviel/sd-controlnet-canny", torch_dtype=torch.float16)
    pipe = StableDiffusionControlNetPipeline.from_pretrained(
        model_id, controlnet=controlnet, torch_dtype=torch.float16
    ).to("cuda")

    # Set the attention processor
    pipe.unet.set_attn_processor(CrossFrameAttnProcessor(batch_size=2))
    pipe.controlnet.set_attn_processor(CrossFrameAttnProcessor(batch_size=2))

    # fix latents for all frames
    latents = torch.randn((1, 4, 64, 64), device="cuda", dtype=torch.float16).repeat(len(canny_edges), 1, 1, 1)

    prompt = "oil painting of a beautiful girl avatar style"
    result = pipe(prompt=[prompt] * len(canny_edges), image=canny_edges, latents=latents).images
    imageio.mimsave("video.mp4", result, fps=4)
    ```

你可以通过[这个链接](https://huggingface.co/models?search=dreambooth)过滤出一些可用的DreamBooth训练模型。

<Tip>

确保查看[调度器指南](../../using-diffusers/schedulers),了解如何探索调度器速度和质量之间的权衡,并查看[在管道之间重用组件](../../using-diffusers/loading#reuse-components-across-pipelines)部分,了解如何高效地将相同组件加载到多个管道中。

</Tip>

## TextToVideoZeroPipeline
[[autodoc]] TextToVideoZeroPipeline
	- all
	- __call__

## TextToVideoZeroSDXLPipeline
[[autodoc]] TextToVideoZeroSDXLPipeline
	- all
	- __call__

## TextToVideoPipelineOutput
[[autodoc]] pipelines.text_to_video_synthesis.pipeline_text_to_video_zero.TextToVideoPipelineOutput